
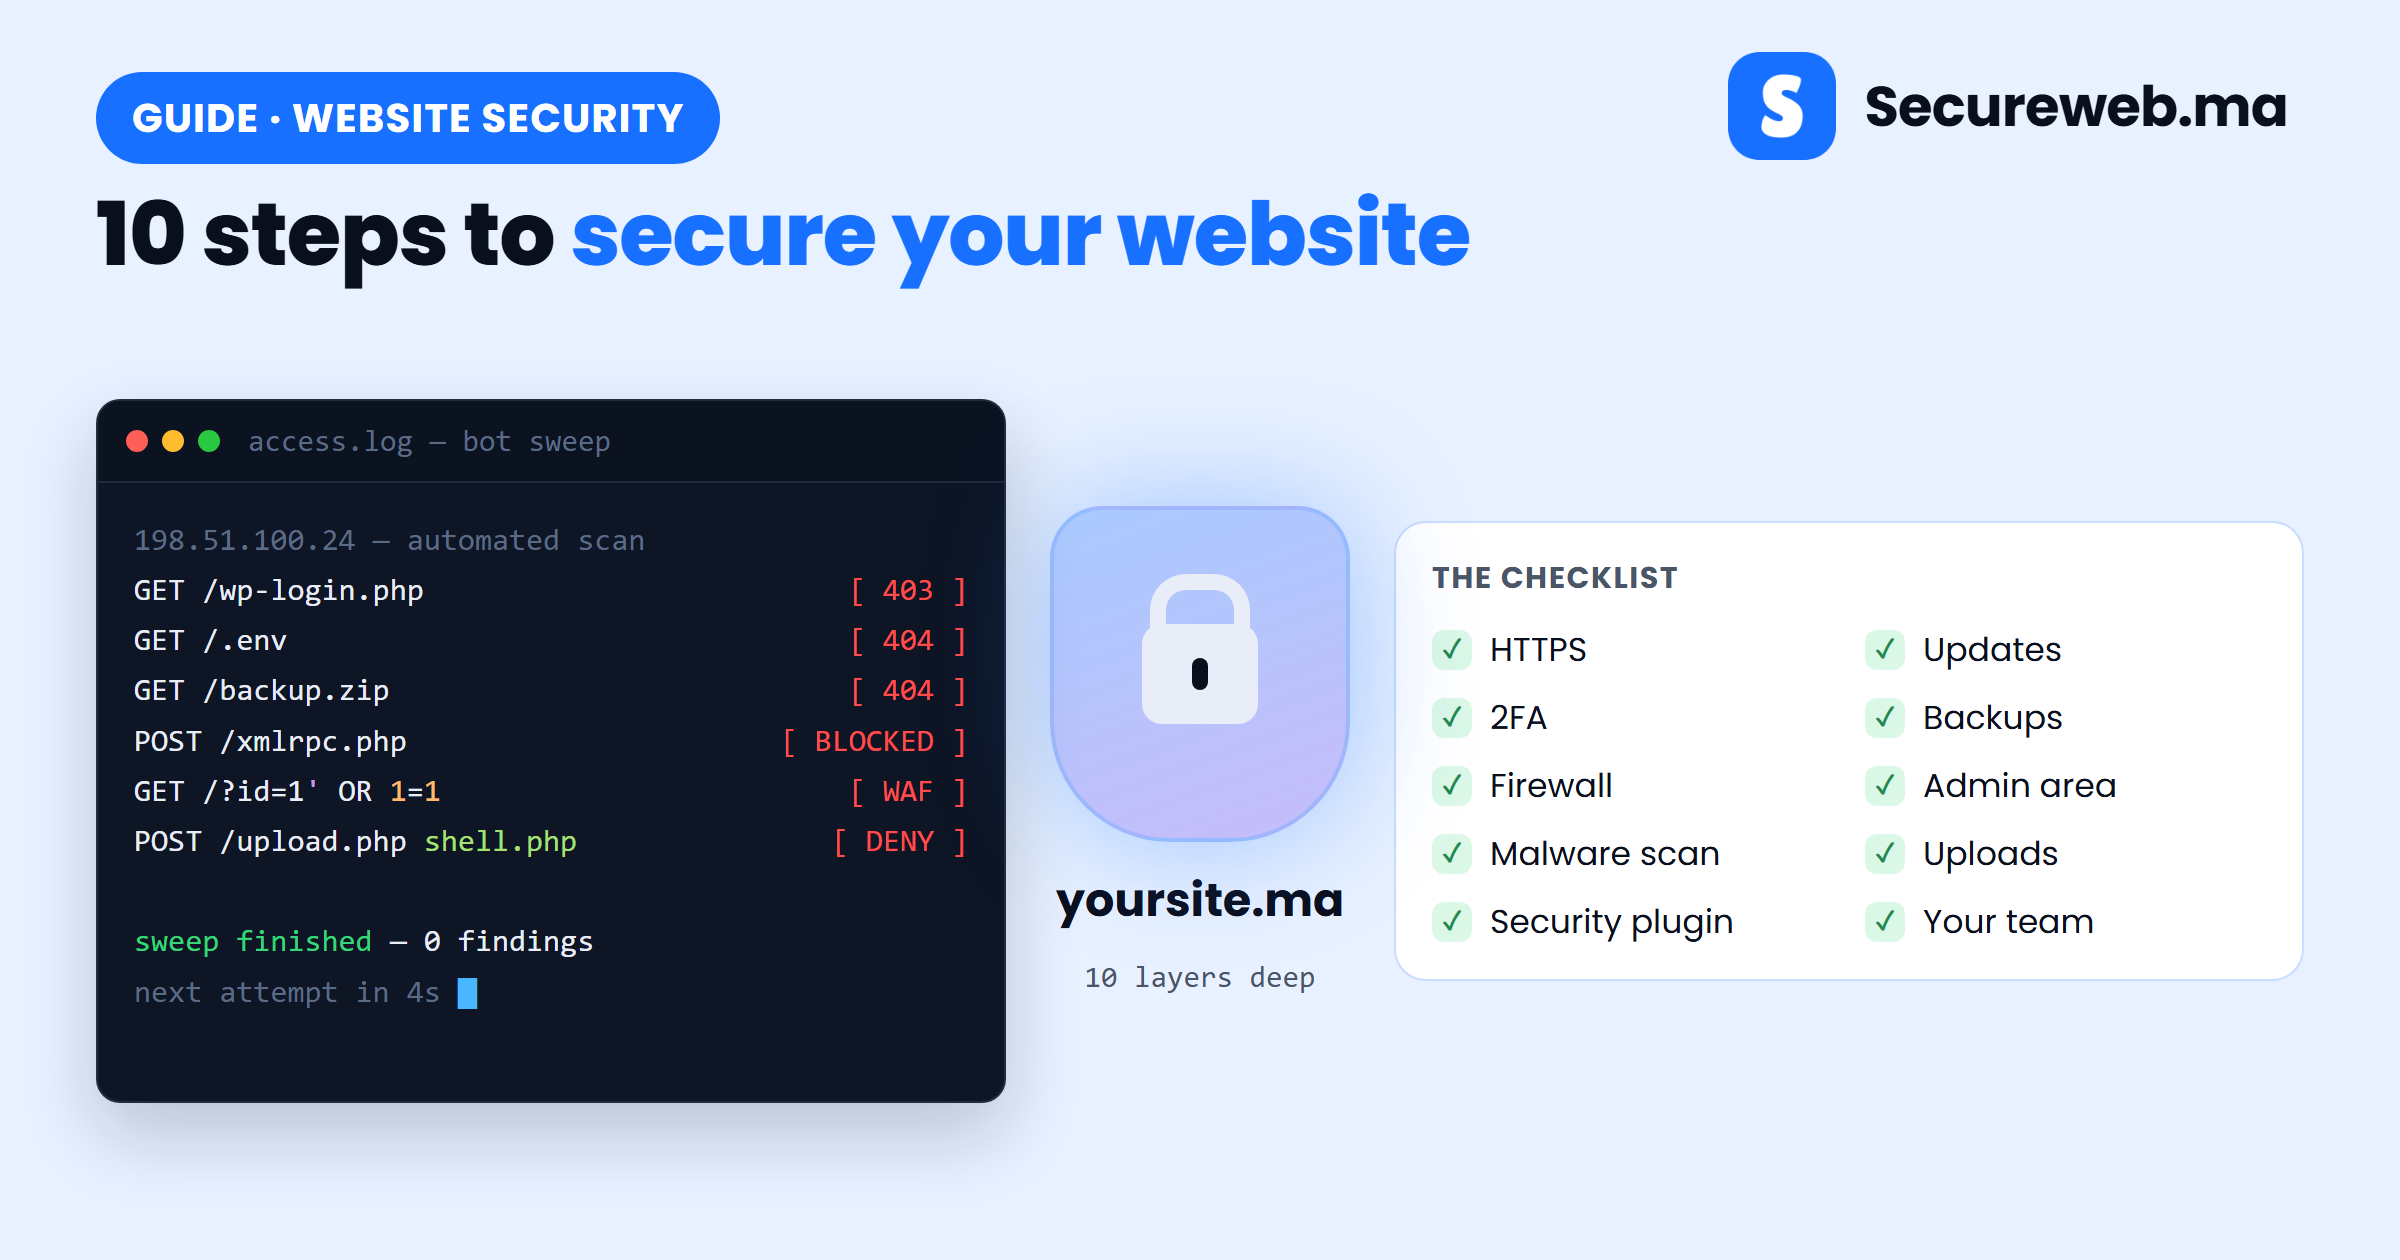
Almost nobody chooses to attack a small business website. Bots do the choosing: they sweep the entire internet looking for a plugin version with a public exploit, an exposed .env file, or a login page with no limit on how many passwords you can try — and whatever answers gets attacked. That is actually good news, because it means most of the defence is mechanical. You close the doors the scanners knock on.
This guide shows you how to secure your website in 10 practical steps, in the order we work through them during a real hardening job: encryption first, then updates, then access, then the layers that catch whatever slipped past. Each step tells you exactly what to click, and six of them include a screenshot of what the screen should look like when you are done. The examples use WordPress and a typical hosting panel, but the same settings exist under different names on PrestaShop, Joomla, Drupal, Shopify and custom-built sites.
What it actually takes to secure your website
There is no single setting that makes a site safe. Security works in layers: HTTPS protects data in transit but does nothing about a vulnerable plugin; a firewall blocks known attack patterns but will not save you from an administrator who reuses a leaked password; backups do not prevent anything at all, but they are the difference between a bad afternoon and a lost business.
The 10 steps below each remove one class of attack. Done together they take an ordinary Moroccan business site — an e-commerce shop, a clinic booking page, a company brochure site — from “whatever the bots find” to a target that is genuinely expensive to break into. None of them require a developer, and most cost nothing beyond your existing hosting.
Before you start
- Administrator access to your CMS — a WordPress admin account, or the equivalent on your platform.
- Your hosting control panel login, for certificates and file-level settings.
- A password manager to store the new credentials, recovery codes and API keys you are about to create.
- Roughly two hours, ideally outside business hours — and a fresh backup taken before you change anything.
If your site earns money, do the risky steps (steps 1, 5 and 8) on a staging copy first. If you do not have one, at least keep the backup from the previous line within reach.
Step 1 — Force HTTPS on every page
HTTPS encrypts everything travelling between your visitors and your server — passwords, order details, contact forms. Without it, anyone on the same Wi-Fi network can read that traffic, and browsers label the site “Not secure”. It is also a confirmed Google ranking signal, so this step pays for itself twice.
In your hosting panel, open SSL/TLS and issue a certificate for every domain and subdomain you use. Practically every host now offers free automated certificates from Let’s Encrypt, usually behind a button called AutoSSL or Install certificate. Then turn on Force HTTPS redirect so visitors who type the old http:// address are sent to the secure version automatically, and confirm auto-renewal is enabled — certificates expire every 90 days. Our step-by-step walkthrough on installing an SSL certificate covers the host-specific details.
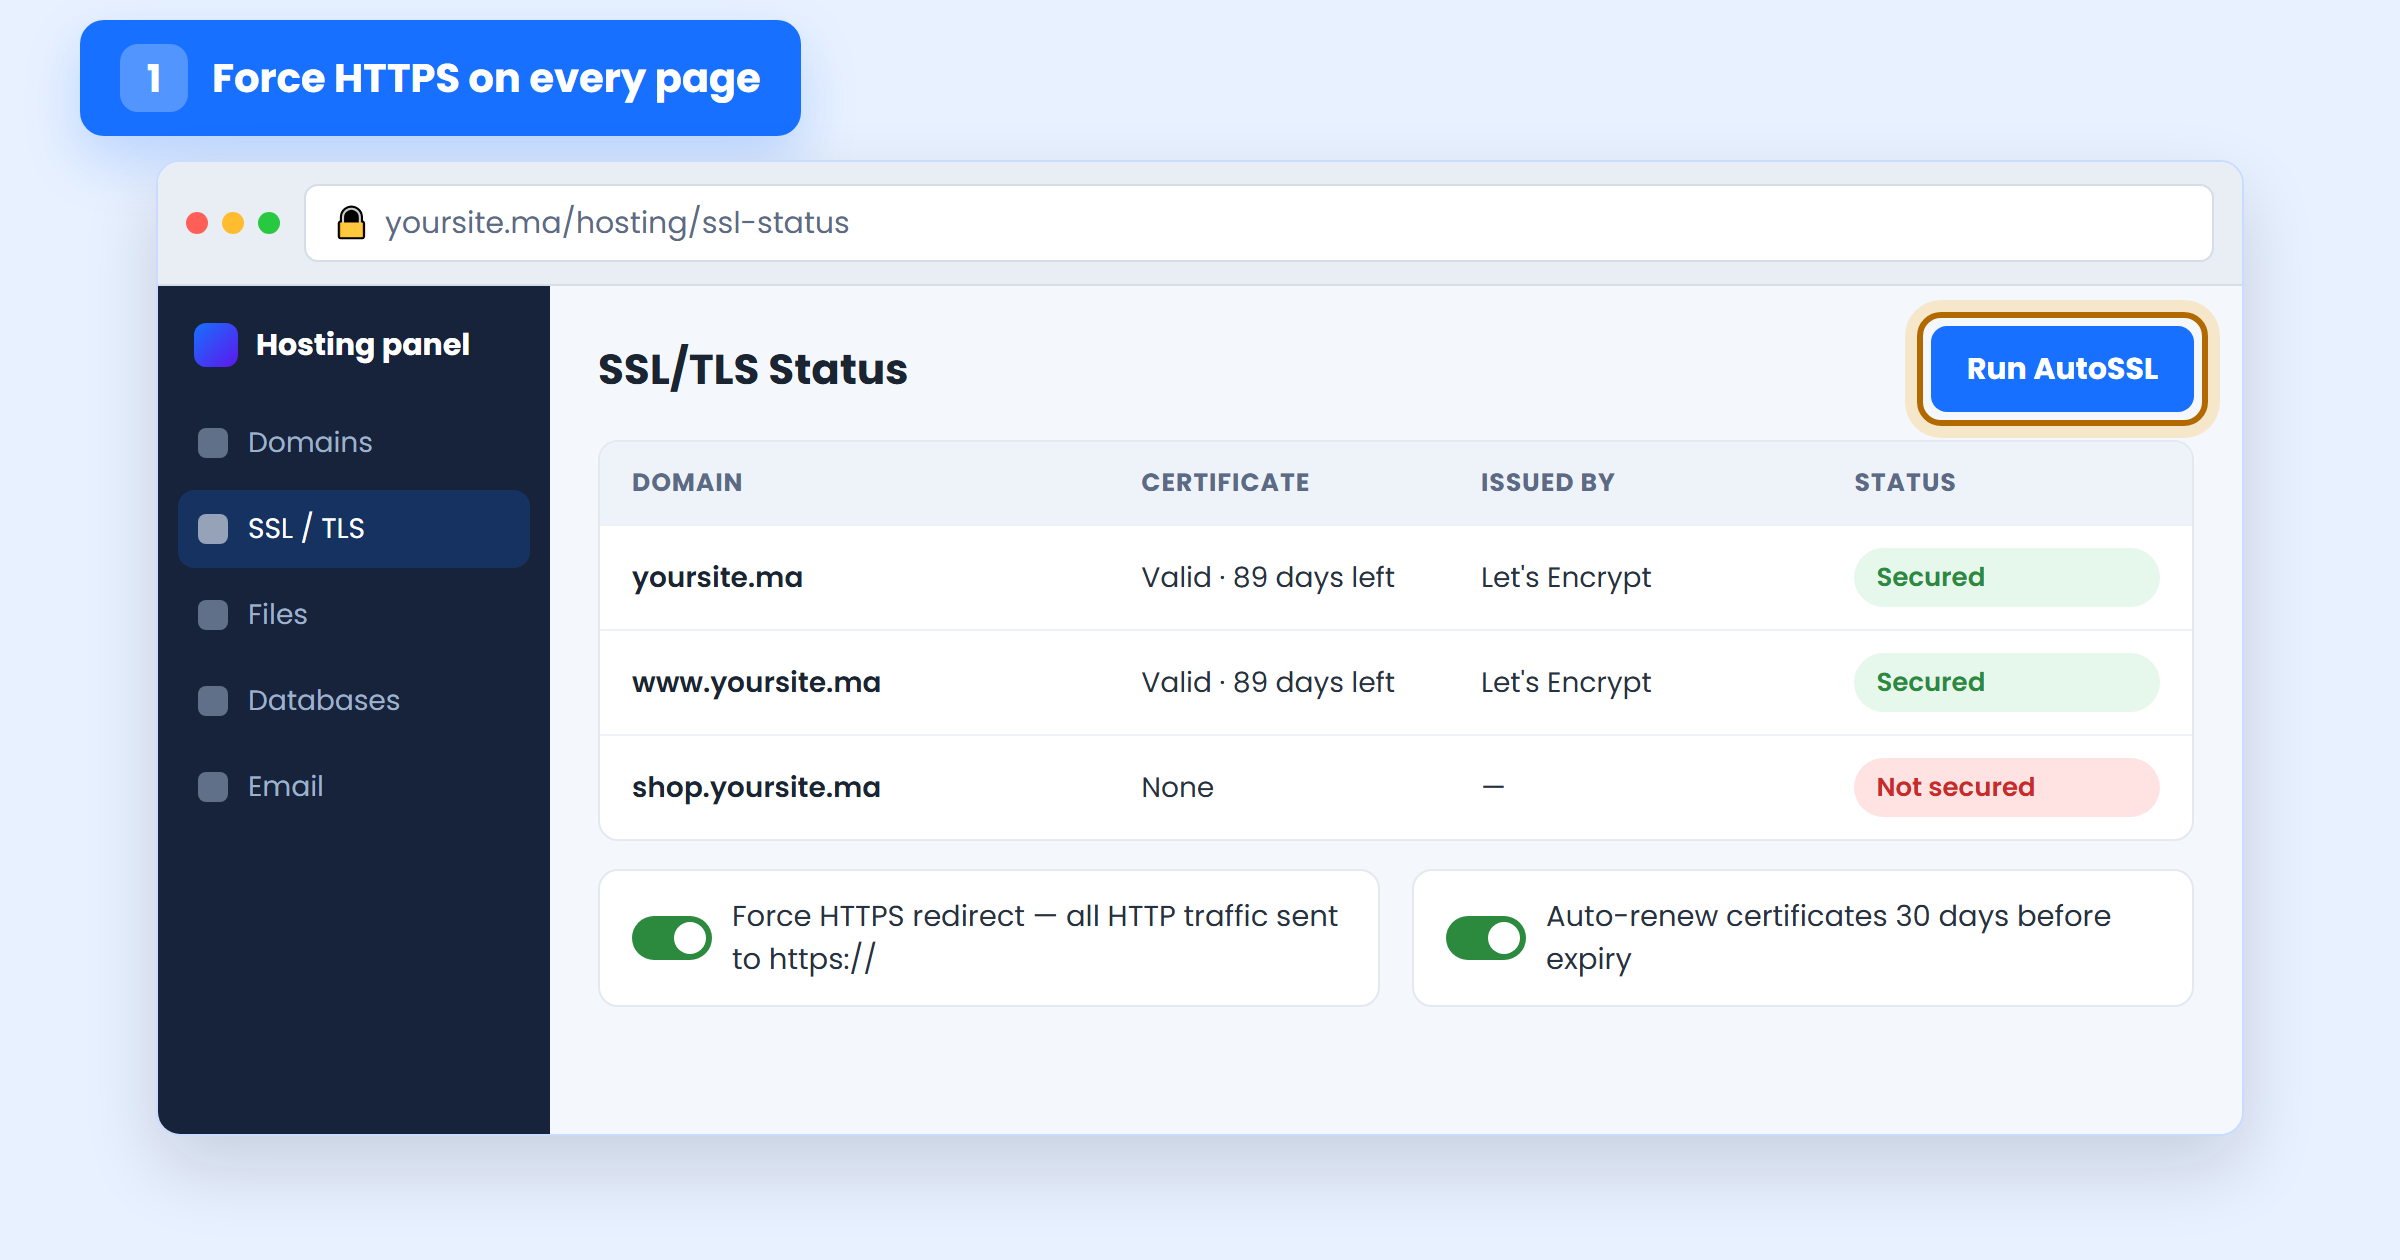
In WordPress, finish by setting both WordPress Address and Site Address under Settings → General to the https:// version. If the padlock still does not appear, you have mixed content: an image, font or script somewhere on the page is still loading over http://. Your browser’s developer console names the offending file.
Step 2 — Turn on automatic updates
Outdated software is the single most common way sites get compromised. When a plugin vulnerability is disclosed, the exploit code is public within days and scanners start hunting for unpatched installations within hours. The update that fixes it is usually already waiting in your dashboard.
Go to Dashboard → Updates, apply everything pending, then enable auto-updates for each plugin and for your theme. WordPress already installs minor and security releases of the core automatically; leave that on. Then do the part most people skip: delete every plugin and theme you are not using. Deactivated is not removed — the code still sits on disk and can still be reachable.
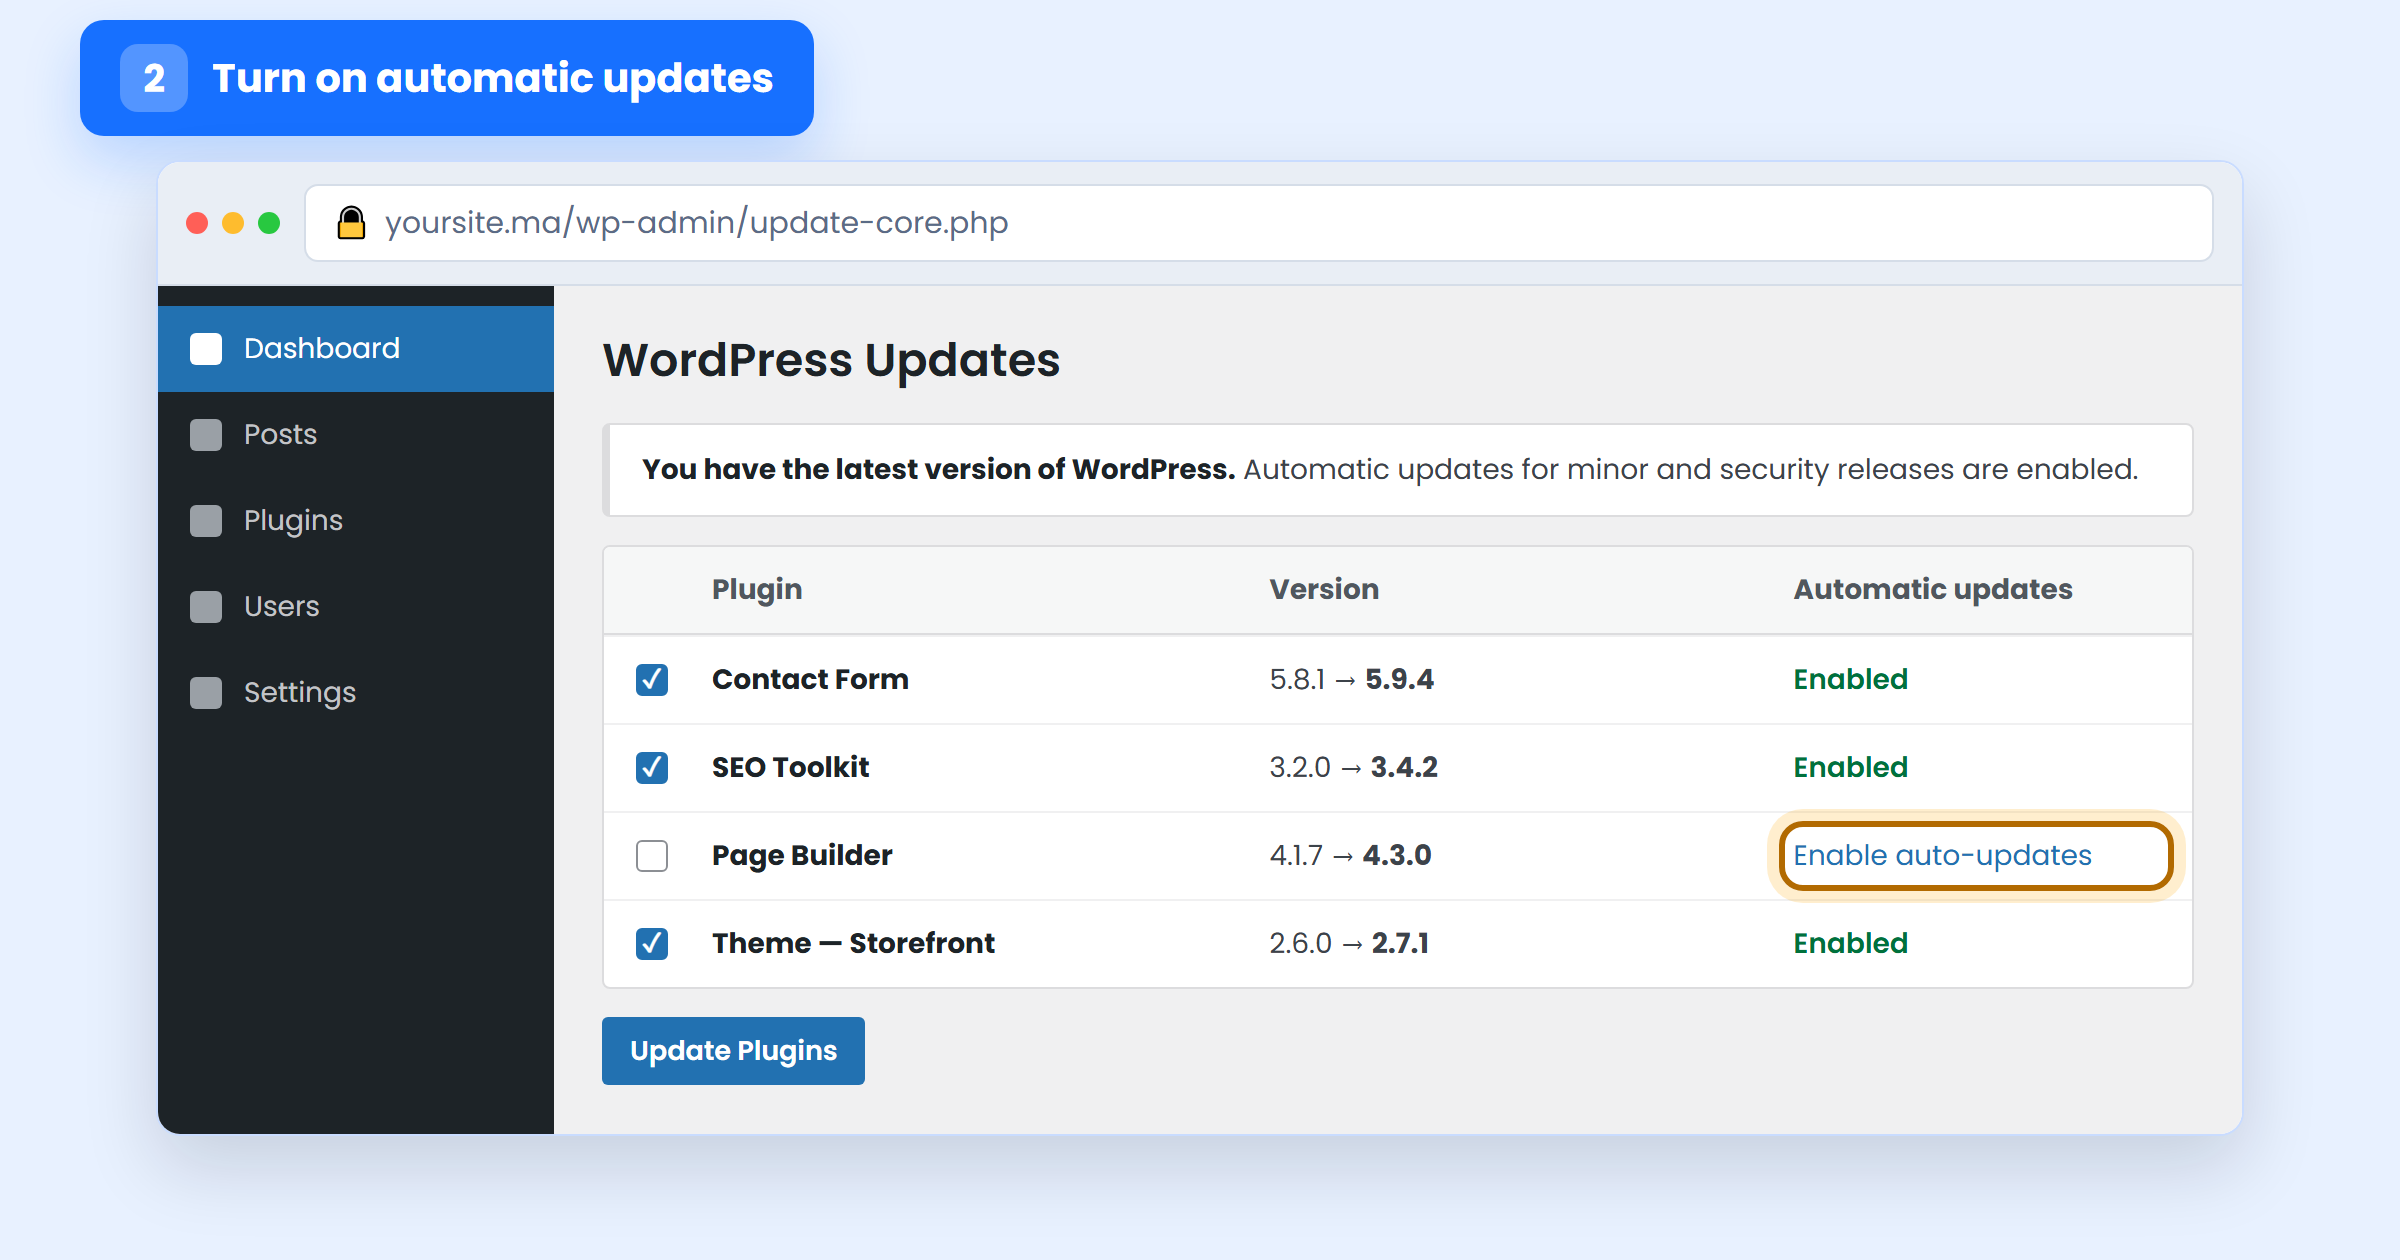
Auto-updates occasionally break a layout, which is exactly why step 4 exists. For a business-critical site, keep auto-updates on for security releases and review major version jumps manually once a week.
Step 3 — Lock down logins with strong passwords and 2FA
Bots do not guess passwords at random. They replay the billions of username-and-password pairs already leaked in other companies’ breaches, betting that someone reused one. If your admin password protects anything else — your email, another site, an old forum account — treat it as already known.
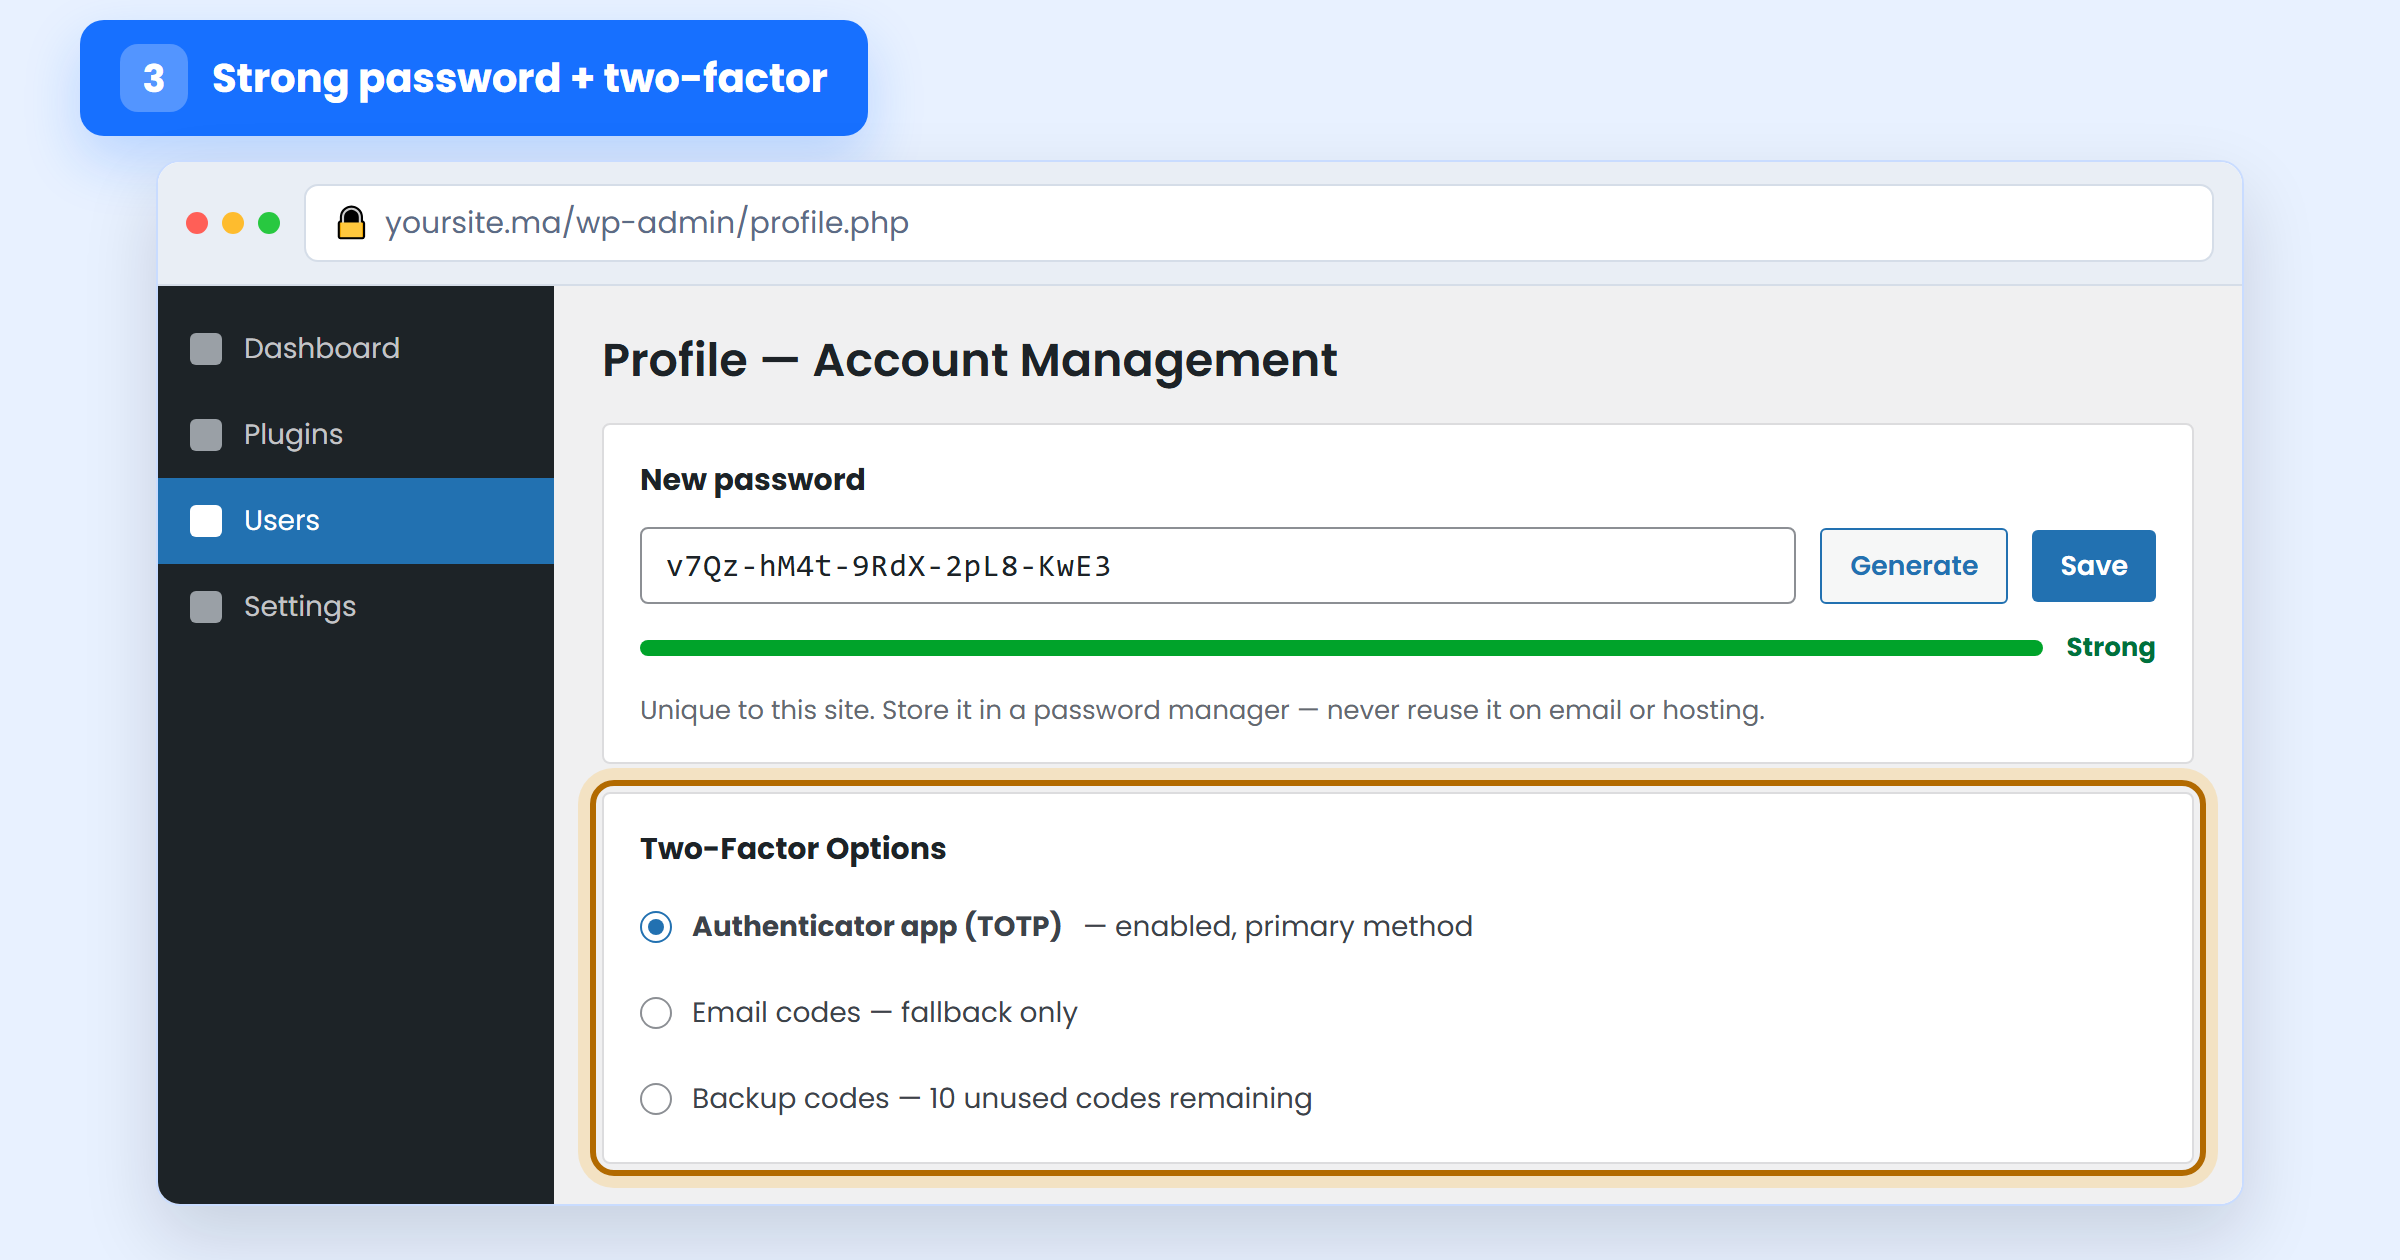
Open Users → Profile, click Generate password, and let WordPress create a long random one; store it in your password manager rather than trying to remember it. Do this for every account with publishing rights, not just your own. Our guide to creating a strong password explains what actually makes one hard to crack.
Then add the second factor. With two-factor authentication, a stolen password on its own is worthless — the attacker also needs a six-digit code from your phone. Use an authenticator app rather than SMS, which can be redirected by SIM-swapping. We cover the full setup in how to set up WordPress two-factor authentication.
Step 4 — Set up offsite backups you have actually tested
A backup is not a security control — it is your guarantee that a bad day stays a bad day. Two rules decide whether it will work when you need it: it must live somewhere other than the server it backs up (ransomware and a hacked hosting account take the local copies with them), and you must have restored it at least once.
Configure daily backups of your files and more frequent backups of the database if you take orders. Send them to external storage — object storage, a cloud drive, or your provider’s off-server backup service — keep at least 14 copies so you can go back past an infection you did not notice immediately, and enable encryption if the tool offers it.
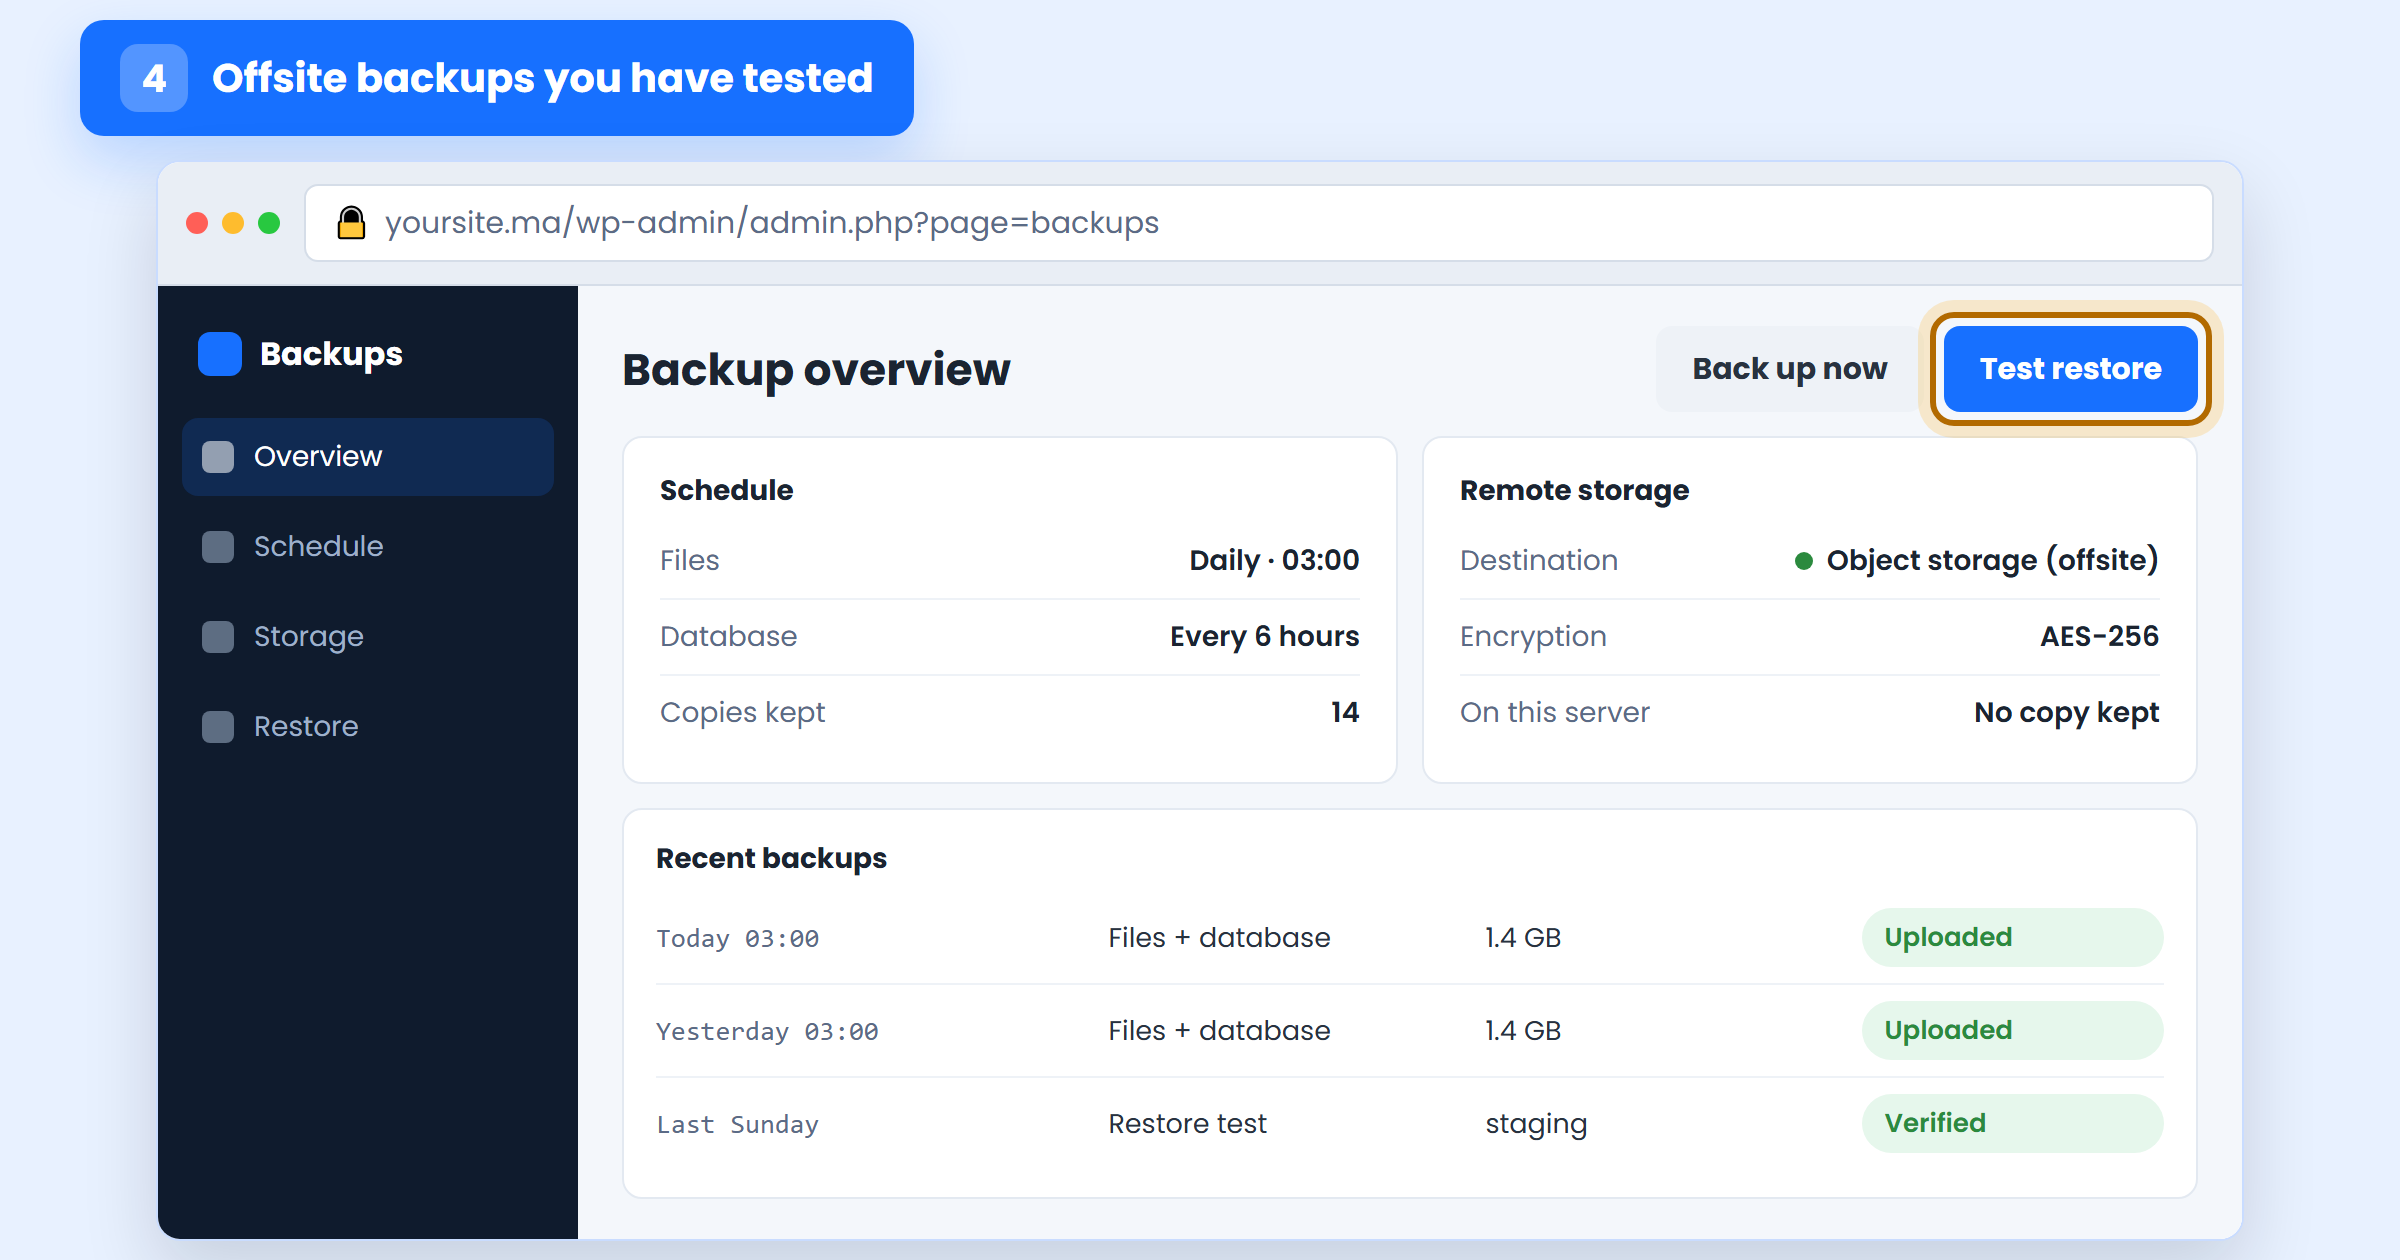
Put a recurring reminder in the calendar to restore a backup to a staging site once a quarter. Untested backups fail far more often than anyone expects, and the moment you discover it should not be the morning you need it. If the worst has already happened, our guide on restoring a hacked website walks through the recovery order.
Step 5 — Put a web application firewall in front of your site
A web application firewall (WAF) inspects every request before your site processes it and drops the ones carrying known attack patterns — SQL injection, cross-site scripting, path traversal, the categories catalogued in the OWASP Top Ten. It also buys you time: when a new plugin vulnerability appears, a good WAF blocks the exploit attempt before you have finished updating.
You have two options. A cloud WAF (Cloudflare, Sucuri and similar) filters traffic before it ever reaches your server and absorbs floods along the way — see our notes on DDoS protection for websites. A plugin WAF runs inside WordPress: easier to install, but the request already reached your server. Cloud protection is stronger; a plugin is far better than nothing.
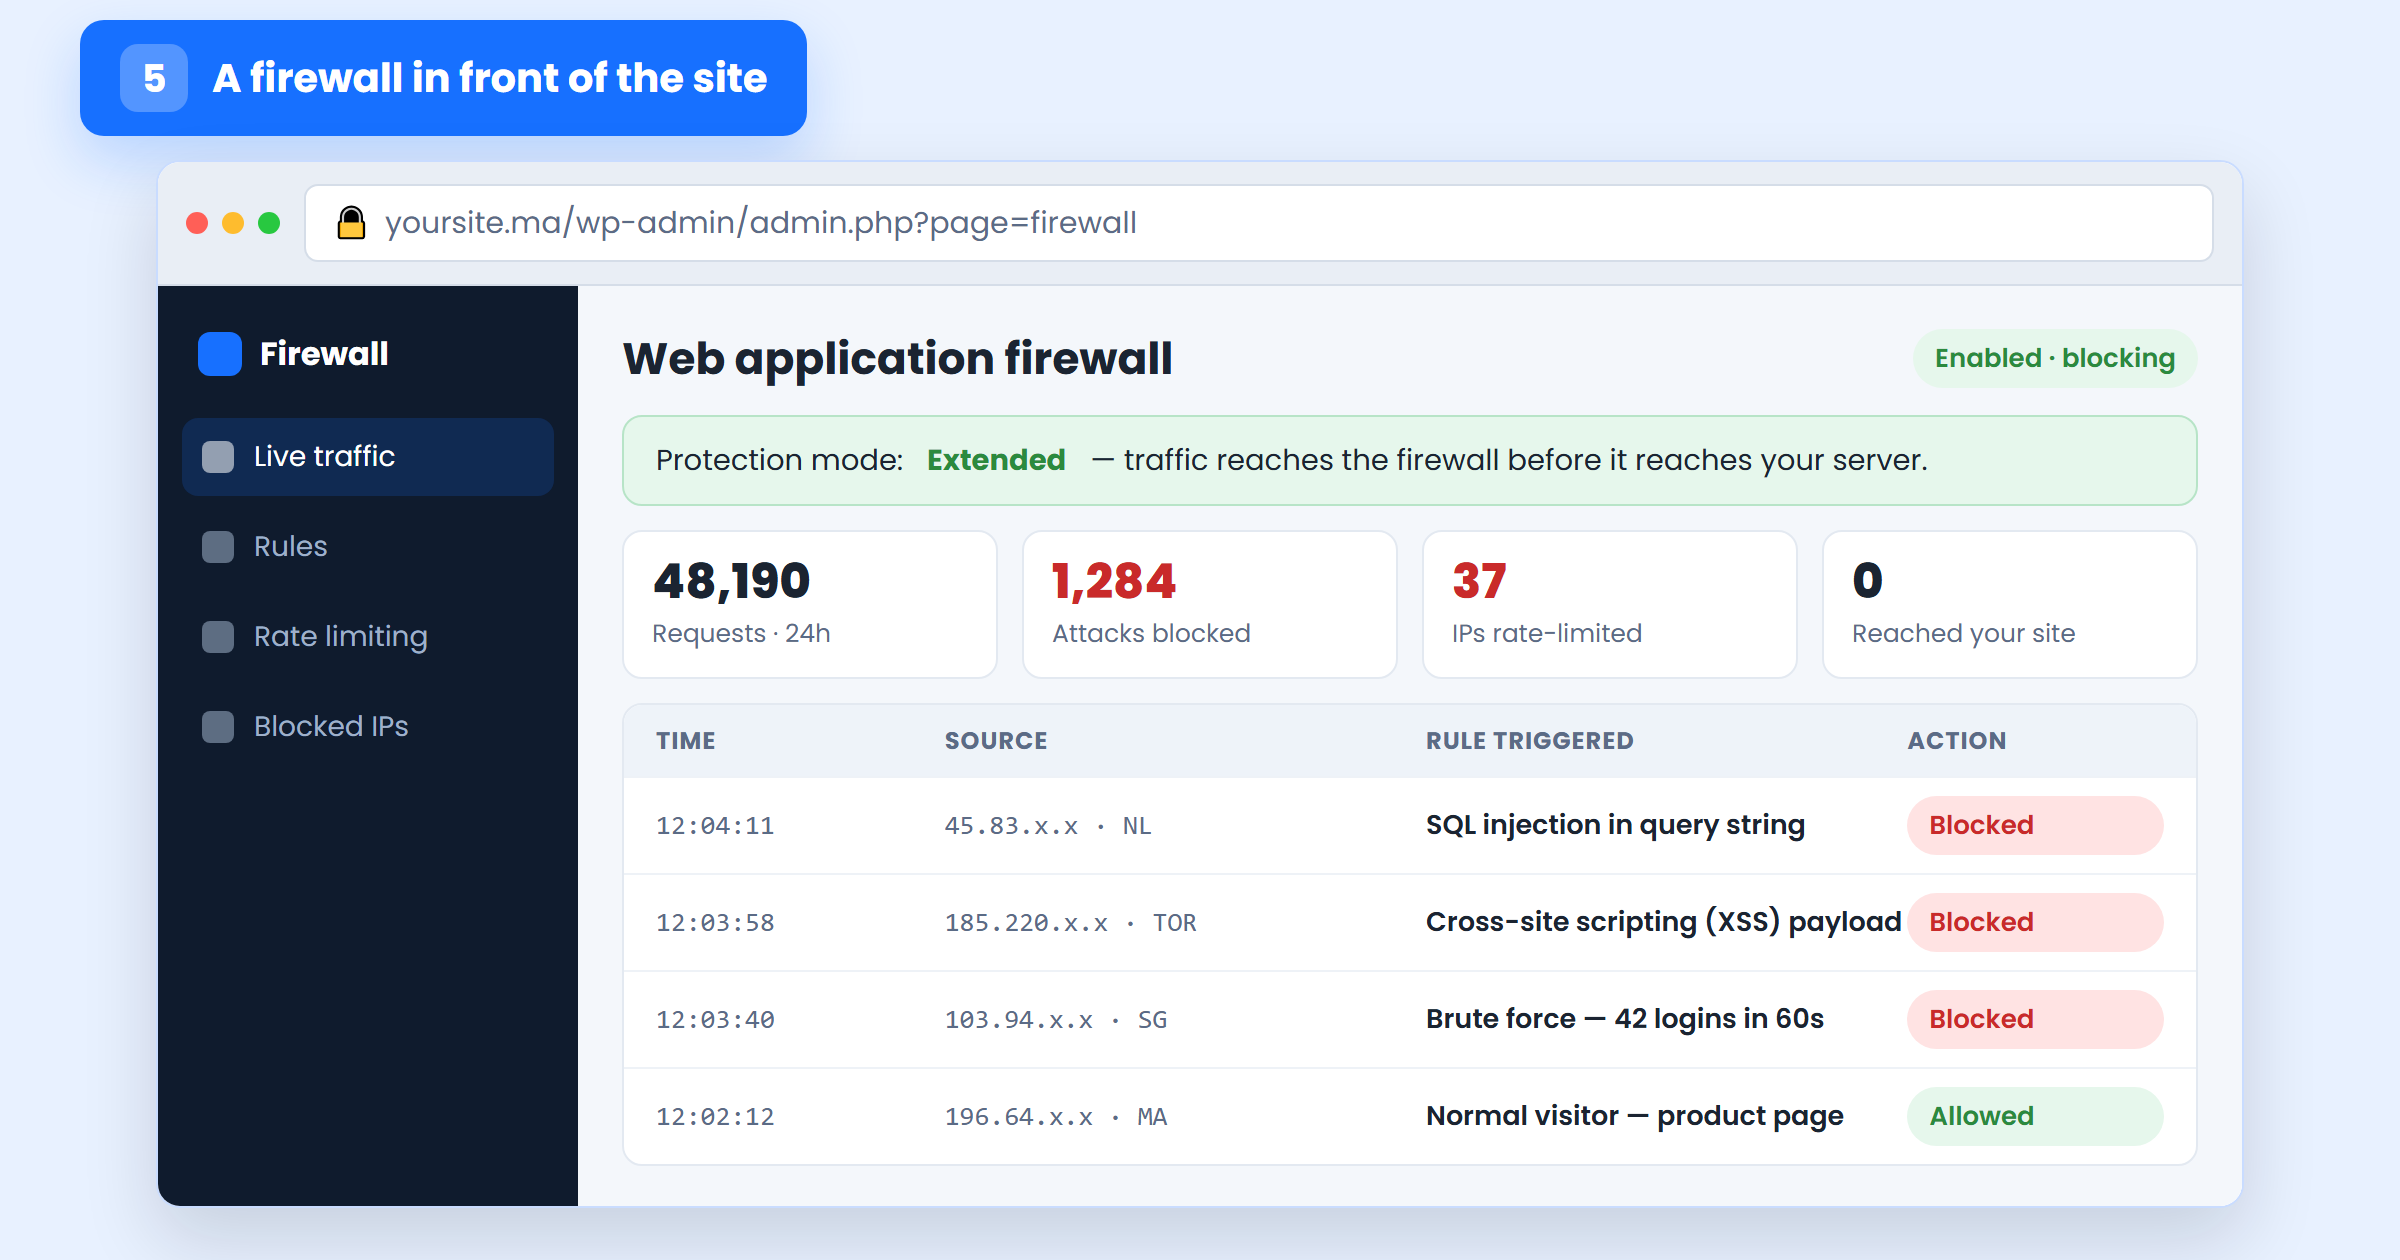
Whichever you choose, switch on rate limiting for the login page and let it block the scrapers and scanners that generate most of your junk traffic — we cover the tuning in blocking bots from your website. Watch the blocked-requests log for a day afterwards to be sure no legitimate traffic is being caught.
Step 6 — Harden the admin area
Your login page is the most attacked URL on the site. Every WordPress installation has it at the same address, which is precisely why the bots find it. Four changes make it dramatically less useful to them:
- Limit login attempts — lock an IP out after five failures. Most security plugins do this in one toggle.
- Delete the username “admin”, and any account named after the site or the company. Half of all brute-force attempts try that username first.
- Restrict
/wp-adminby IP if your team works from a fixed office connection, or move the login page to a custom URL if it does not. - Give people the smallest role that lets them work — an editor who only writes posts does not need administrator rights — and remove accounts belonging to former staff and finished freelance contracts the day they end.
While you are in there, disable the built-in file editor so a stolen admin session cannot rewrite your theme’s PHP from the browser. Add this line to wp-config.php:
define( 'DISALLOW_FILE_EDIT', true );Our guide on how to block hackers goes deeper on brute-force defence if the login page is already being hammered.
Step 7 — Scan for malware every week
Modern website malware is built to stay quiet. It injects spam links visible only to Google, skims card details from your checkout, or leaves a backdoor for later — while the site looks perfectly normal to you. Owners usually discover it when Google flags the site or the hosting provider suspends the account, which is weeks too late.
Install a scanner (Wordfence, Sucuri, Solid Security and your host’s own scanner all work) and schedule a weekly scan with an emailed report. The valuable check is file integrity: comparing your core files against the official published checksums, which catches a modified core file even when the malware itself is unknown.
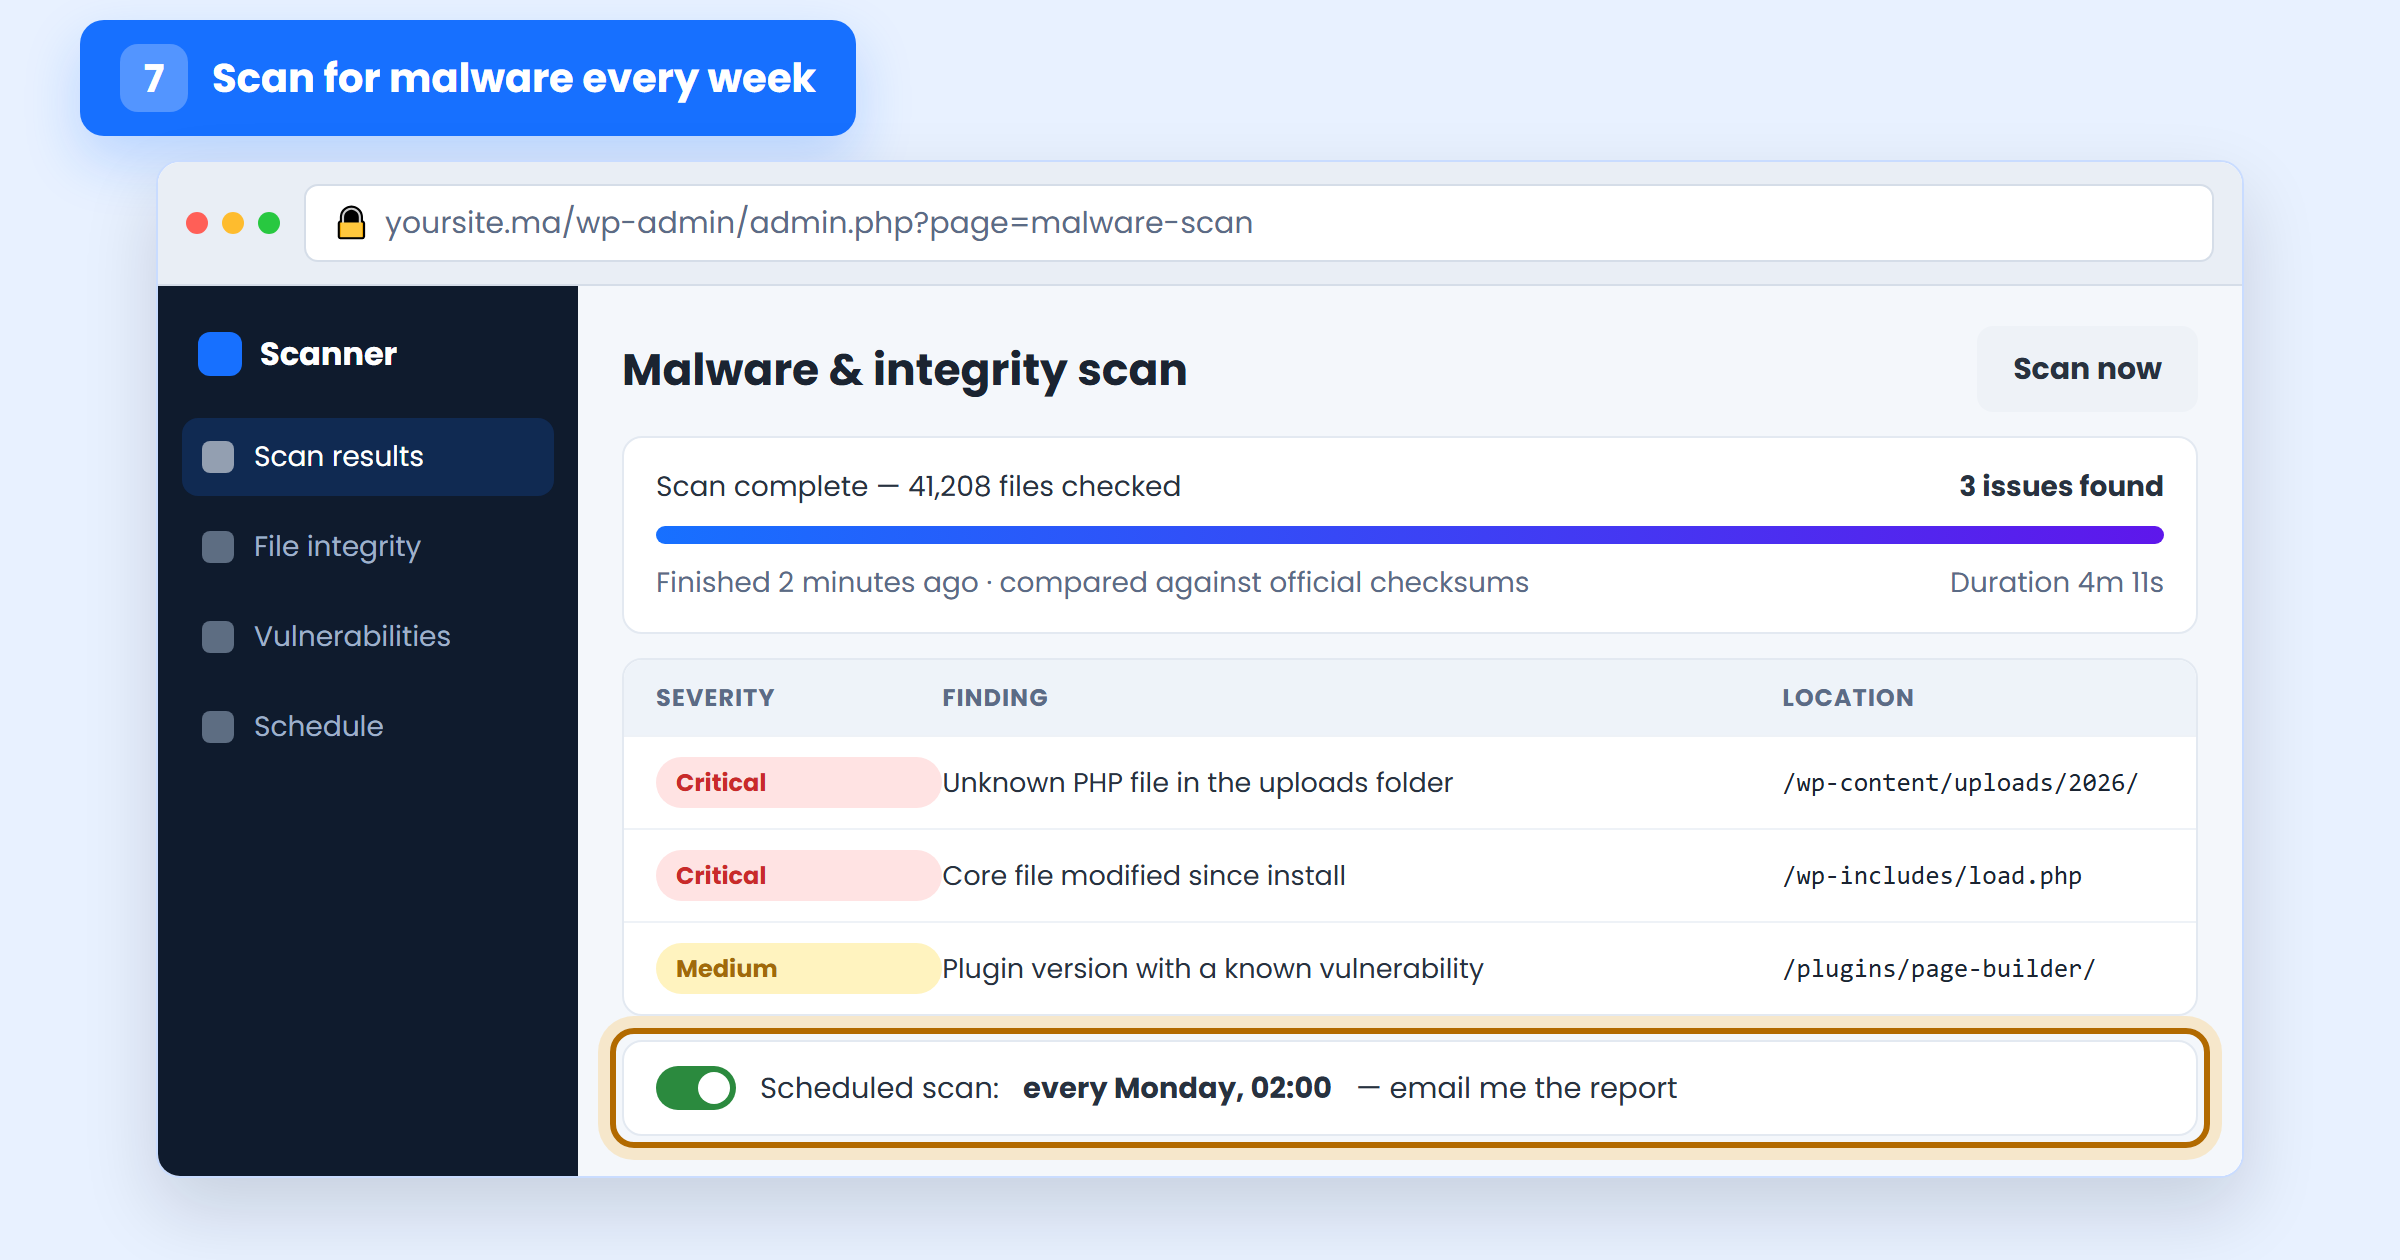
Two findings are always urgent: a PHP file inside /wp-content/uploads/ (nothing legitimate puts executable code there) and a modified core file. If you find either, do not simply delete it and move on — something created it, and that entry point is still open.
Step 8 — Restrict what visitors can upload
Any form that accepts a file — a CV upload, a product photo, a support attachment — is a way to place a file on your server. If an attacker can upload a .php file and make the server execute it, they own the site. Breaking either half of that chain is enough.
Allow only the extensions you genuinely need (.jpg, .png, .pdf), validate the file’s real type rather than trusting its name, cap the size, and rename files on upload. Then stop the server from executing anything in the uploads folder. On Apache, place an .htaccess file inside /wp-content/uploads/ containing:
<FilesMatch "\.(php|phtml|phar)$">
    Require all denied
</FilesMatch>
On nginx, ask your host to deny PHP execution under that path. While you are there, make sure visitors cannot browse your folders — see preventing directory listing.
Step 9 — Add one security plugin, not five
A good security suite bundles several of the steps above: firewall, login limiting, malware scanning, file integrity monitoring and alerts. Wordfence, Sucuri Security and Solid Security are all credible choices. Install one — running two overlapping suites causes conflicts, false alarms and a slower site, and it is a common reason people end up disabling security entirely.
Then configure it. An unconfigured security plugin left at defaults does very little; spend twenty minutes in its settings turning on the protections you decided on in steps 5, 6 and 7, and point its alerts at an inbox someone actually reads.
One rule with no exceptions: install plugins and themes only from the official repository or directly from the developer you paid. “Nulled” premium themes offered for free are one of the most reliable ways to install a backdoor on your own server. Our WordPress security checklist covers platform-specific settings in more detail.
Step 10 — Train everyone who has access
The nine steps above harden the software. Step 10 addresses the part attackers now target most often: the people. A phishing email that convincingly imitates your hosting provider, your bank or Google will hand over an admin password no firewall can protect.
Agree four rules with everyone who can log in, and write them down:
- No shared accounts. One person, one login — otherwise you cannot tell who did what, and offboarding is impossible.
- Check the sender’s domain before clicking, and never enter your admin password on a page you arrived at from an email. Our guide on spotting phishing emails is worth ten minutes in a team meeting.
- No admin work over public Wi-Fi without a VPN — see public Wi-Fi security.
- Report suspicious messages, never quietly delete them. If one person received it, others did too.
Test your work — a five-minute check
Do not assume a setting took effect because you saved it. Run through this list before you close the laptop:
- Type your address with
http://. It should redirect tohttps://and show a padlock, on the home page and a deep page. - Log out and back in. You should be asked for your password and a code from your authenticator app.
- Open your backup storage and confirm last night’s file is there and is not suspiciously small.
- Enter a wrong password five times from a private browser window — you should be locked out, not offered a sixth try.
- Review Users. Every account should belong to someone you can name today.
- Run one full malware scan and keep the result as your clean baseline.
Diary it for once a month, alongside our fuller website security audit checklist.
Frequently asked questions
How long does it take to secure your website?
Steps 1 to 5 are an afternoon’s work on a typical small business site and remove the large majority of automated attacks. Steps 6 to 10 are ongoing habits rather than one-off tasks — a weekly scan report to read, a monthly five-minute check, and updates that now install themselves.
Do I have to pay for a firewall or a security plugin?
No. Free tiers of the major cloud firewalls and the free versions of the main security plugins cover everything in this guide. Paid plans mainly add faster malware signature updates, priority support and a cleanup service if you are compromised — worth it for a site that takes payments, optional otherwise.
My site is not WordPress. Do these steps still apply?
Yes — only the menu names change. HTTPS, patching, strong credentials with 2FA, offsite backups, a firewall, restricted uploads and trained staff apply equally to PrestaShop, Joomla, Drupal, Shopify and custom applications. On a hosted platform like Shopify the vendor handles patching and server hardening for you, which moves steps 2 and 8 off your plate and makes steps 3 and 10 even more important.
My site has already been hacked. Do I start here?
No — clean first, harden second. Hardening a site that already contains a backdoor just locks the attacker inside. Follow our guide on restoring a hacked website, confirm the site is clean, rotate every password, and then work through these 10 steps so it does not happen again.
How to secure your website: the bottom line
You do not need an enterprise budget to secure your website. Almost every compromise we are called in to clean traces back to the same short list: an outdated plugin, a reused password, no second factor, or a backup that was never tested. Fix those four and you have already stepped out of the way of the automated attacks that make up the overwhelming majority of the threat.
If you only do three things this week: force HTTPS everywhere (step 1), turn on auto-updates (step 2), and put two-factor authentication on every administrator account (step 3). Then set the calendar reminder for the five-minute check — security is maintained, not installed.
Want to know where you stand before you start? SecureWeb runs a free website security scan and full security audits for Moroccan businesses — a fast way to see which of these 10 steps your site is currently missing.