
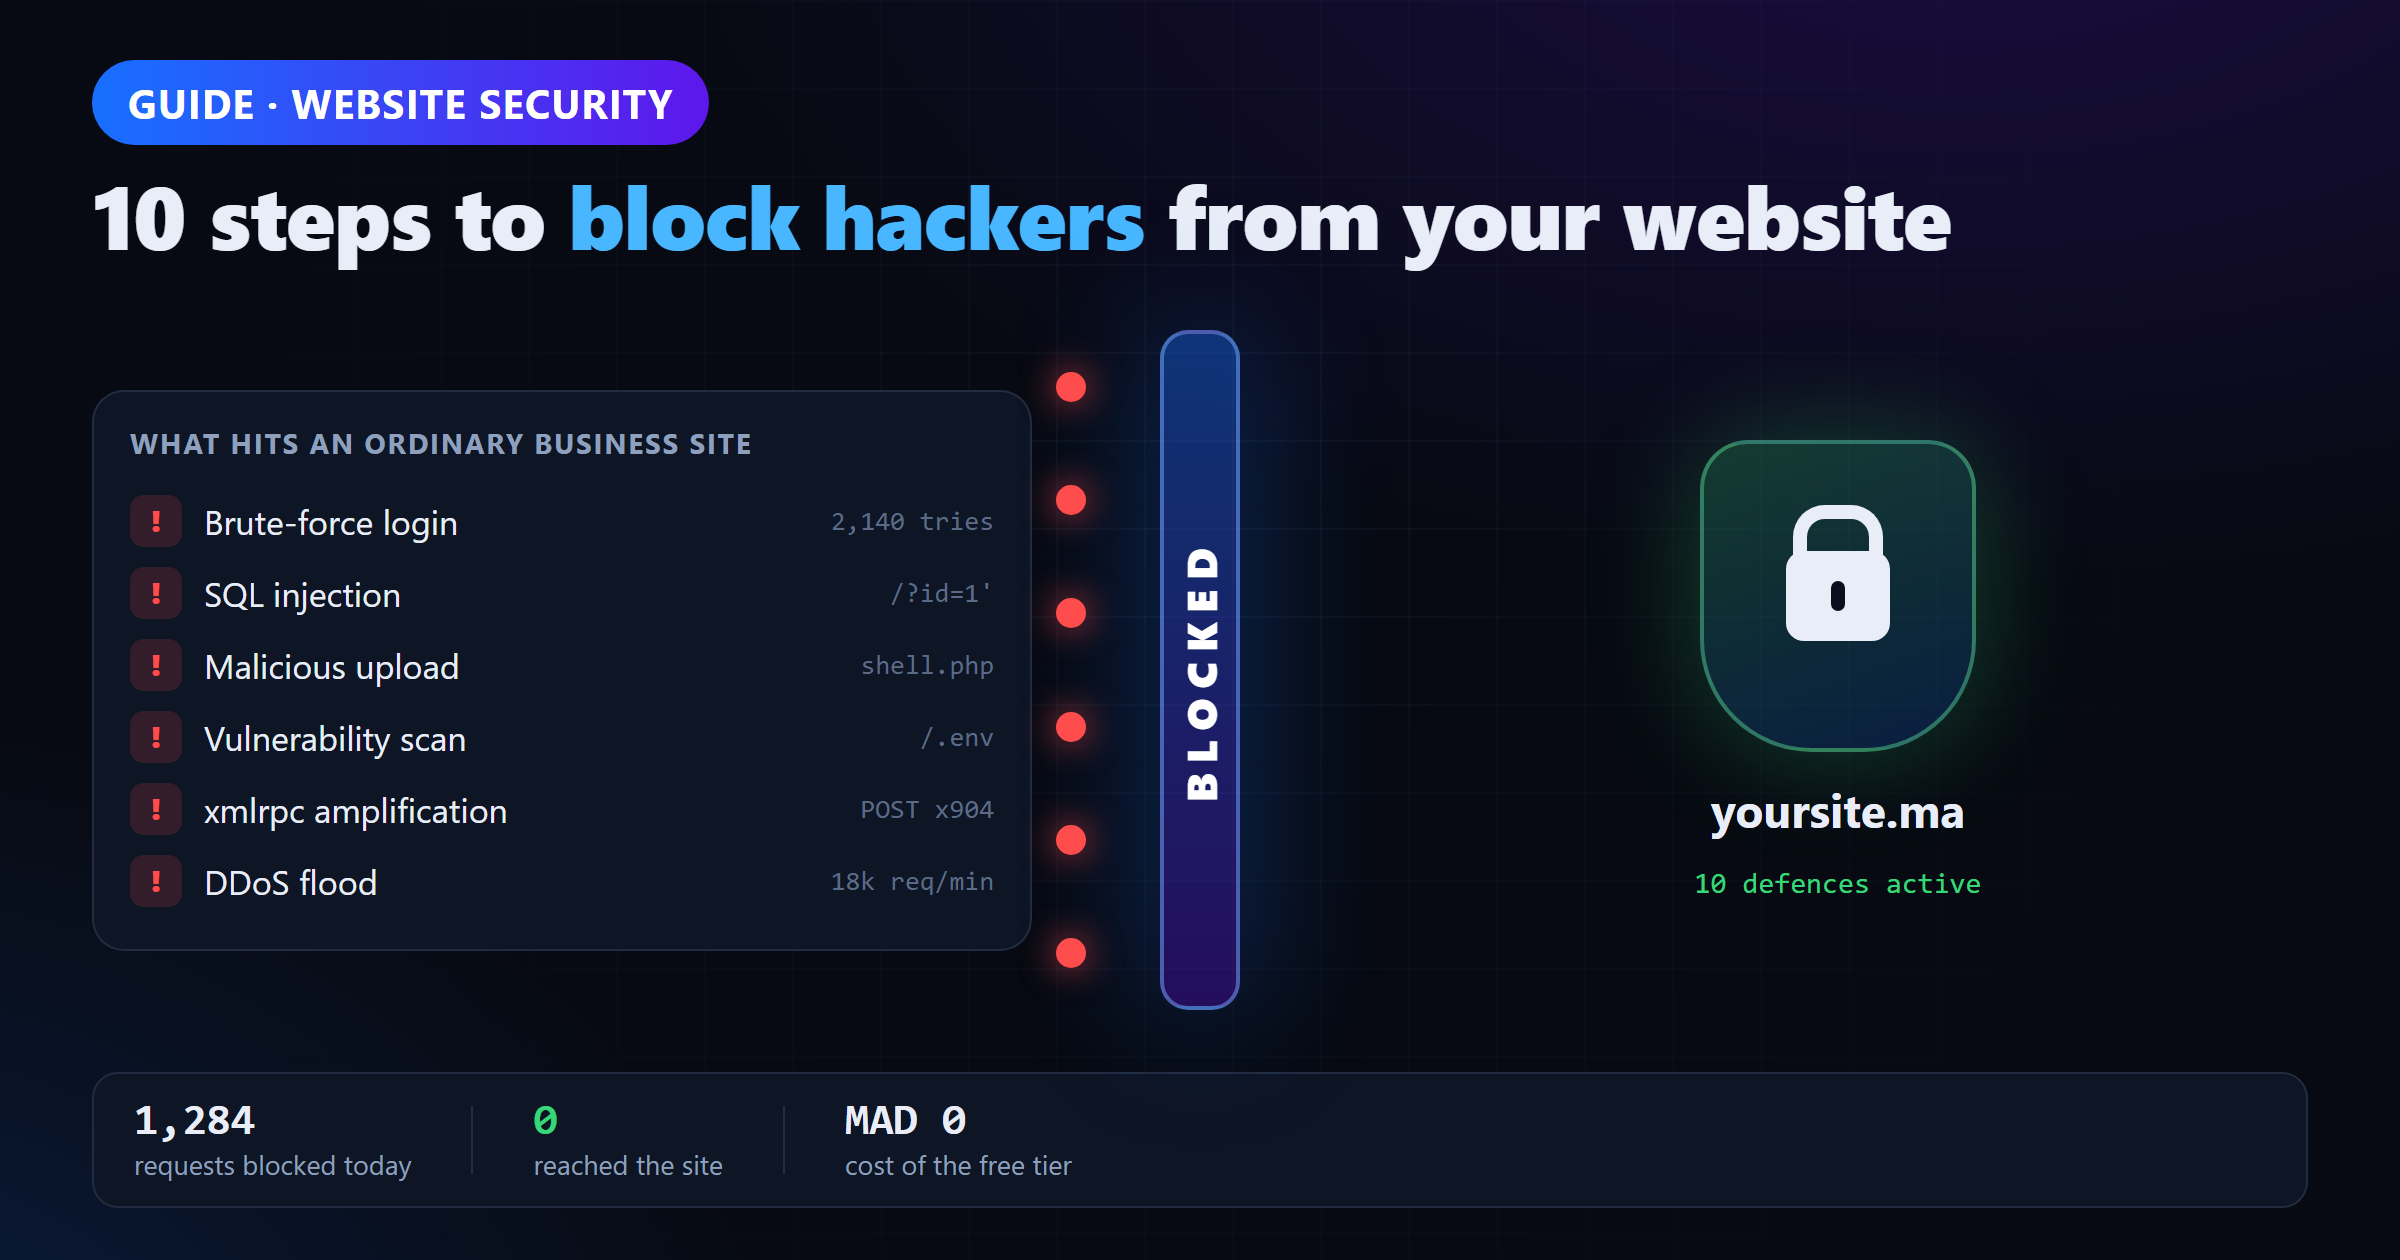
Nobody sits at a keyboard and picks your business out of a list. Bots do the picking: they crawl the entire internet looking for a login page with no attempt limit, a plugin version with a public exploit, or an .env file left where the web server will happily serve it. Whatever answers gets attacked, at 3 a.m., automatically, whether the site belongs to a Casablanca e-commerce shop or a clinic in Rabat.
That is good news, because it means most of the defence is mechanical. This guide shows you how to block hackers from your website in 10 steps, in the order we work through them during a real hardening job: a firewall out front, then the known holes, then the login page, then the layers that catch whatever slipped past. Each step says exactly what to click, and six of them include a screenshot of what the screen should look like when you are done. The examples use WordPress and a typical hosting panel, but the same settings exist under different names on PrestaShop, Joomla, Drupal, Shopify and custom-built sites.
What it actually takes to block hackers
There is no single switch that makes a site safe. Attackers work through a sequence — find the site, find a weakness, get in, stay in, use it — and each step below removes one link in that chain. A firewall stops the mass scanning. Patching removes the weakness the scanner was looking for. Two-factor authentication makes a stolen password useless. Monitoring means that if all of that fails, you find out in minutes instead of when a customer tells you.
The goal is not an impenetrable system; it is to be expensive enough that an automated campaign gives up and moves to the next target. Almost every hacked site we are called in to clean was running an outdated plugin, a reused password, or both. Fix those and you have stepped out of the way of the overwhelming majority of the threat — and none of the 10 steps needs a developer or costs anything beyond your existing hosting.
Before you start
- Administrator access to your CMS, and your hosting control panel login — several steps happen at the server, not in WordPress.
- Access to the domain’s DNS, if you are going to route traffic through a cloud firewall in step 1.
- A password manager to hold the new credentials, recovery codes and API keys you are about to create.
- Roughly two hours, ideally outside business hours — and a fresh backup taken before you change anything.
One warning before the first step: if your site is already compromised, hardening it now just locks the intruder inside. Clean first — our guide to restoring a hacked website covers that — then come back here.
Step 1 — Put a firewall in front of your website
A web application firewall (WAF) inspects every request before it reaches your server and drops the ones that match known attack patterns: SQL injection, cross-site scripting, malicious file uploads, credential-stuffing floods. It is the single highest-value hour in this guide, because it works even on the weaknesses you have not fixed yet.
You have two routes. A cloud WAF — Cloudflare and Sucuri both have suitable plans, Cloudflare’s free tier included — filters traffic before it ever touches your host; you point your domain’s nameservers at the provider and enable the managed ruleset. A plugin WAF such as Wordfence runs inside WordPress instead: far easier to switch on, but it only sees requests that already reached your server. If you take payments, use the cloud option.
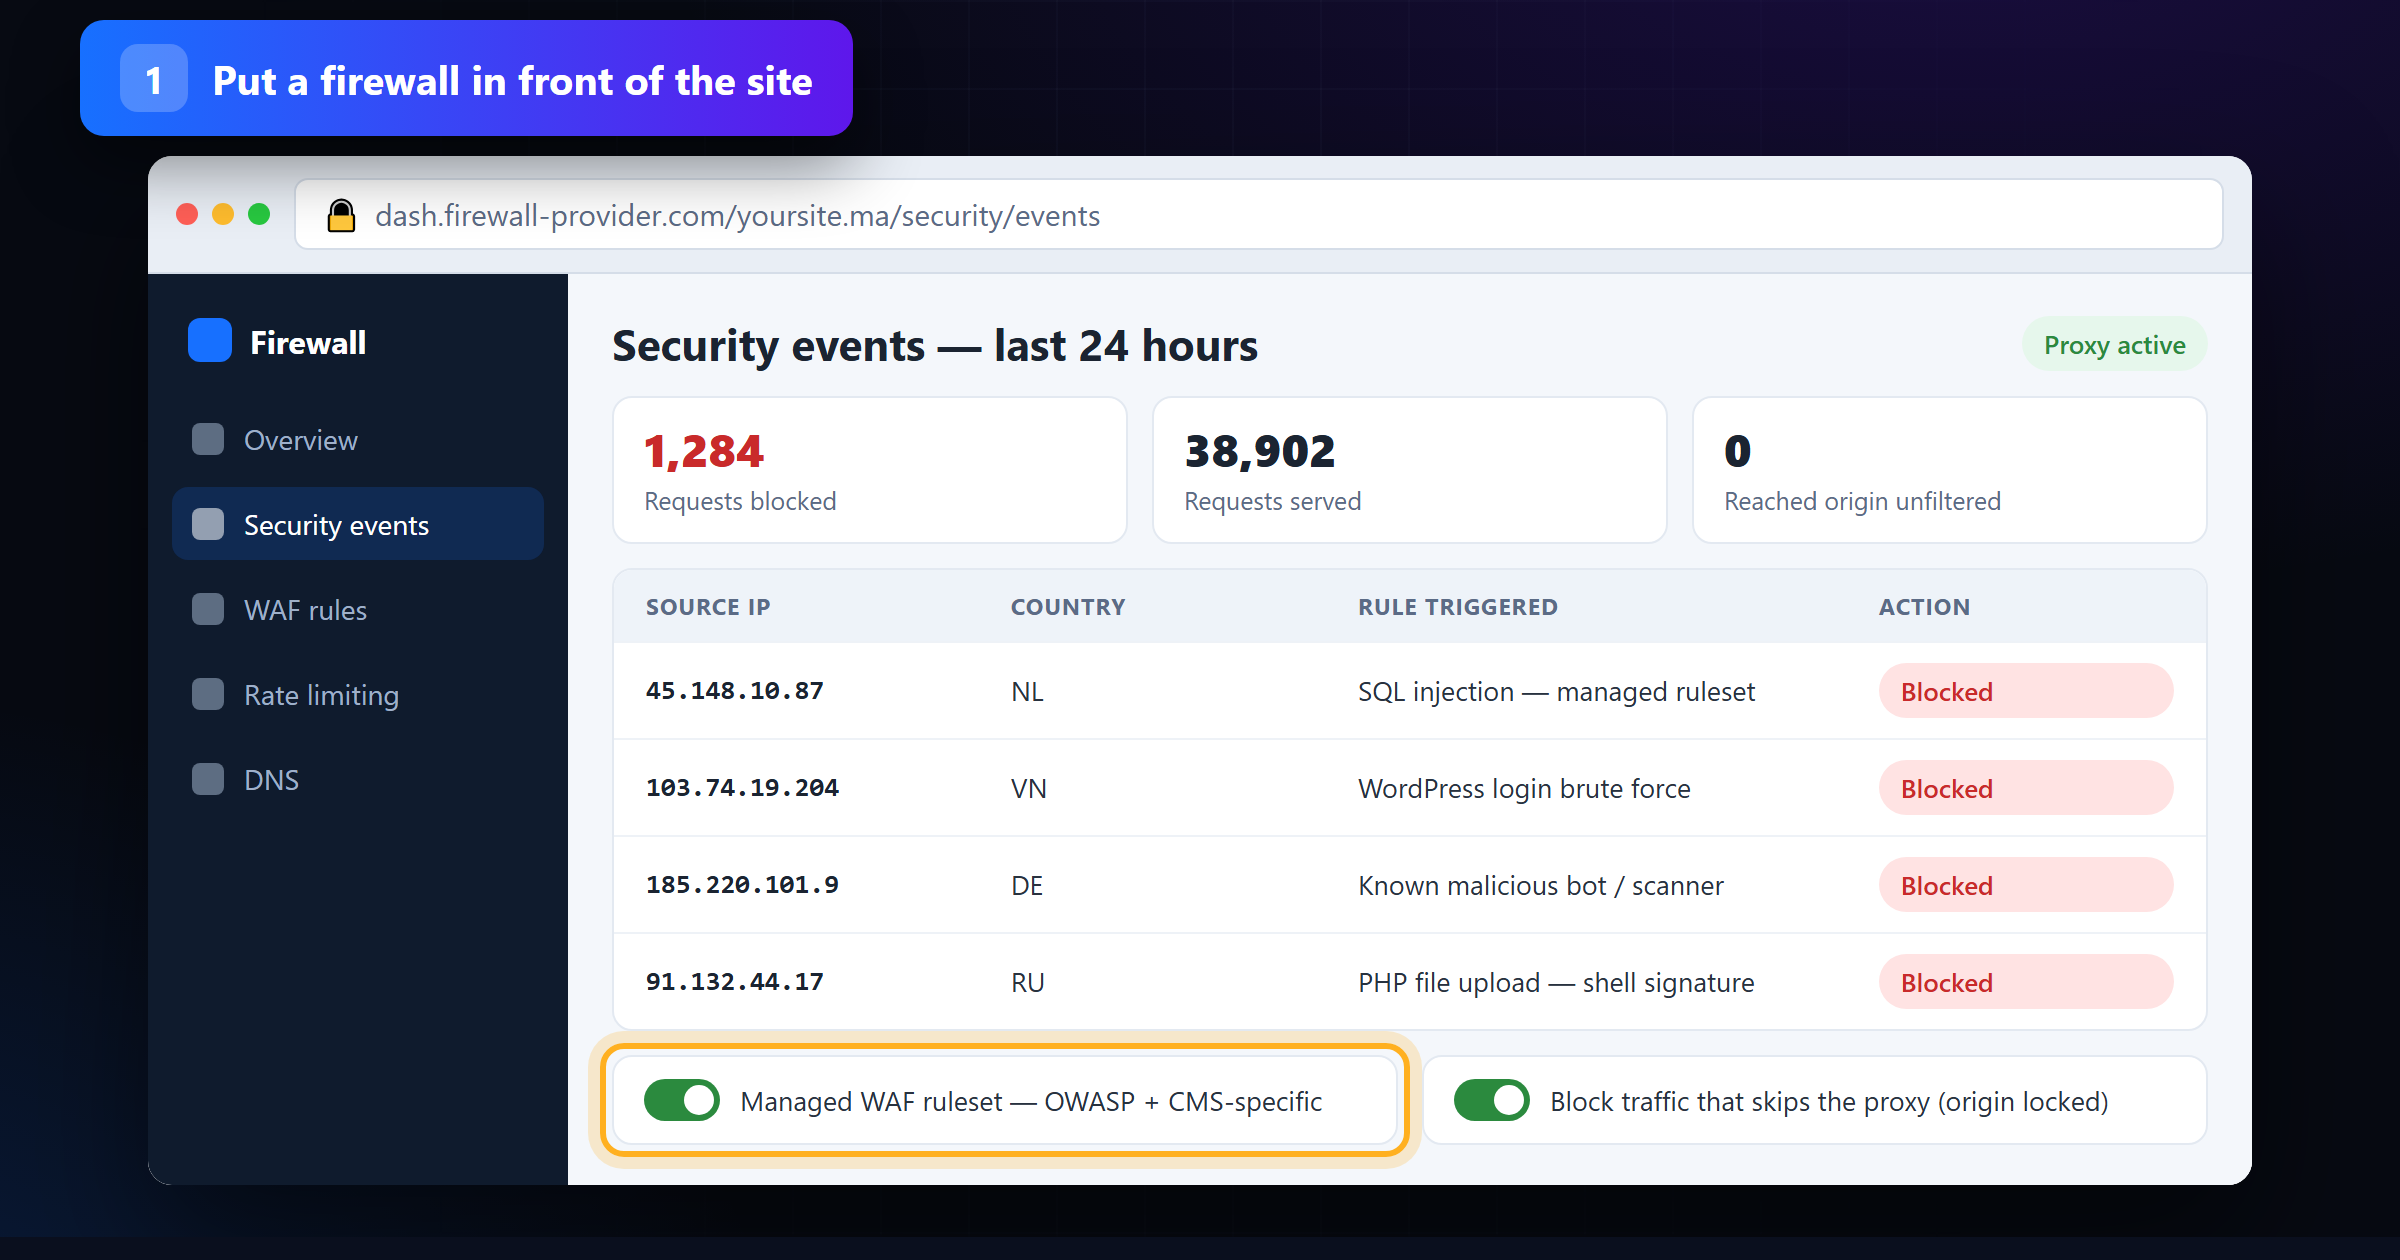
Finish the job by closing the back door: once traffic runs through the proxy, tell your host to refuse connections that arrive directly at the server IP. Otherwise an attacker who finds your origin address simply walks around the firewall. Then watch the events list for a couple of days before tightening any rule — over-aggressive settings block customers, and a blocked customer is a lost order.
Step 2 — Patch everything, then delete what you do not use
Outdated software is the most common way sites get compromised, and it is not close. When a plugin vulnerability is disclosed, working exploit code is usually public within days and scanners start hunting for unpatched installations within hours. The fix is almost always already sitting in your dashboard.
Go to Dashboard → Updates, apply everything pending, then open Plugins and switch on auto-updates for each plugin and your theme. WordPress installs its own minor and security releases automatically — leave that on. Then do the part most people skip: delete every plugin and theme you are not using, and any plugin whose developer has abandoned it. Deactivated is not removed; the code still sits on disk and can still be reached over the web.
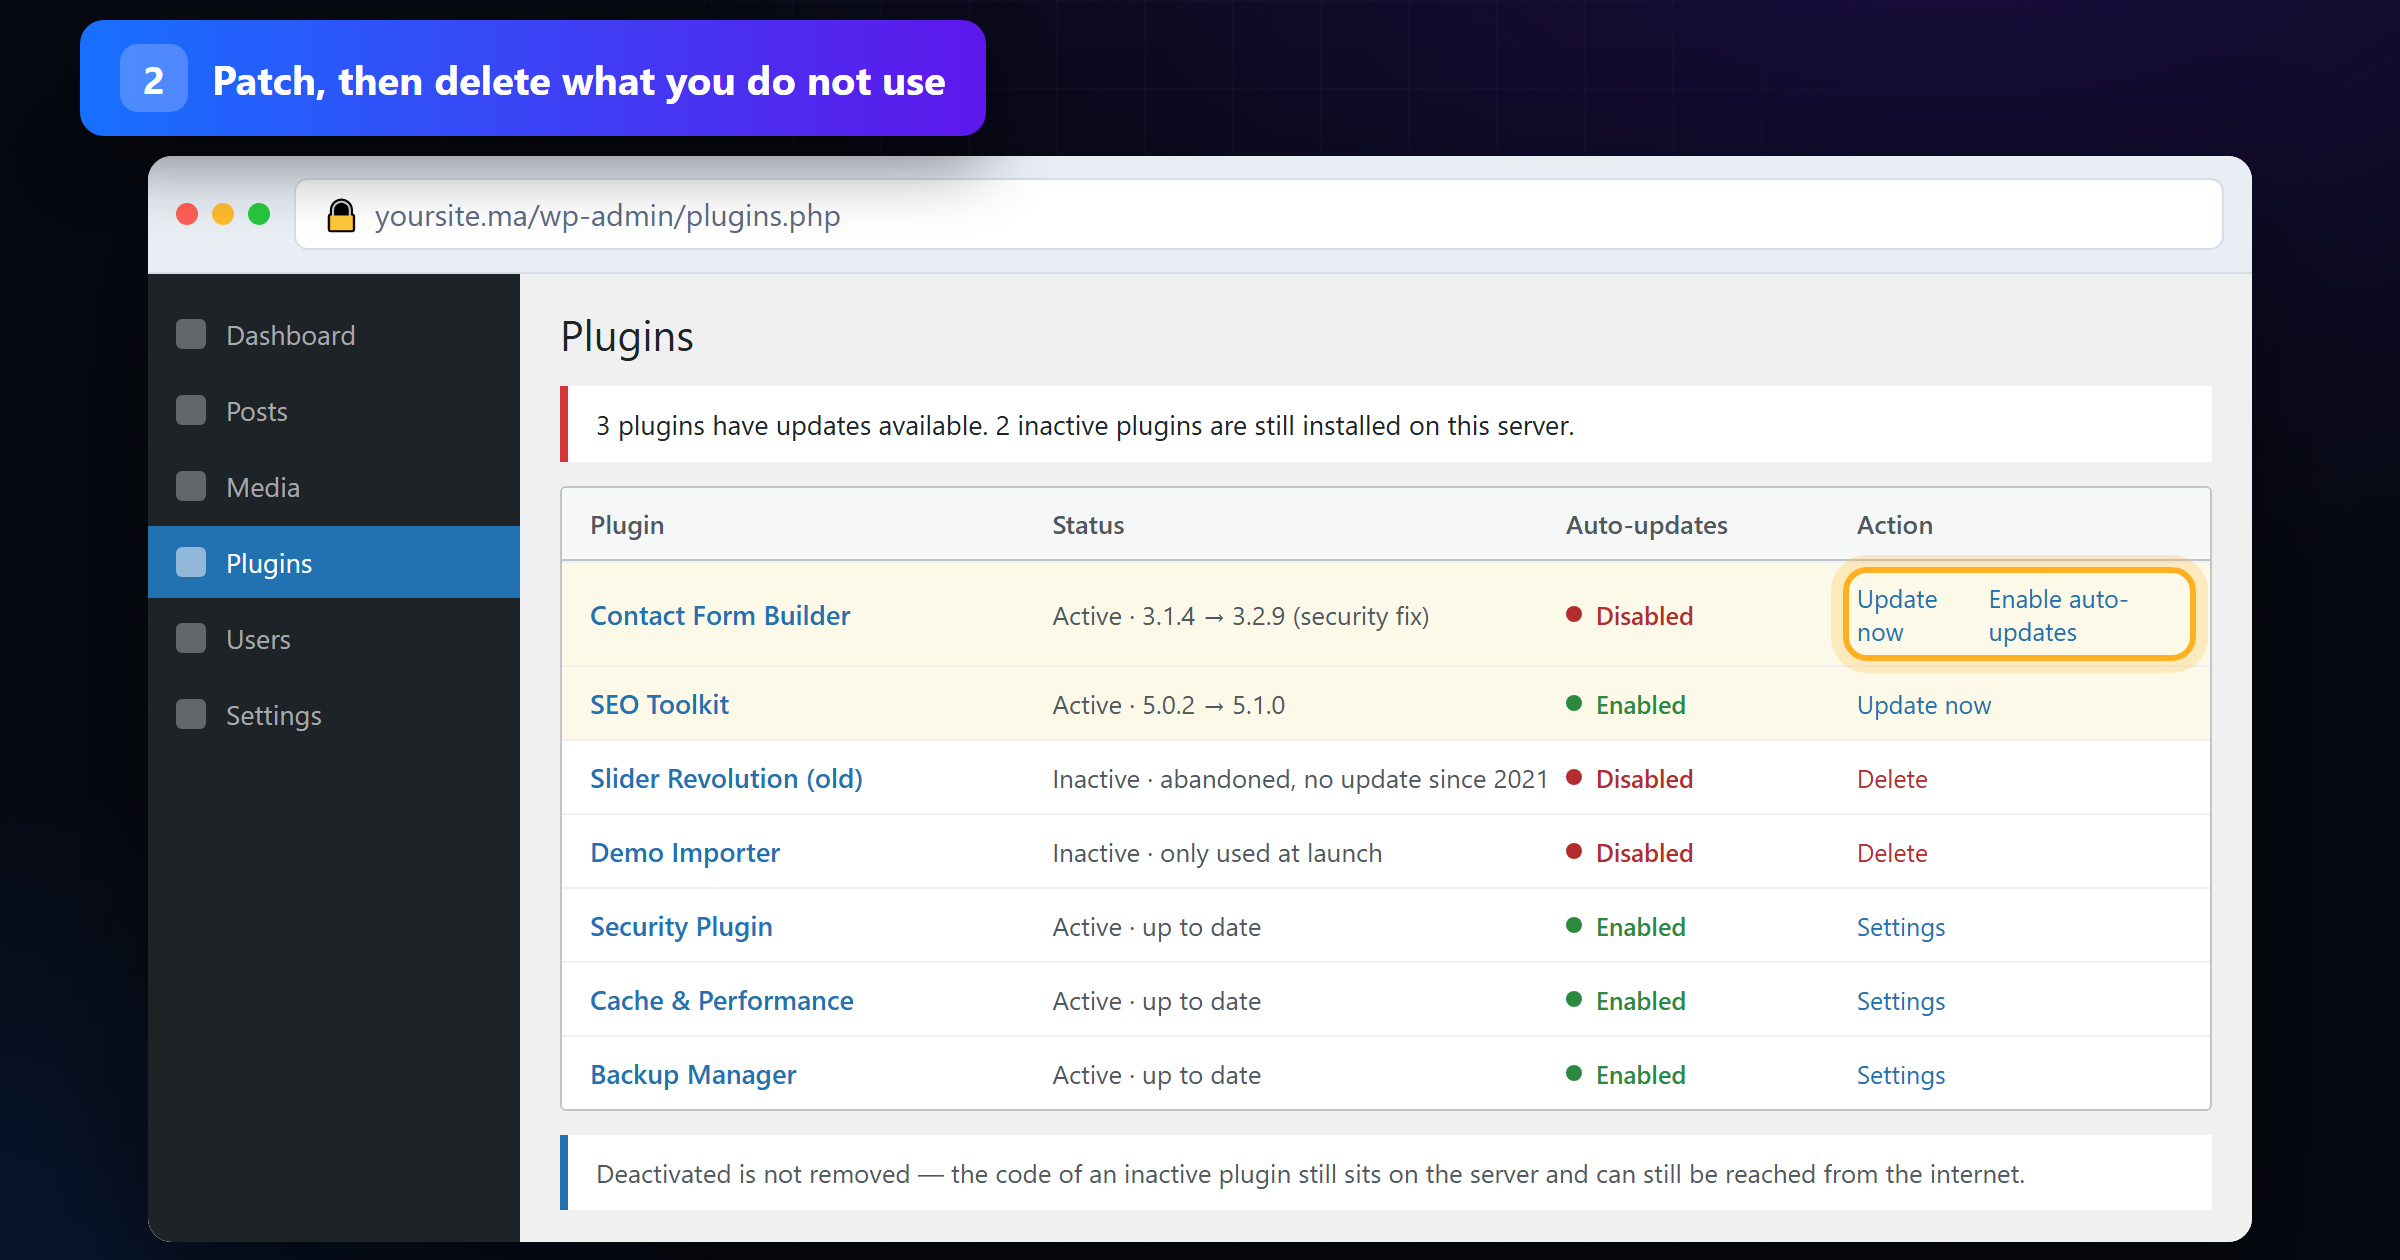
Do not stop at the CMS. Your hosting panel controls the PHP version, and an end-of-life PHP release stops receiving security fixes entirely no matter how current WordPress is. If yours is older than the versions your host lists as supported, schedule the upgrade — test on a staging copy first, because very old plugins occasionally break on it.
Step 3 — Make the login page unguessable
Bots do not guess passwords at random. They replay the billions of username-and-password pairs already leaked in other companies’ breaches, betting that somebody reused one. If your admin password protects anything else — your email, another site, an old forum account — treat it as already known.
Four settings, in your security plugin or your host’s protection panel. Limit login attempts to about five, with a lockout of an hour, so a brute-force run dies after five tries instead of running all night. Require two-factor authentication for every account that can publish or install — a stolen password on its own then buys the attacker nothing; our walkthrough on setting up WordPress two-factor authentication takes about ten minutes. Generate long random passwords per account and store them in the manager (see what actually makes a password strong). Finally, change the login URL away from /wp-login.php and disable XML-RPC if nothing you use needs it — neither is real security on its own, but both remove you from the scanners’ default list.
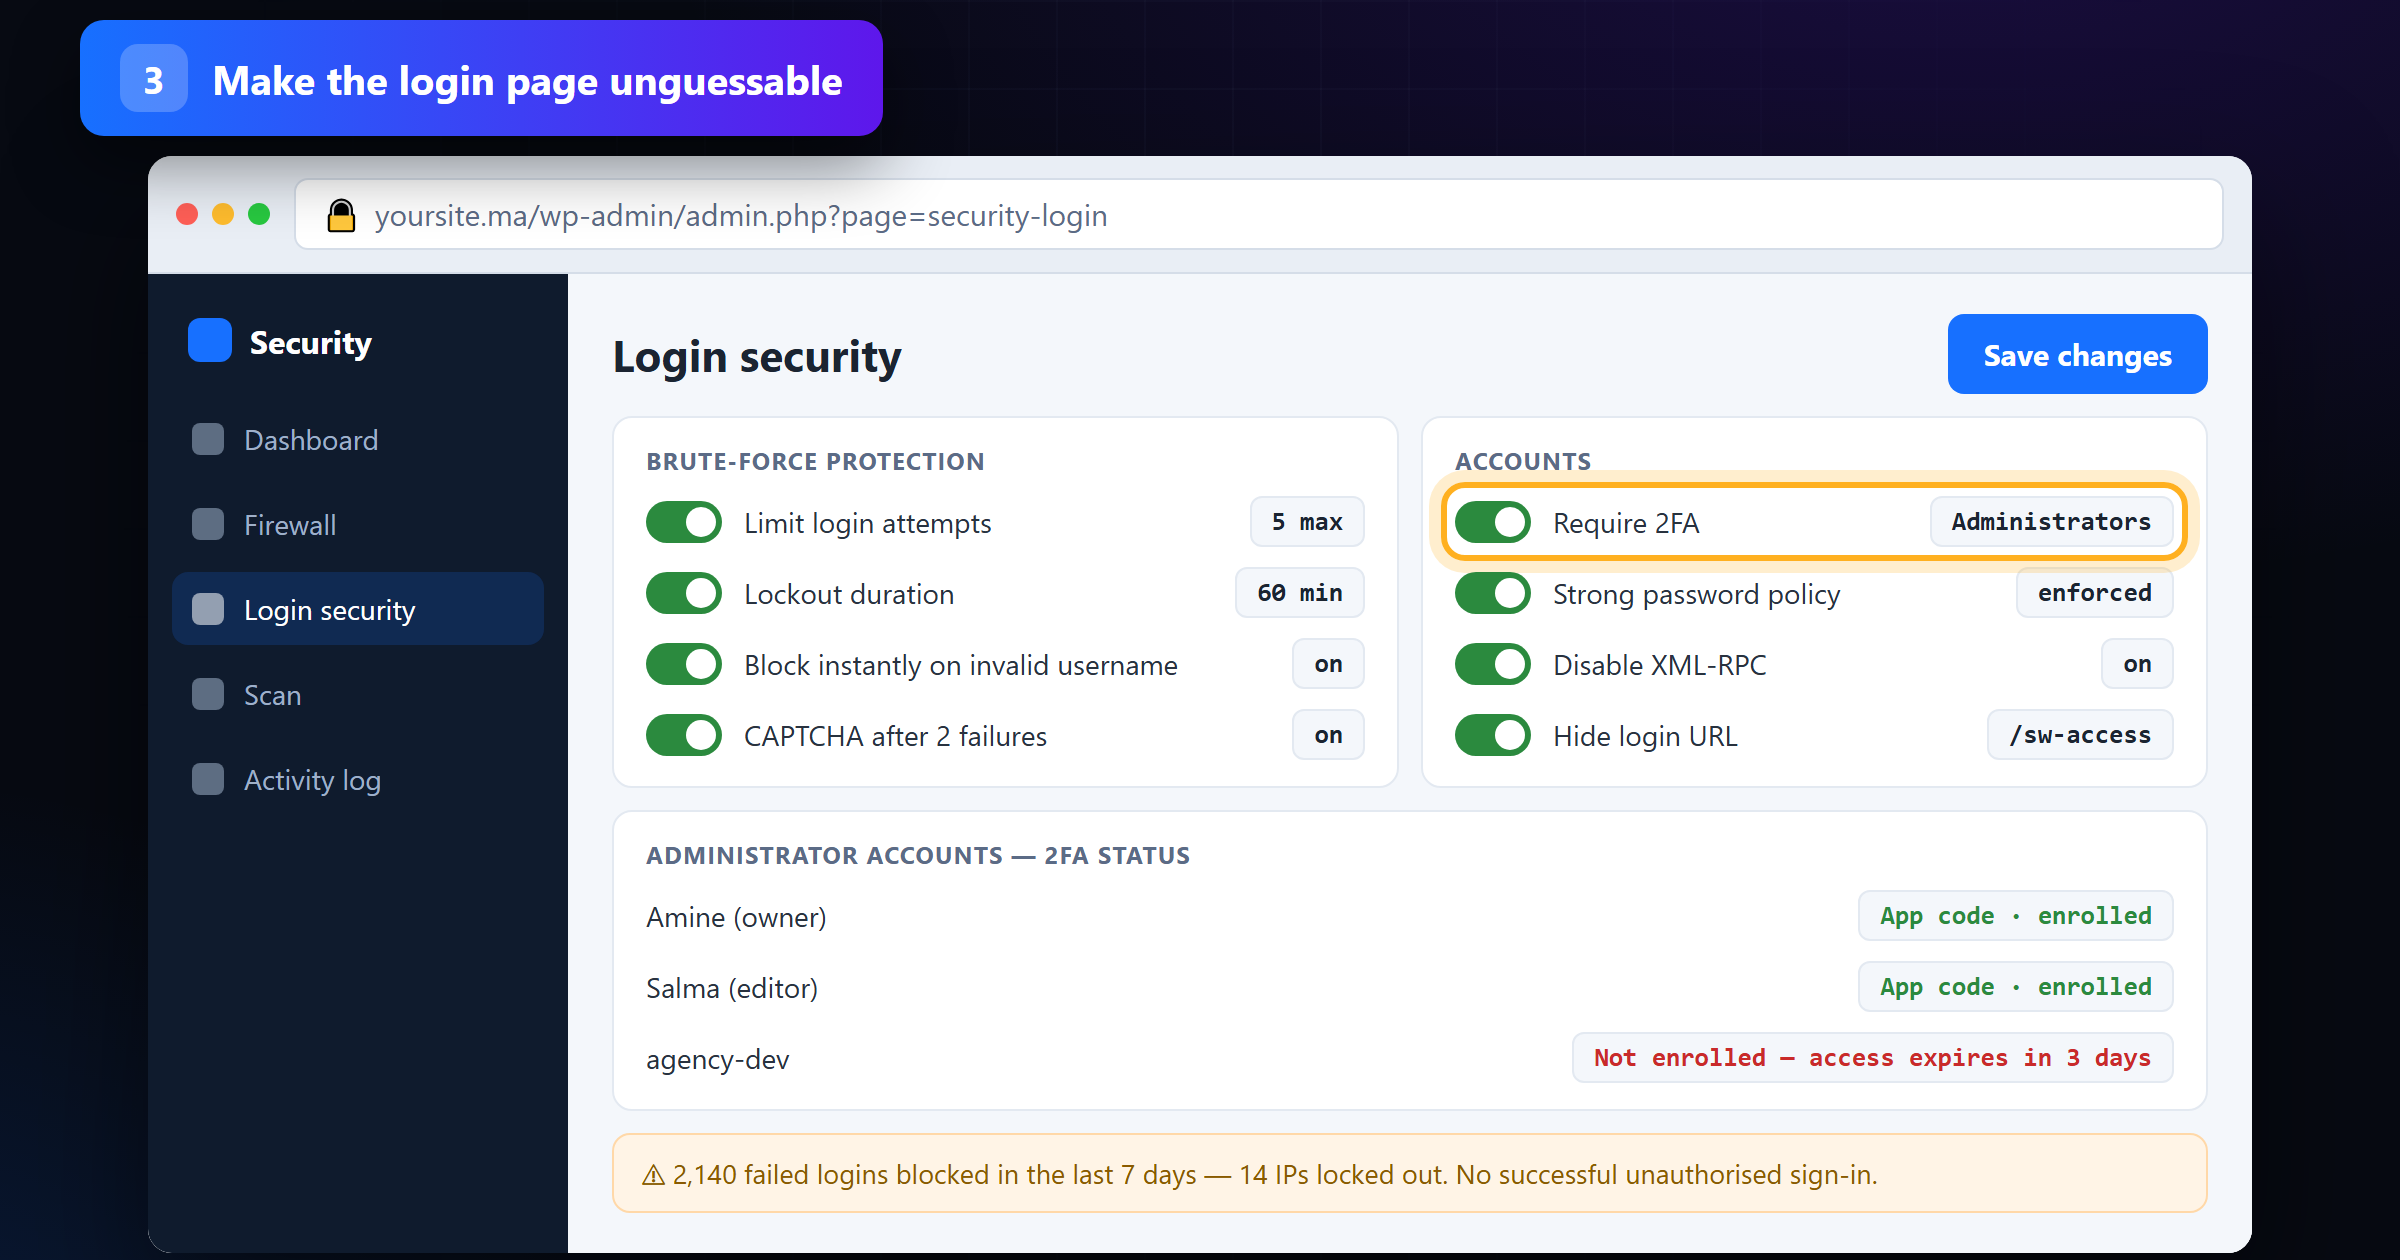
Print or save the recovery codes somewhere that is not the site you just locked. Being unable to reach your own admin panel on a Sunday is the most common reason people switch 2FA back off — which puts them straight back where they started.
Step 4 — Force HTTPS on every page
HTTPS encrypts everything travelling between your visitors and your server — passwords, order details, contact forms. Without it, anyone sharing a café’s Wi-Fi with your customer can read that traffic, and browsers now label the site “Not secure”. It is also a confirmed Google ranking signal, so it pays for itself twice.
In your hosting panel, open SSL/TLS and issue a certificate for every domain and subdomain, including www and any shop or staging subdomain. Practically every host now offers free automated certificates from Let’s Encrypt, usually behind a button marked AutoSSL. Switch on Force HTTPS redirect, confirm auto-renewal is enabled, and in WordPress set both WordPress Address and Site Address under Settings → General to the https:// version. Our step-by-step guide to installing an SSL certificate covers the host-specific details.
If the padlock still does not appear, you have mixed content: an image, font or script on the page is still loading over http://. Your browser’s developer console names the offending file. Once it is clean, ask your host to add the HSTS header, which tells browsers never to try the insecure version again.
Step 5 — Lock the files attackers go looking for
Long before anyone tries your login page, scanners request a short list of files by name: wp-config.php and .env for database and API credentials, backup.zip for a copy of everything, /wp-content/uploads/ in the hope that directory listing is on. Every one of those requests is free for them and catastrophic for you if it succeeds.
In your hosting file manager, set permissions to 644 for files and 755 for directories, and tighten wp-config.php to 400 or 440. Never leave anything at 777. Then add three rules to .htaccess (or the Nginx equivalent): deny direct access to wp-config.php and .env, turn off directory listing with Options -Indexes, and — the important one — block PHP execution inside the uploads folder, so a malicious file that does get uploaded cannot be run.
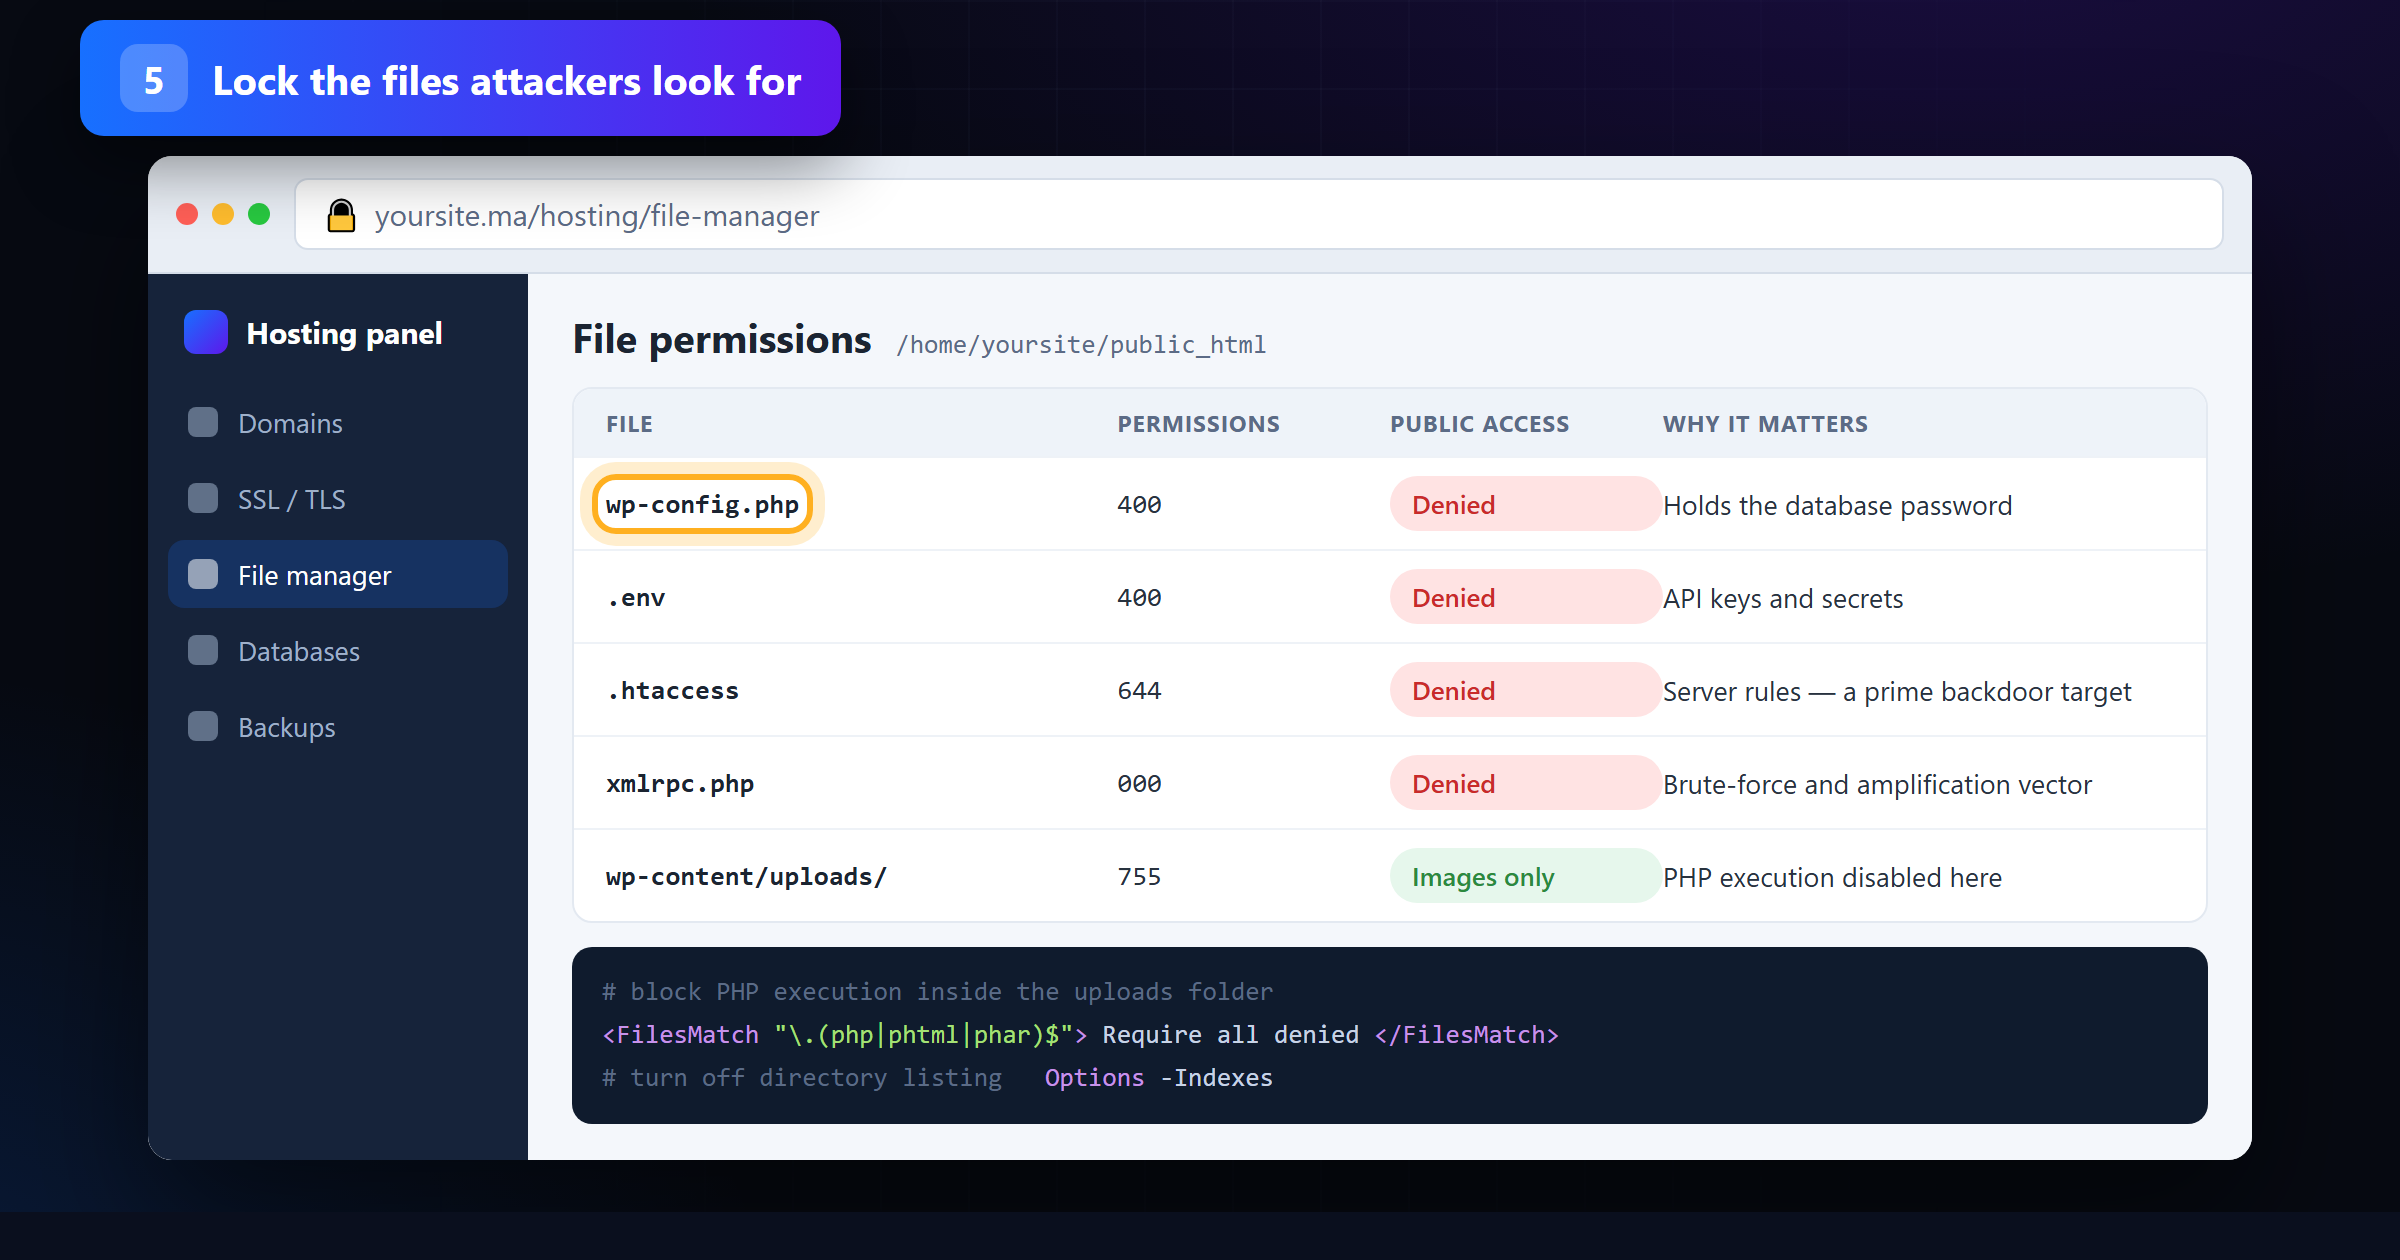
While you are in there, delete the things that should never have been left on a live server: database exports, info.php, old theme folders, and the site-old copy from the last redesign. Forgotten files are unpatched files.
Step 6 — Absorb floods with a CDN and rate limits
A distributed denial-of-service attack does not steal anything; it simply makes your site unavailable, which for an online shop is the same thing as being robbed. Small sites are hit surprisingly often, sometimes as collateral damage from an attack on a neighbour on the same shared host.
If you completed step 1 with a cloud provider, most of this is already done — the CDN absorbs volumetric traffic across its own network. Add rate-limiting rules on top for the endpoints that cost you the most work per request: the login page, the search box, the cart and checkout, and any API route. A rule such as “more than 10 requests to /wp-login.php from one IP in a minute → block for an hour” removes an entire category of noise. On a plugin-only setup, enable its equivalent throttling and ask your host what upstream protection they provide.
Step 7 — Get alerted before your customers notice
Breaches are rarely discovered at the moment of entry. They are discovered weeks later, when Google flags the site, when the host suspends the account for sending spam, or when a customer sends a screenshot. The gap between those two moments is where the real damage accumulates.
Turn on the activity log in your security plugin and set email alerts for the four events that genuinely matter: a new administrator account being created, a core or plugin file changing, a plugin being installed or activated, and repeated failed logins for an account that exists. Everything else is noise, and alerts you ignore are worse than no alerts at all.
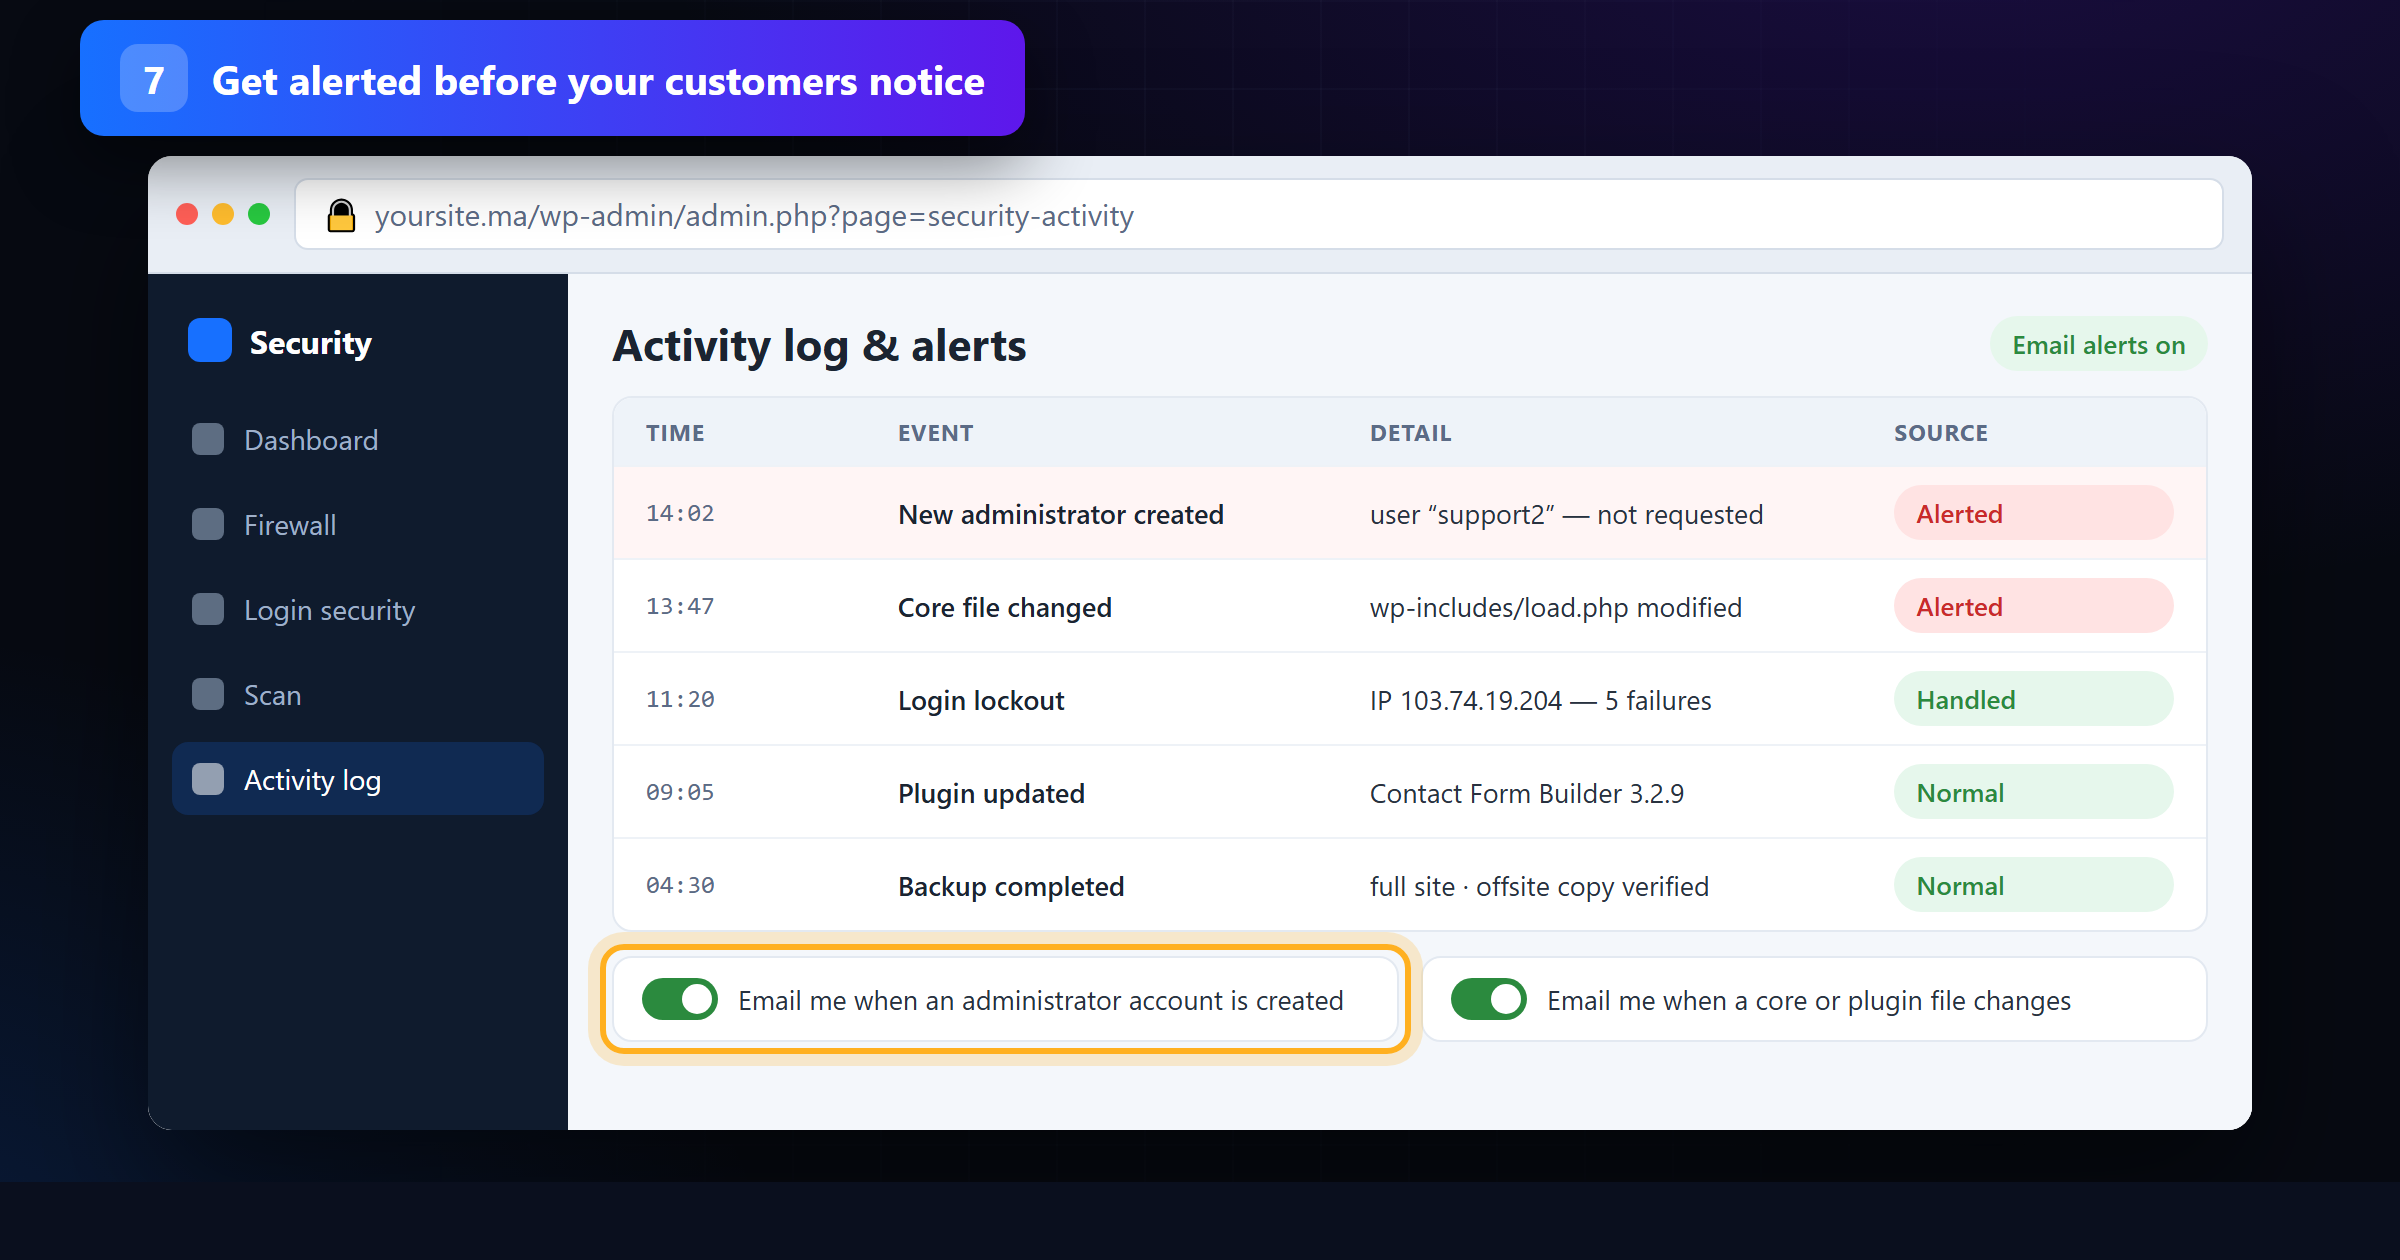
Send those alerts to an address somebody actually reads, and agree in advance who acts on one that arrives at 2 a.m. If a Moroccan business does suffer a serious incident, Morocco’s cybersecurity rules set out who has to be notified and when — worth knowing before you need it, not after.
Step 8 — Scan on a schedule, not after a breach
Scanning does two jobs. A vulnerability scan tells you which of the doors above are still open — missing headers, exposed files, outdated components. A malware scan compares your files against the originals and flags anything modified or added, which is how you catch a backdoor that was planted before you started hardening.
Run our free website scanner for an outside-in view of what an attacker sees, and schedule your security plugin’s file-integrity scan weekly from inside. Read the report the same day: a scan nobody reads is a task that only feels like security.
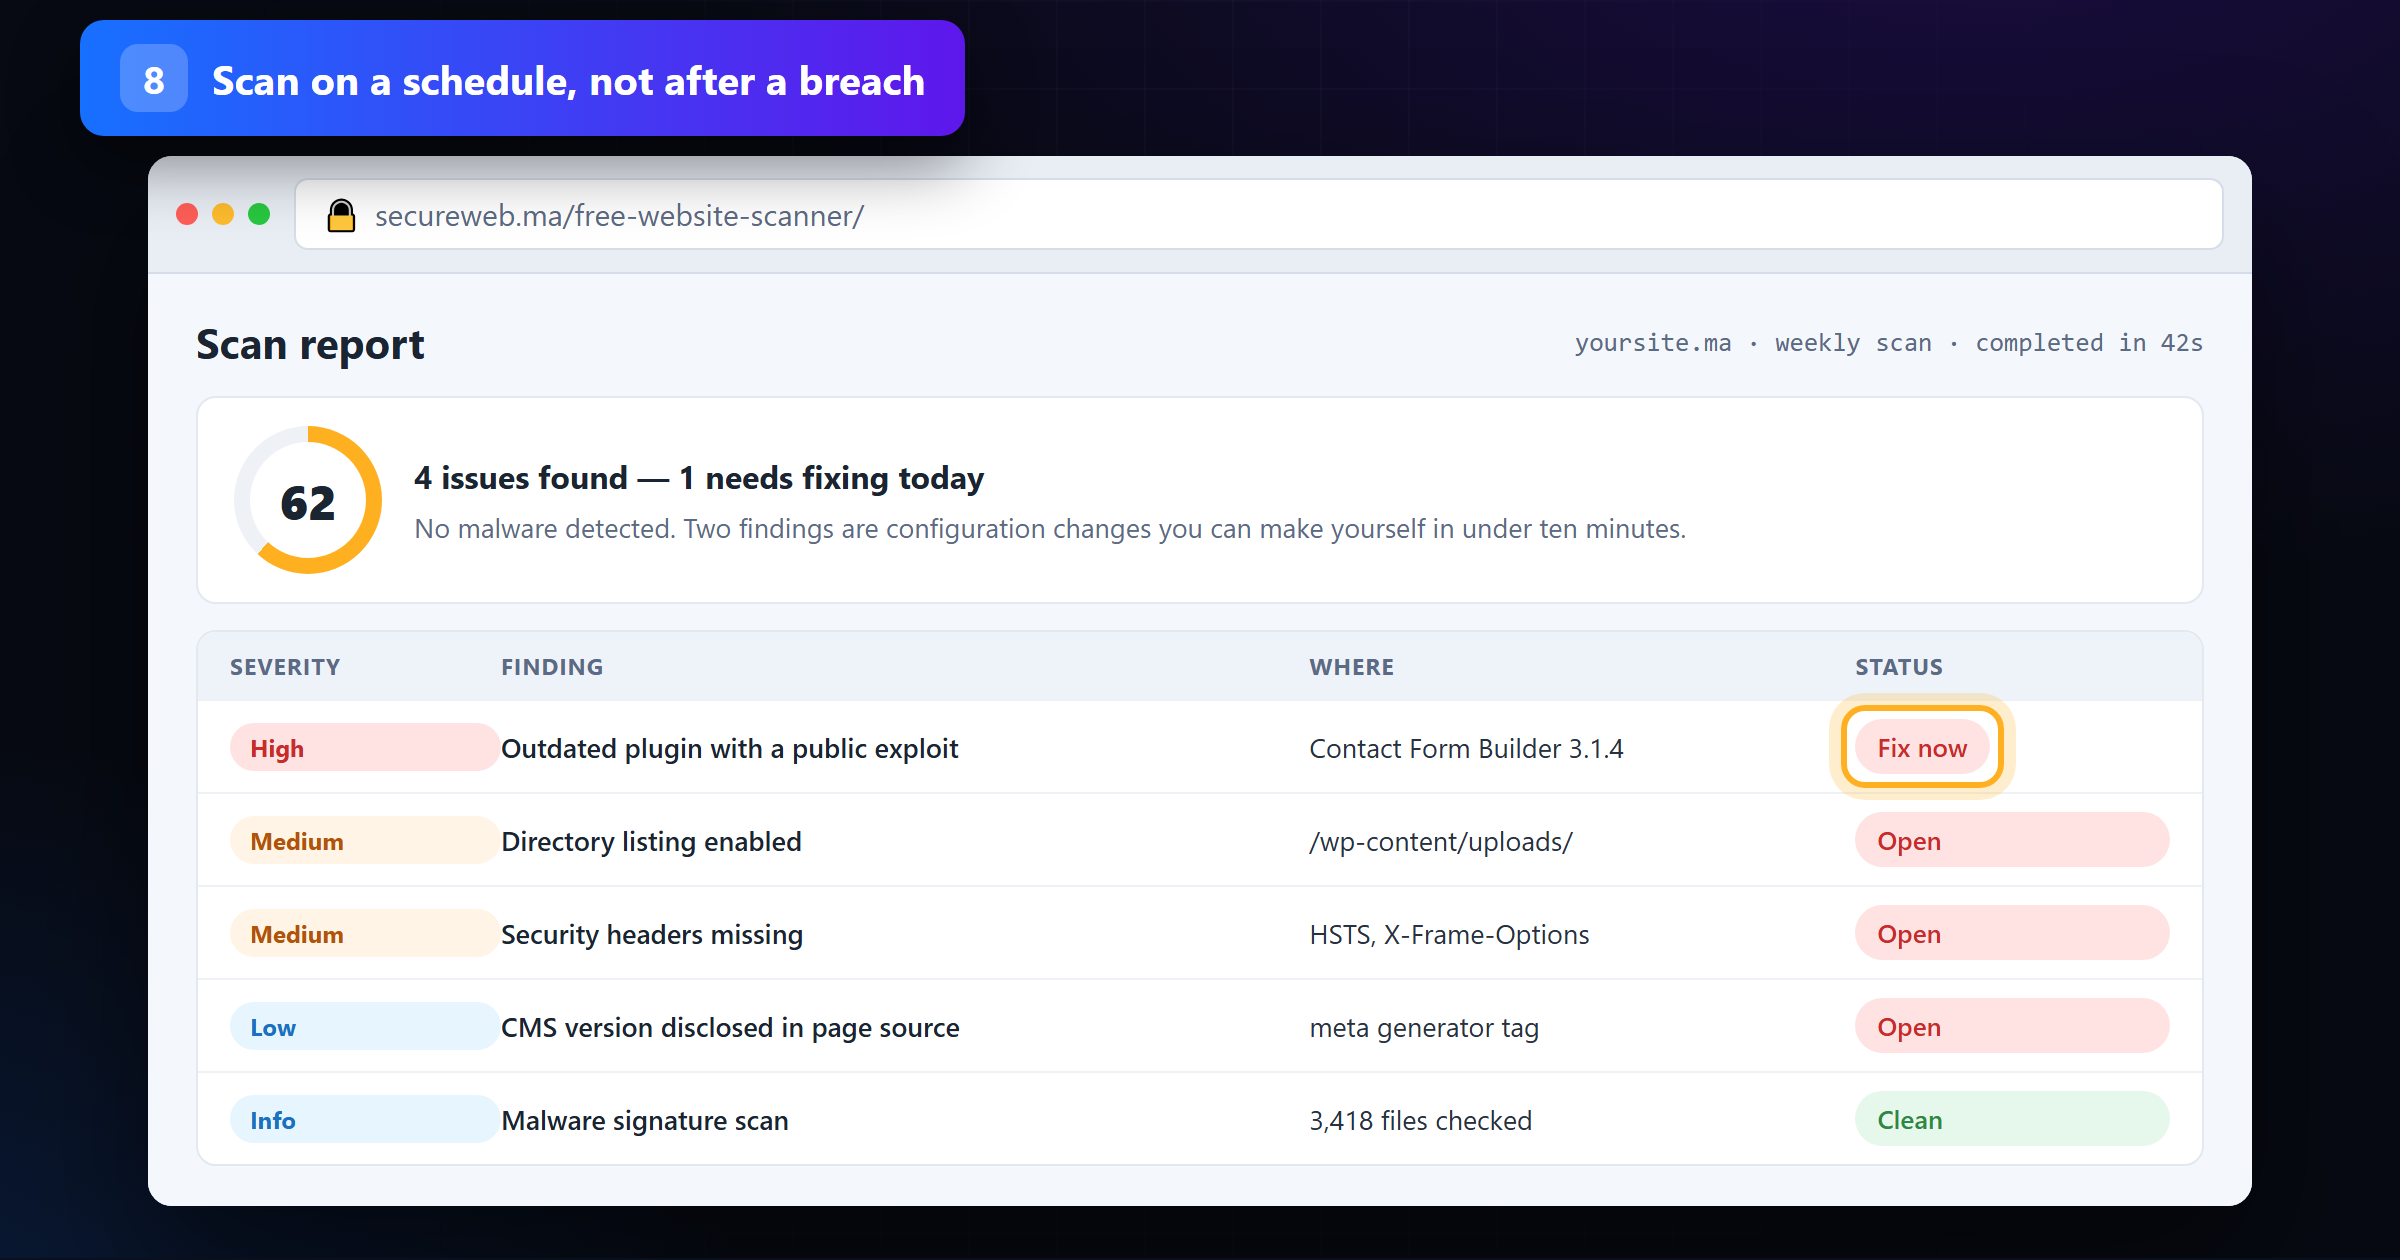
Keep the first clean result. When something looks odd in six months, the fastest way to tell whether a file is supposed to be there is to compare it against a scan you trusted.
Step 9 — Keep backups you have actually restored
Backups prevent nothing. They are the difference between a bad afternoon and a lost business, and they are the one control that still works when every other step has failed.
Three rules make a backup worth having. Store it off the server it protects — a copy in the same hosting account is encrypted along with everything else by ransomware, and deleted along with everything else if the account is suspended. Keep at least 30 days of history, because a backdoor planted three weeks ago is inside last night’s backup too. And restore one to a staging site before you need to, timing how long it takes; a backup you have never restored is a hypothesis, not a plan.
Step 10 — Prove the defences hold
Nine steps of hardening still leave you with an assumption: that it all works. Two things test that assumption. The cheap one is your team — a phishing email that convincingly imitates your host, your bank or Google will hand over an admin password no firewall can protect, so make sure everyone who can log in knows how to spot a phishing email, uses one account per person, and never signs in to the admin panel over public Wi-Fi without a VPN.
The thorough one is a penetration test: an authorised, simulated attack by security specialists who chain together the flaws automated scanners cannot see — business logic that lets one customer read another’s order, a forgotten staging site that shares the production database, an API that trusts a parameter it should verify. The output is not a list of complaints but a ranked, specific set of fixes. For a site that takes payments or holds customer records, it is the difference between hoping you are secure and knowing.
Test your work — a five-minute check
Do not assume a setting took effect because you saved it. Run through this list before you close the laptop:
- Type your address with
http://. It should redirect tohttps://and show a padlock — on the home page and on a deep page. - Enter a wrong password five times from a private browser window. You should be locked out, not offered a sixth try.
- Log out and back in. You should be asked for your password and a code from your authenticator app.
- Request
yoursite.ma/wp-config.phpandyoursite.ma/wp-content/uploads/in a browser. Both should be denied, not displayed. - Open Users. Every account should belong to somebody you can name today.
- Open your backup storage and confirm last night’s file is there and is not suspiciously small.
Diary it for once a month, alongside the fuller website security audit checklist.
Frequently asked questions
How long does it take to block hackers from a small business site?
Steps 1 to 5 are an afternoon’s work and remove the large majority of automated attacks. Steps 6 to 10 are habits rather than tasks: a weekly scan report to read, a monthly five-minute check, alerts that reach a real inbox, and updates that now install themselves.
Do I have to pay for a firewall or a security plugin?
No. The free tiers of the major cloud firewalls and the free versions of the main security plugins cover every step in this guide. Paid plans mainly add faster malware signature updates, priority support and a cleanup service if you are compromised — worth it for a site that takes payments, optional otherwise.
My site is not WordPress. Do these steps still apply?
Yes — only the menu names change. A firewall, patching, strong credentials with 2FA, locked-down files, rate limiting, alerting, scanning and tested backups apply equally to PrestaShop, Joomla, Drupal, Shopify and custom applications. On a hosted platform like Shopify the vendor handles patching and server hardening for you, which takes steps 2 and 5 off your plate and makes steps 3 and 10 matter more.
How do I know whether hackers have already got in?
The usual signs are administrator accounts you did not create, pages or redirects appearing in Google that you never published, files modified at odd hours, a sudden spike in outbound email, or your host suspending the account. Run a malware scan, check Users, and if anything is confirmed, clean before hardening — see restoring a hacked website.
How to block hackers: the bottom line
Attackers are opportunists working at scale. They are not trying to break into your site; they are trying to break into ten thousand sites at once and keep whichever ones open easily. Every step above raises what your site costs them, and there is always an easier target one row down the list.
If you only do three things this week: put a firewall in front of the site (step 1), update everything and delete what you do not use (step 2), and require two-factor authentication on every administrator account (step 3). Then set the calendar reminder for the five-minute check — security is maintained, not installed.
Want to know where you stand before you start? SecureWeb runs a free website security scan and full security audits for Moroccan businesses — a fast way to see which of these 10 steps your site is currently missing.