
WordPress runs a very large share of the web, and that popularity is exactly why it is scanned more than any other platform. The good news is that almost nothing we see in real incidents is clever. Sites get taken over through an outdated plugin, a password that appeared in someone else’s data breach, or a backup file nobody remembered leaving in the web root.
This guide walks through seven changes that close those doors. None of them need a developer, most take a few minutes, and together they move your site out of the group that automated attacks actually succeed against. If you only have an hour to secure WordPress website installations you are responsible for, this is the hour to spend.
Why WordPress Sites Actually Get Hacked
Almost nobody chooses your site. A script sweeps ranges of the internet, requests a handful of predictable paths, and works out in one second whether it is looking at WordPress and which versions are running. Then it tries what is already known to work.
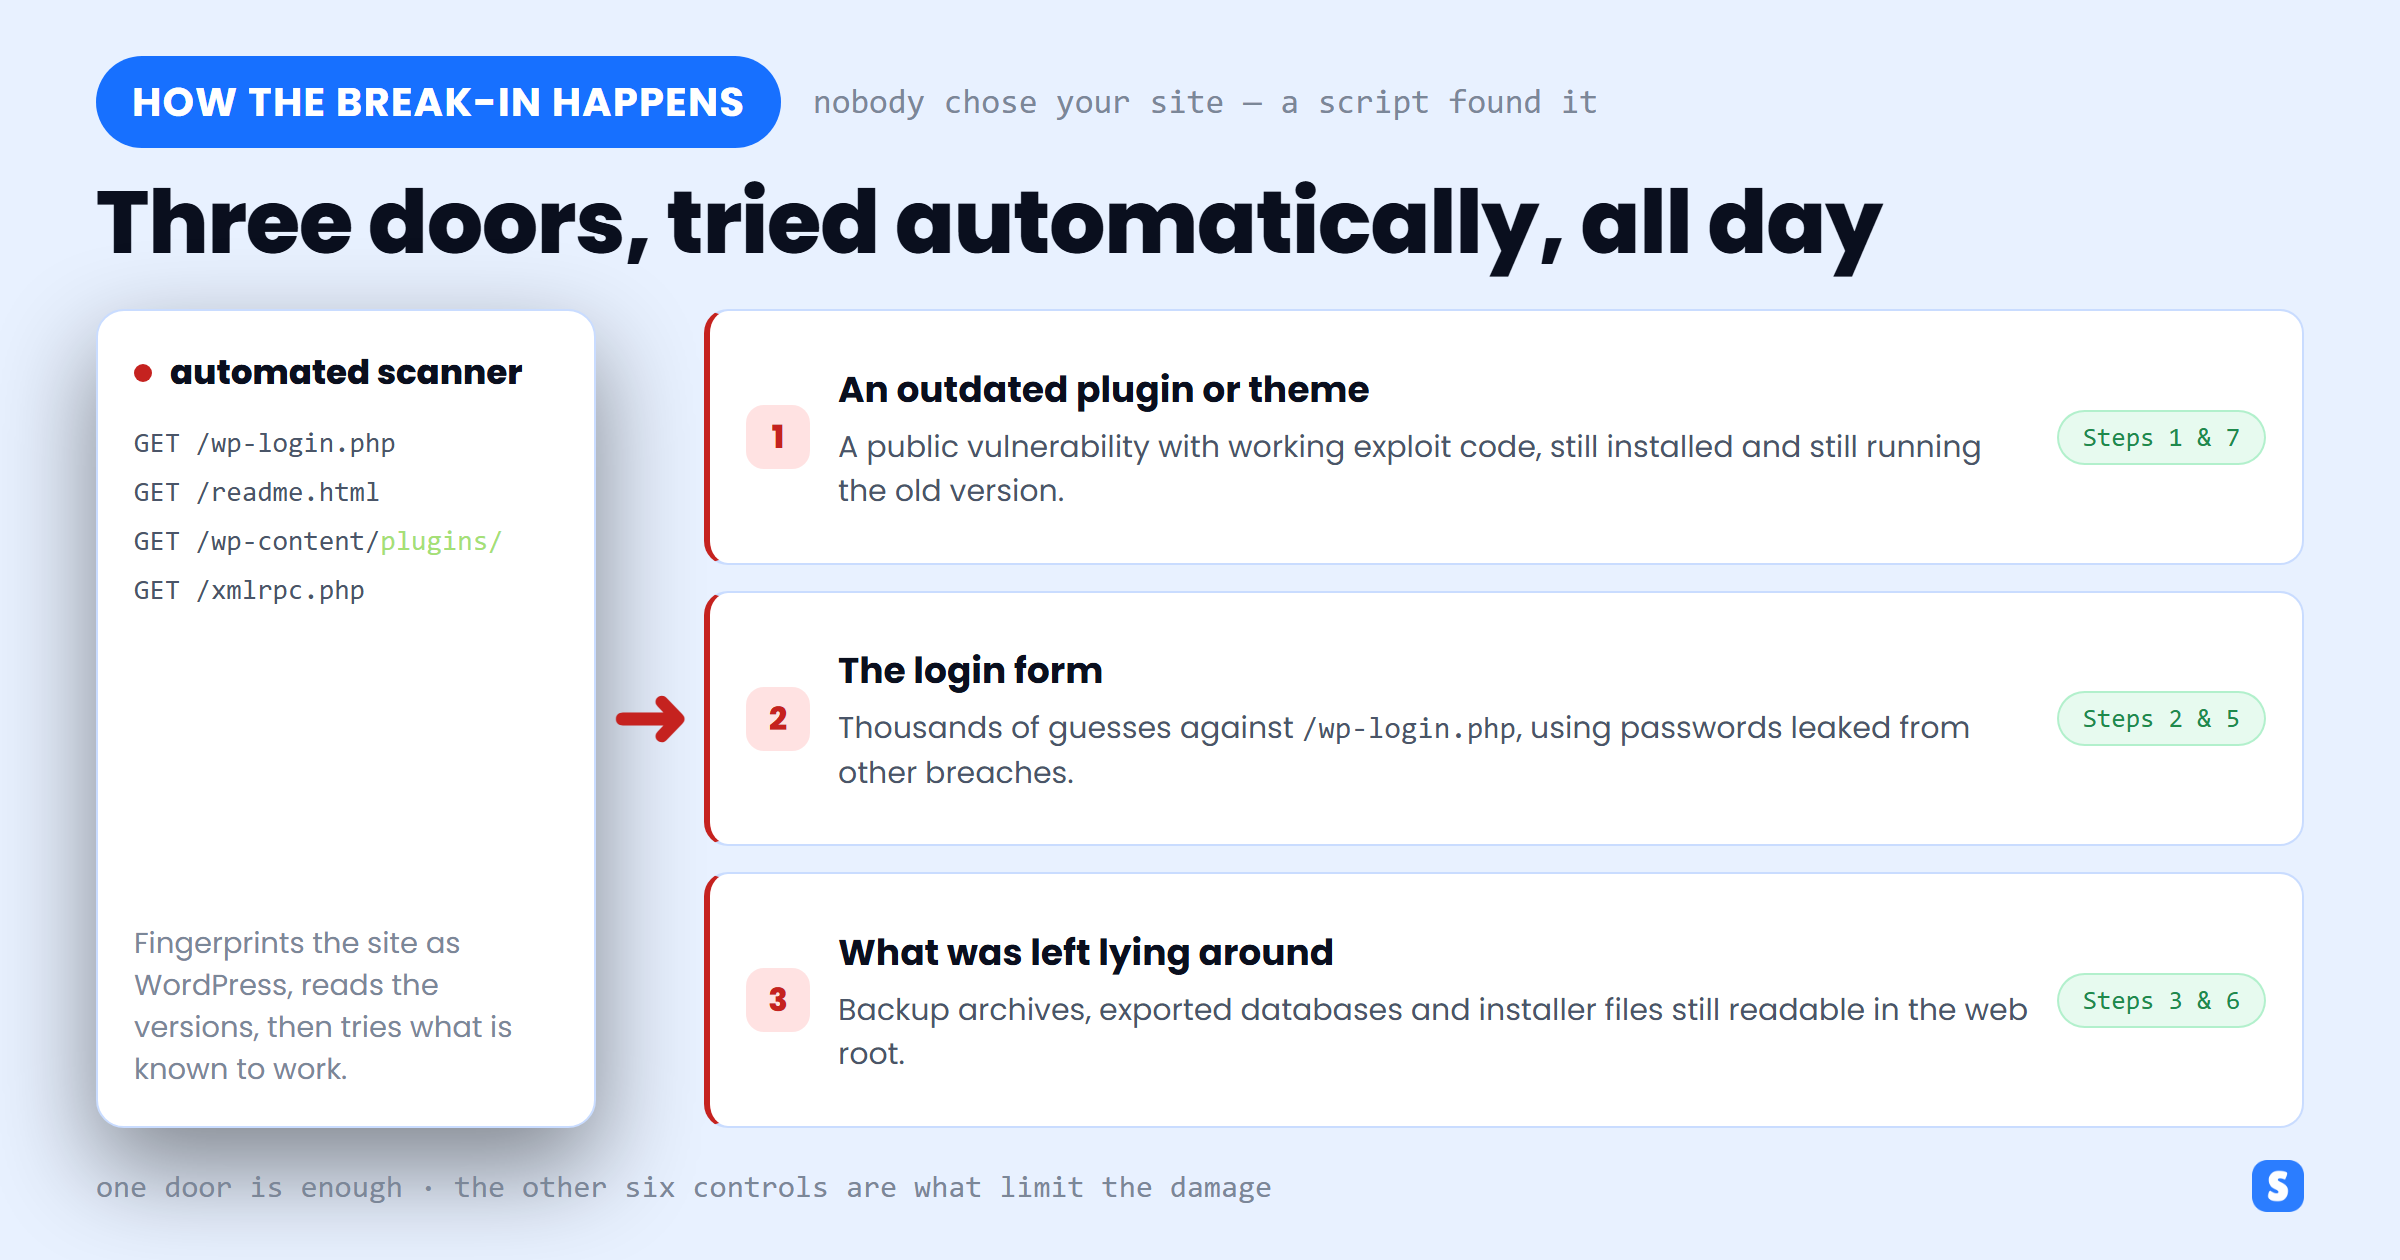
That is the whole shape of the problem. There are three doors worth worrying about — the code you installed and stopped updating, the login form, and the files you left behind — and the seven steps below are simply how you close each one. It is the same pattern we describe in our website security audit checklist, applied specifically to WordPress.
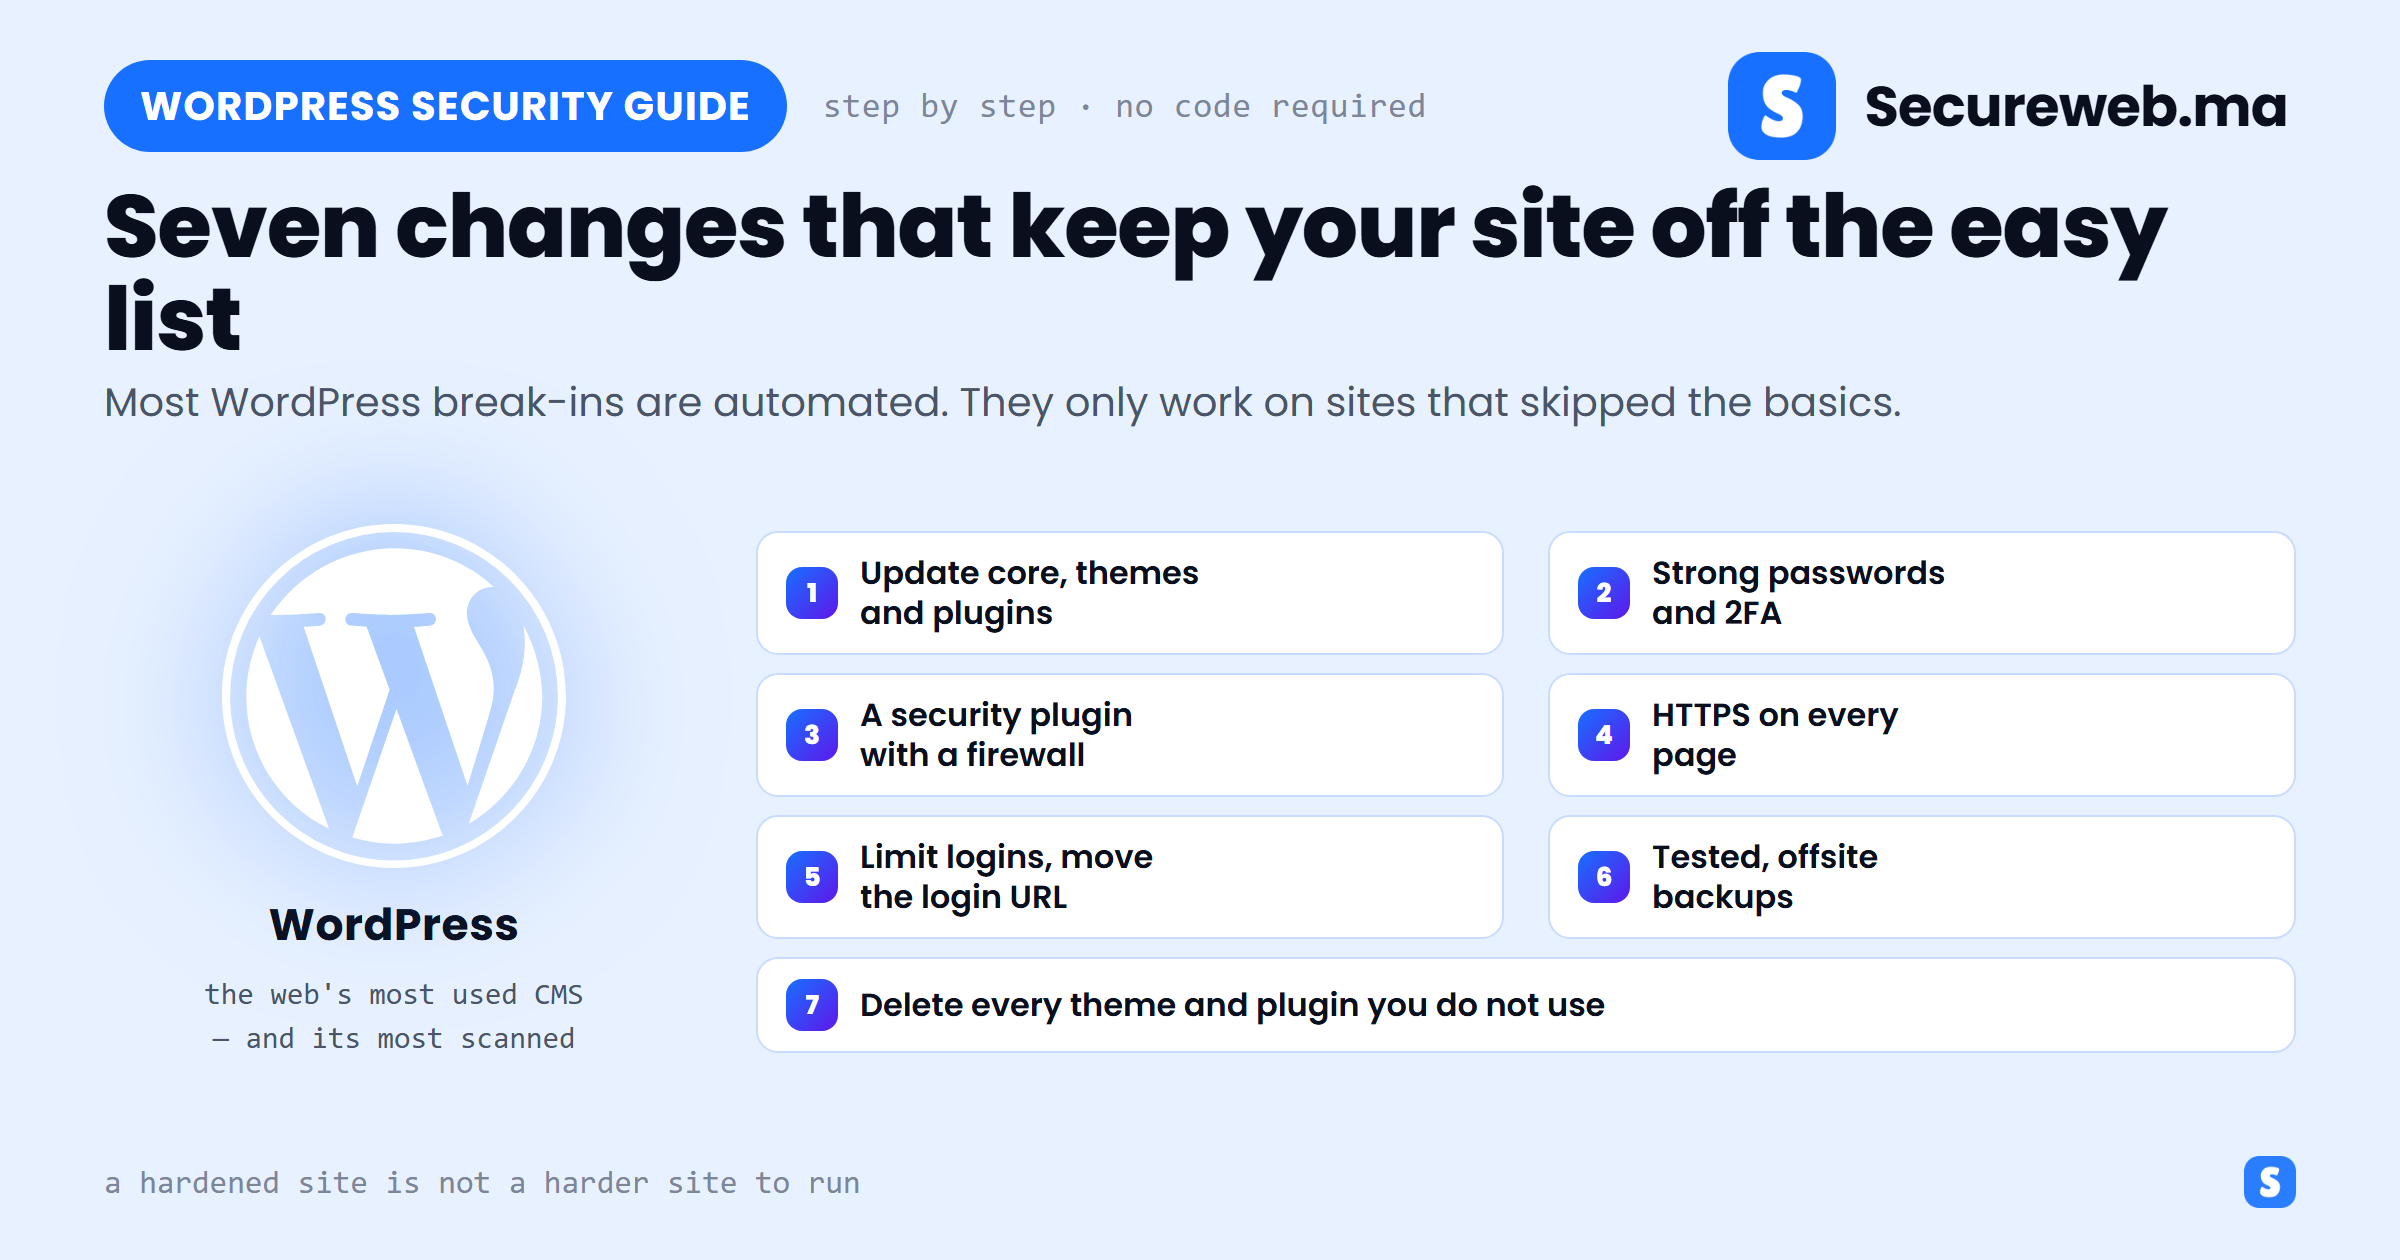
The Seven Steps to Secure WordPress Website Installations
Work through them in order. Steps 1 and 2 remove most of the risk on their own; the rest limit what an attacker can reach if something still goes wrong.
1. Keep WordPress, Themes and Plugins Updated
An unpatched plugin is the single most common way into a WordPress site. When a vulnerability is disclosed, the fix and the exploit become public at roughly the same moment — and scanners start looking for the vulnerable version within hours. The version number you are running is the vulnerability.
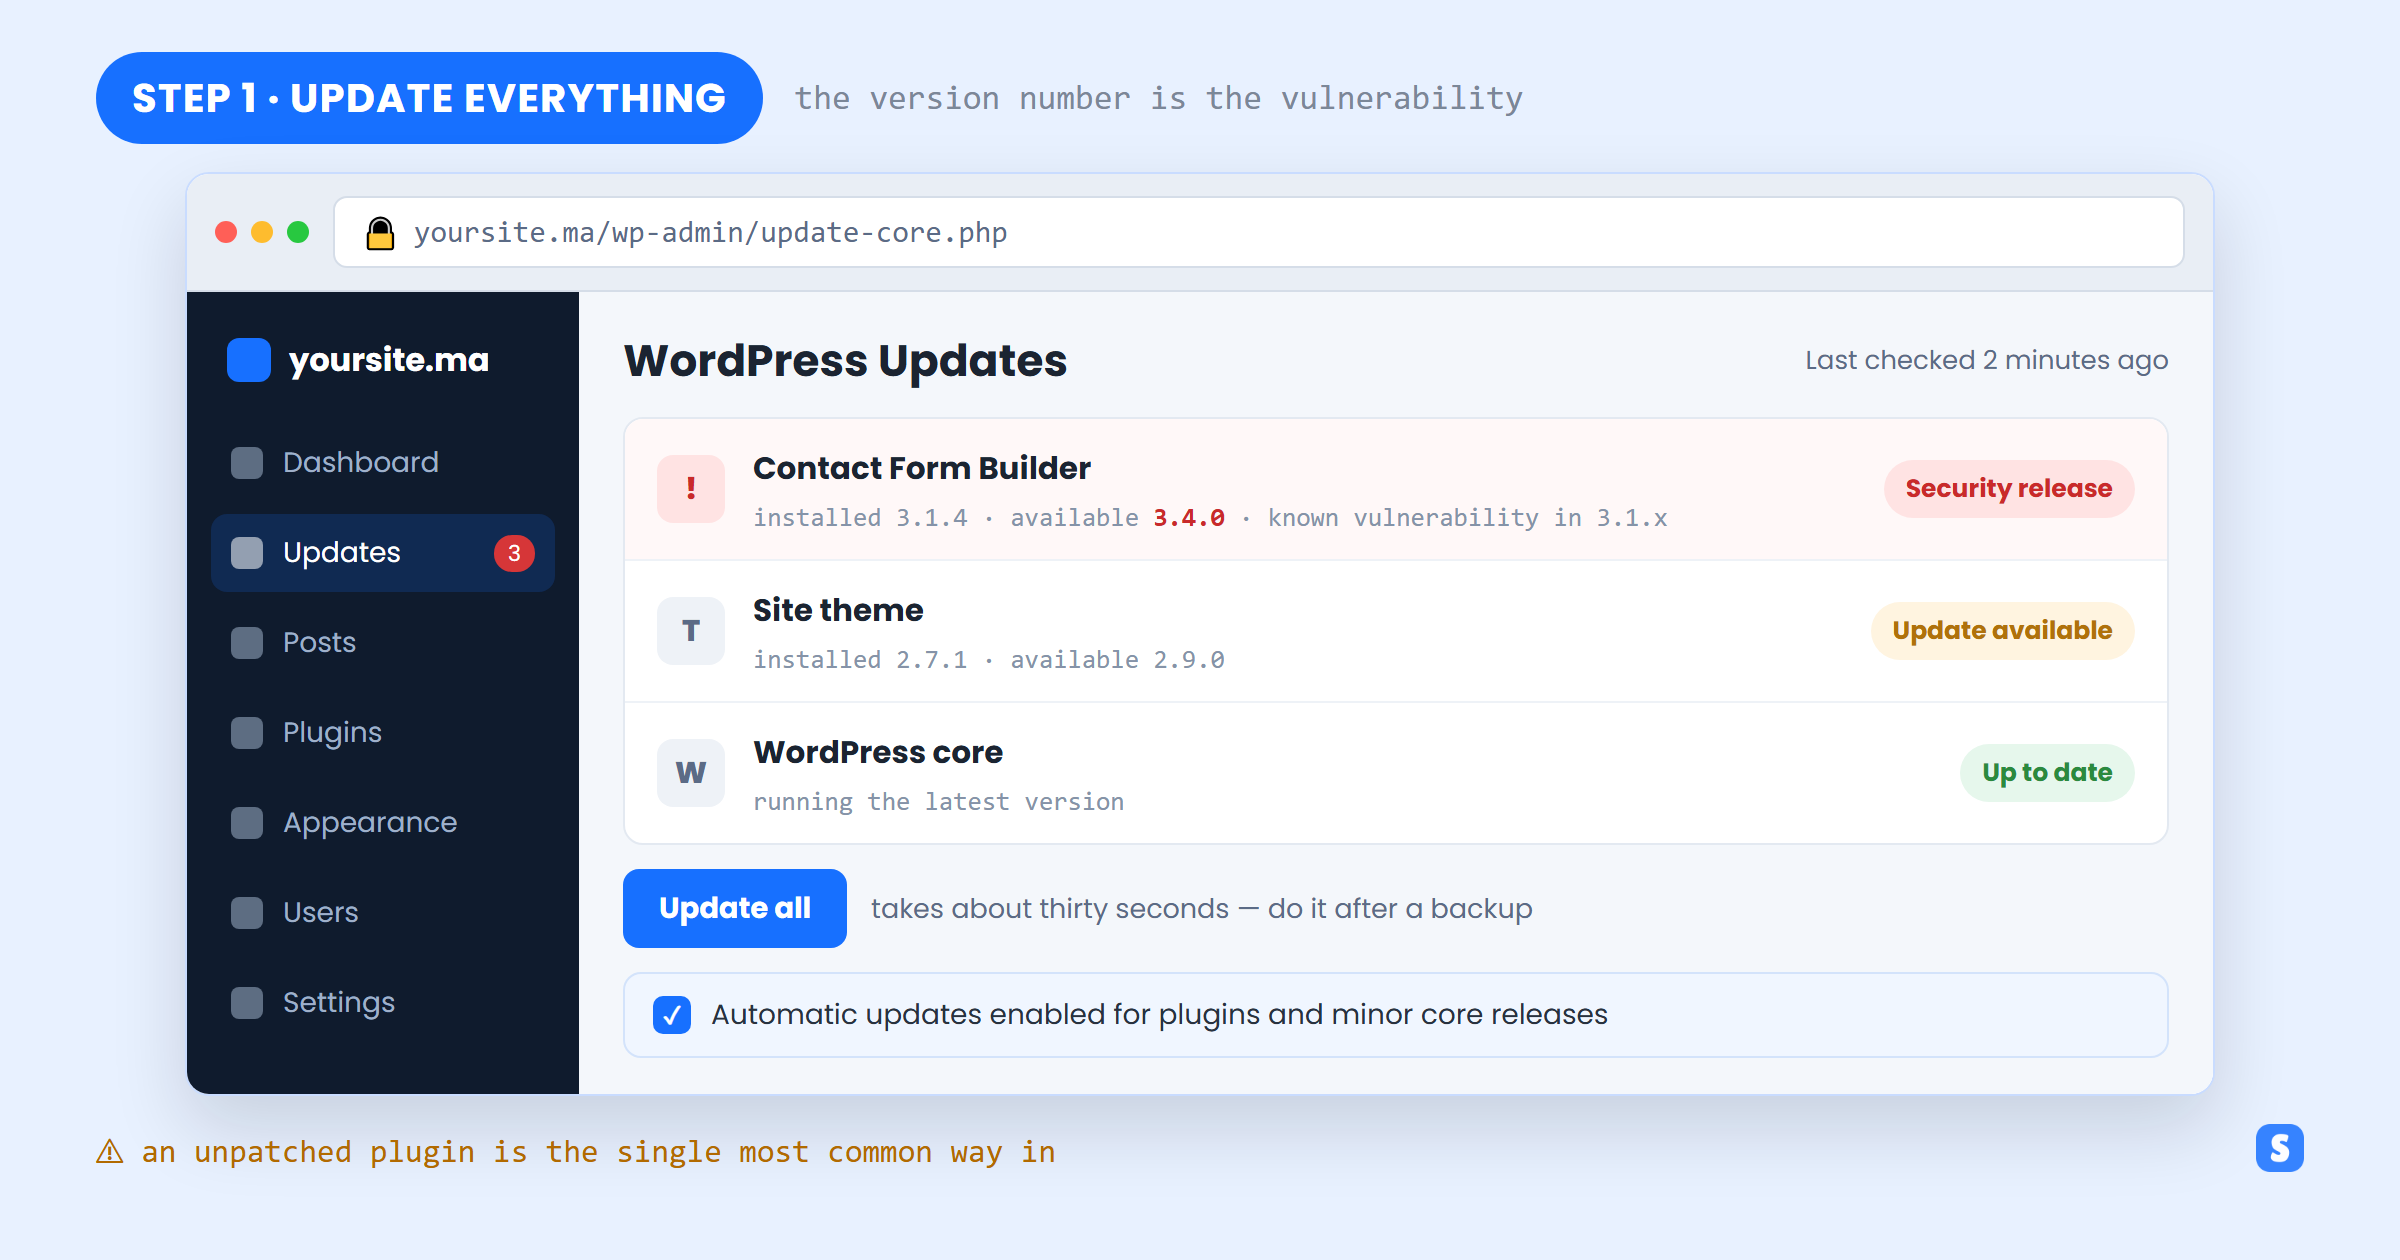
- Turn on automatic updates for plugins and minor core releases (Dashboard → Updates). For most sites this is safe and removes the window where you are exposed but busy.
- Apply security releases the same day. Feature updates can wait for a quiet moment; a security release cannot.
- Take a snapshot first if the site is business-critical, so a bad update is a five-minute rollback rather than an evening.
- Check the plugin is still maintained. If the last update was years ago, the real fix is Step 7 — remove it.
2. Use Strong Passwords and Two-Factor Authentication
Assume the password is already known. Credential-stuffing attacks do not guess randomly — they replay real username and password pairs leaked from other services. If an administrator reused a password anywhere, the login form is not much of an obstacle.
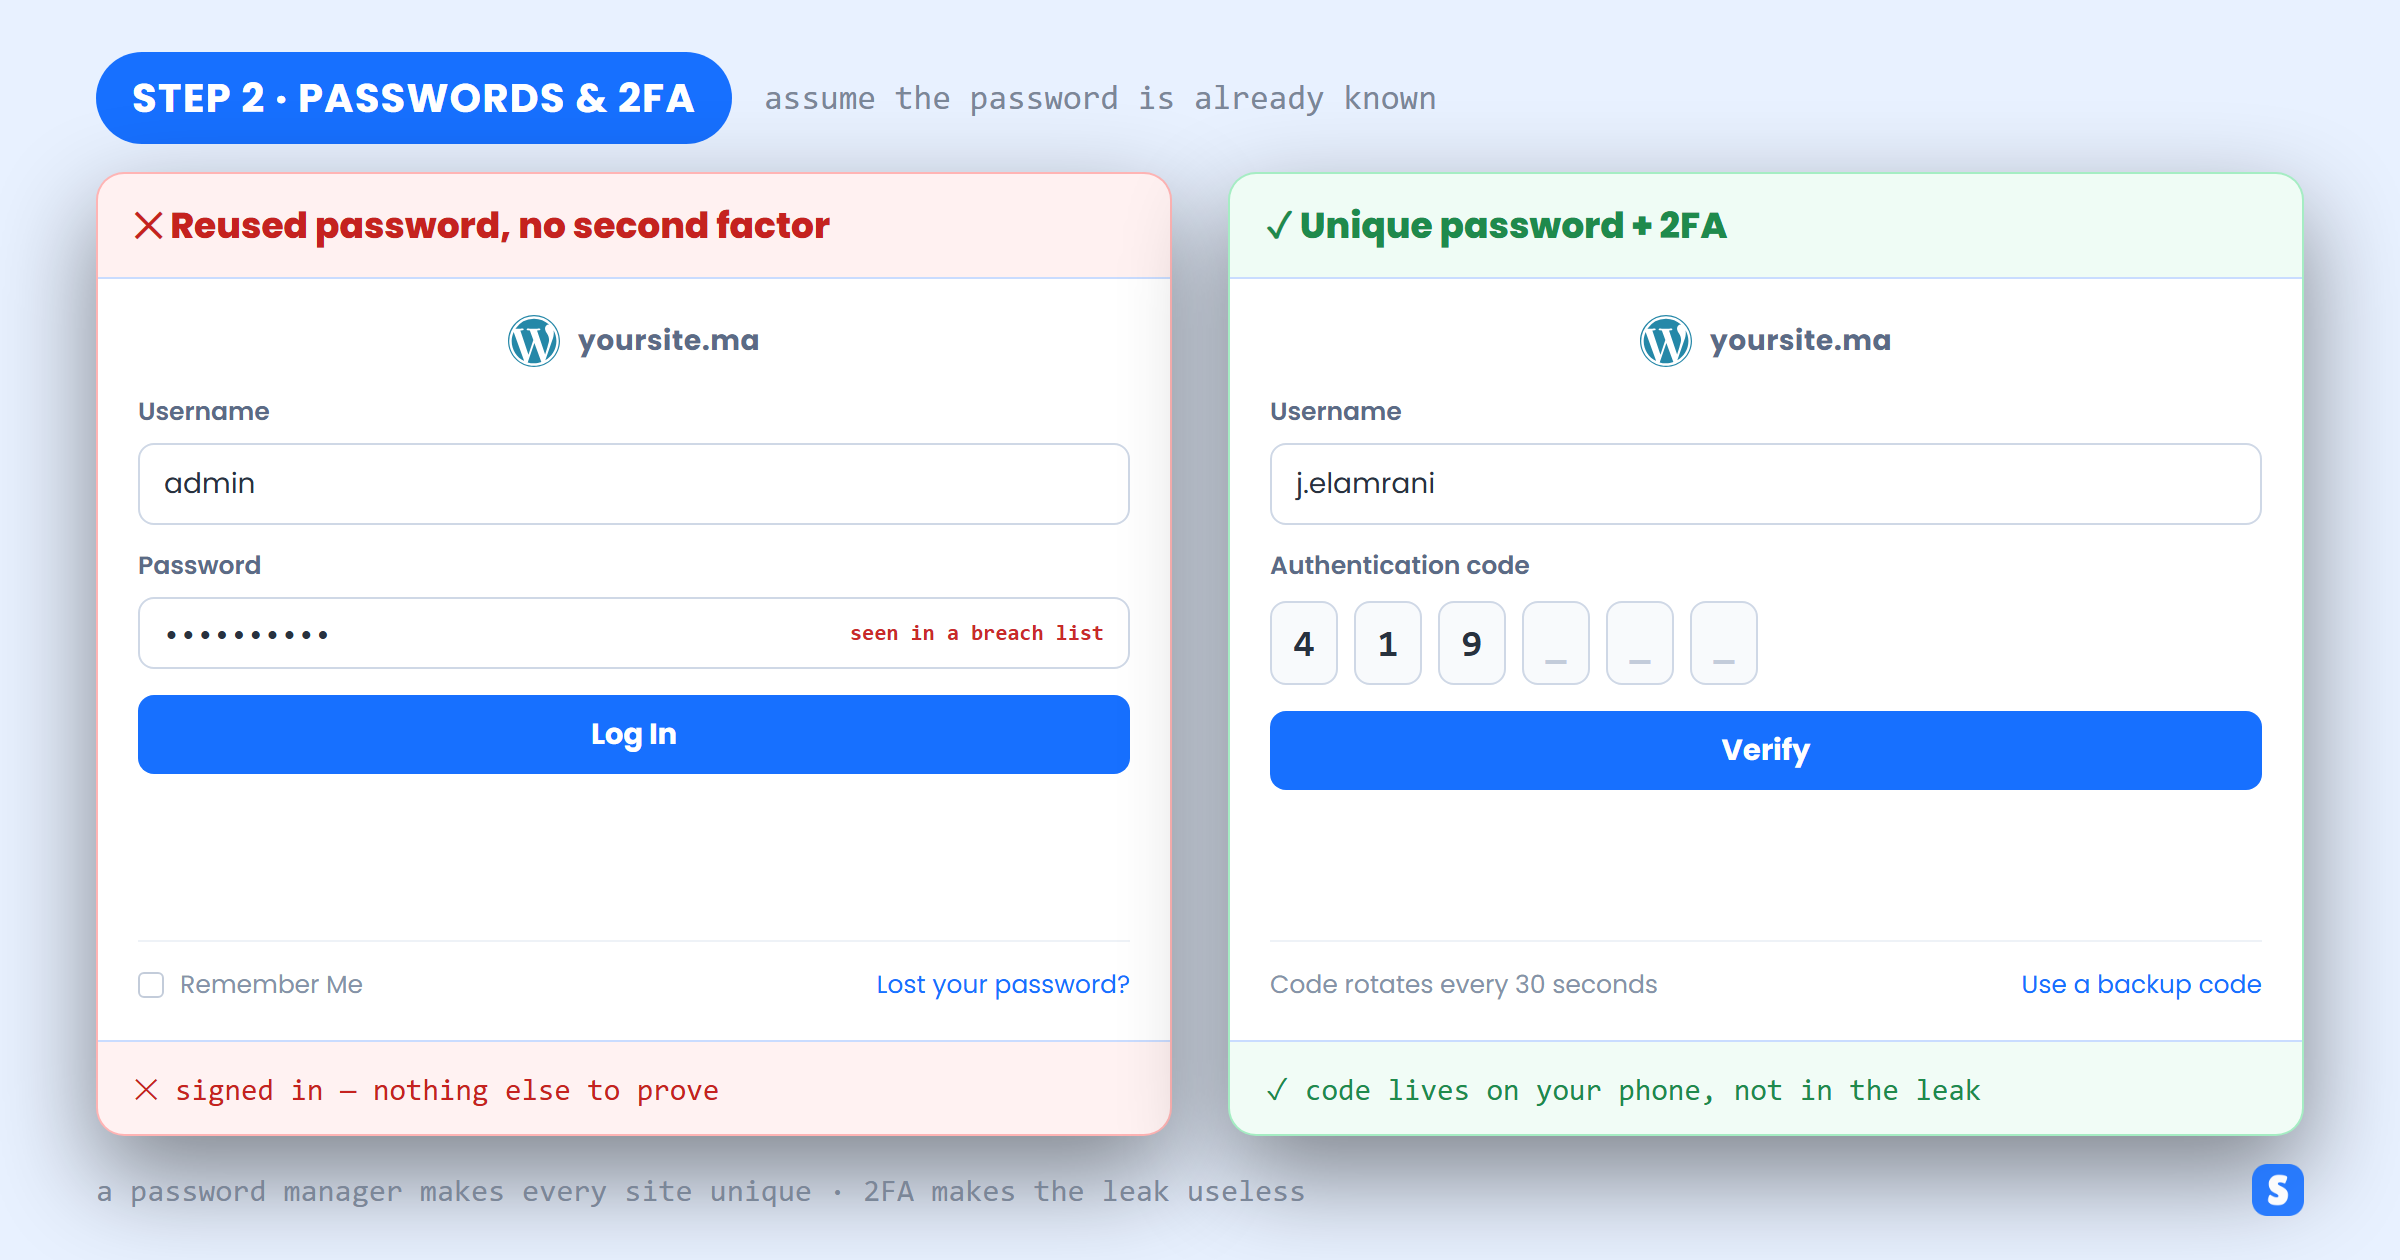
- One unique password per account, generated and stored in a password manager. Length matters more than symbols — see how to create a strong password.
- Two-factor authentication on every administrator. This is the control that still holds when the password has leaked — our walkthrough on setting up WordPress two-factor authentication covers the options.
- Stop using the username
admin. Create a new administrator, then delete the old account and reassign its content. - Give people the role they need. Editors and authors do not need administrator rights, and every extra admin is another account worth stealing.
3. Install a Security Plugin with a Firewall
A security plugin does two jobs that are hard to do yourself: it blocks malicious requests before WordPress processes them, and it tells you when files on your server change unexpectedly. Wordfence, Solid Security and Sucuri are the usual choices — pick one, and only one, because two firewalls fighting each other cause more problems than they solve.
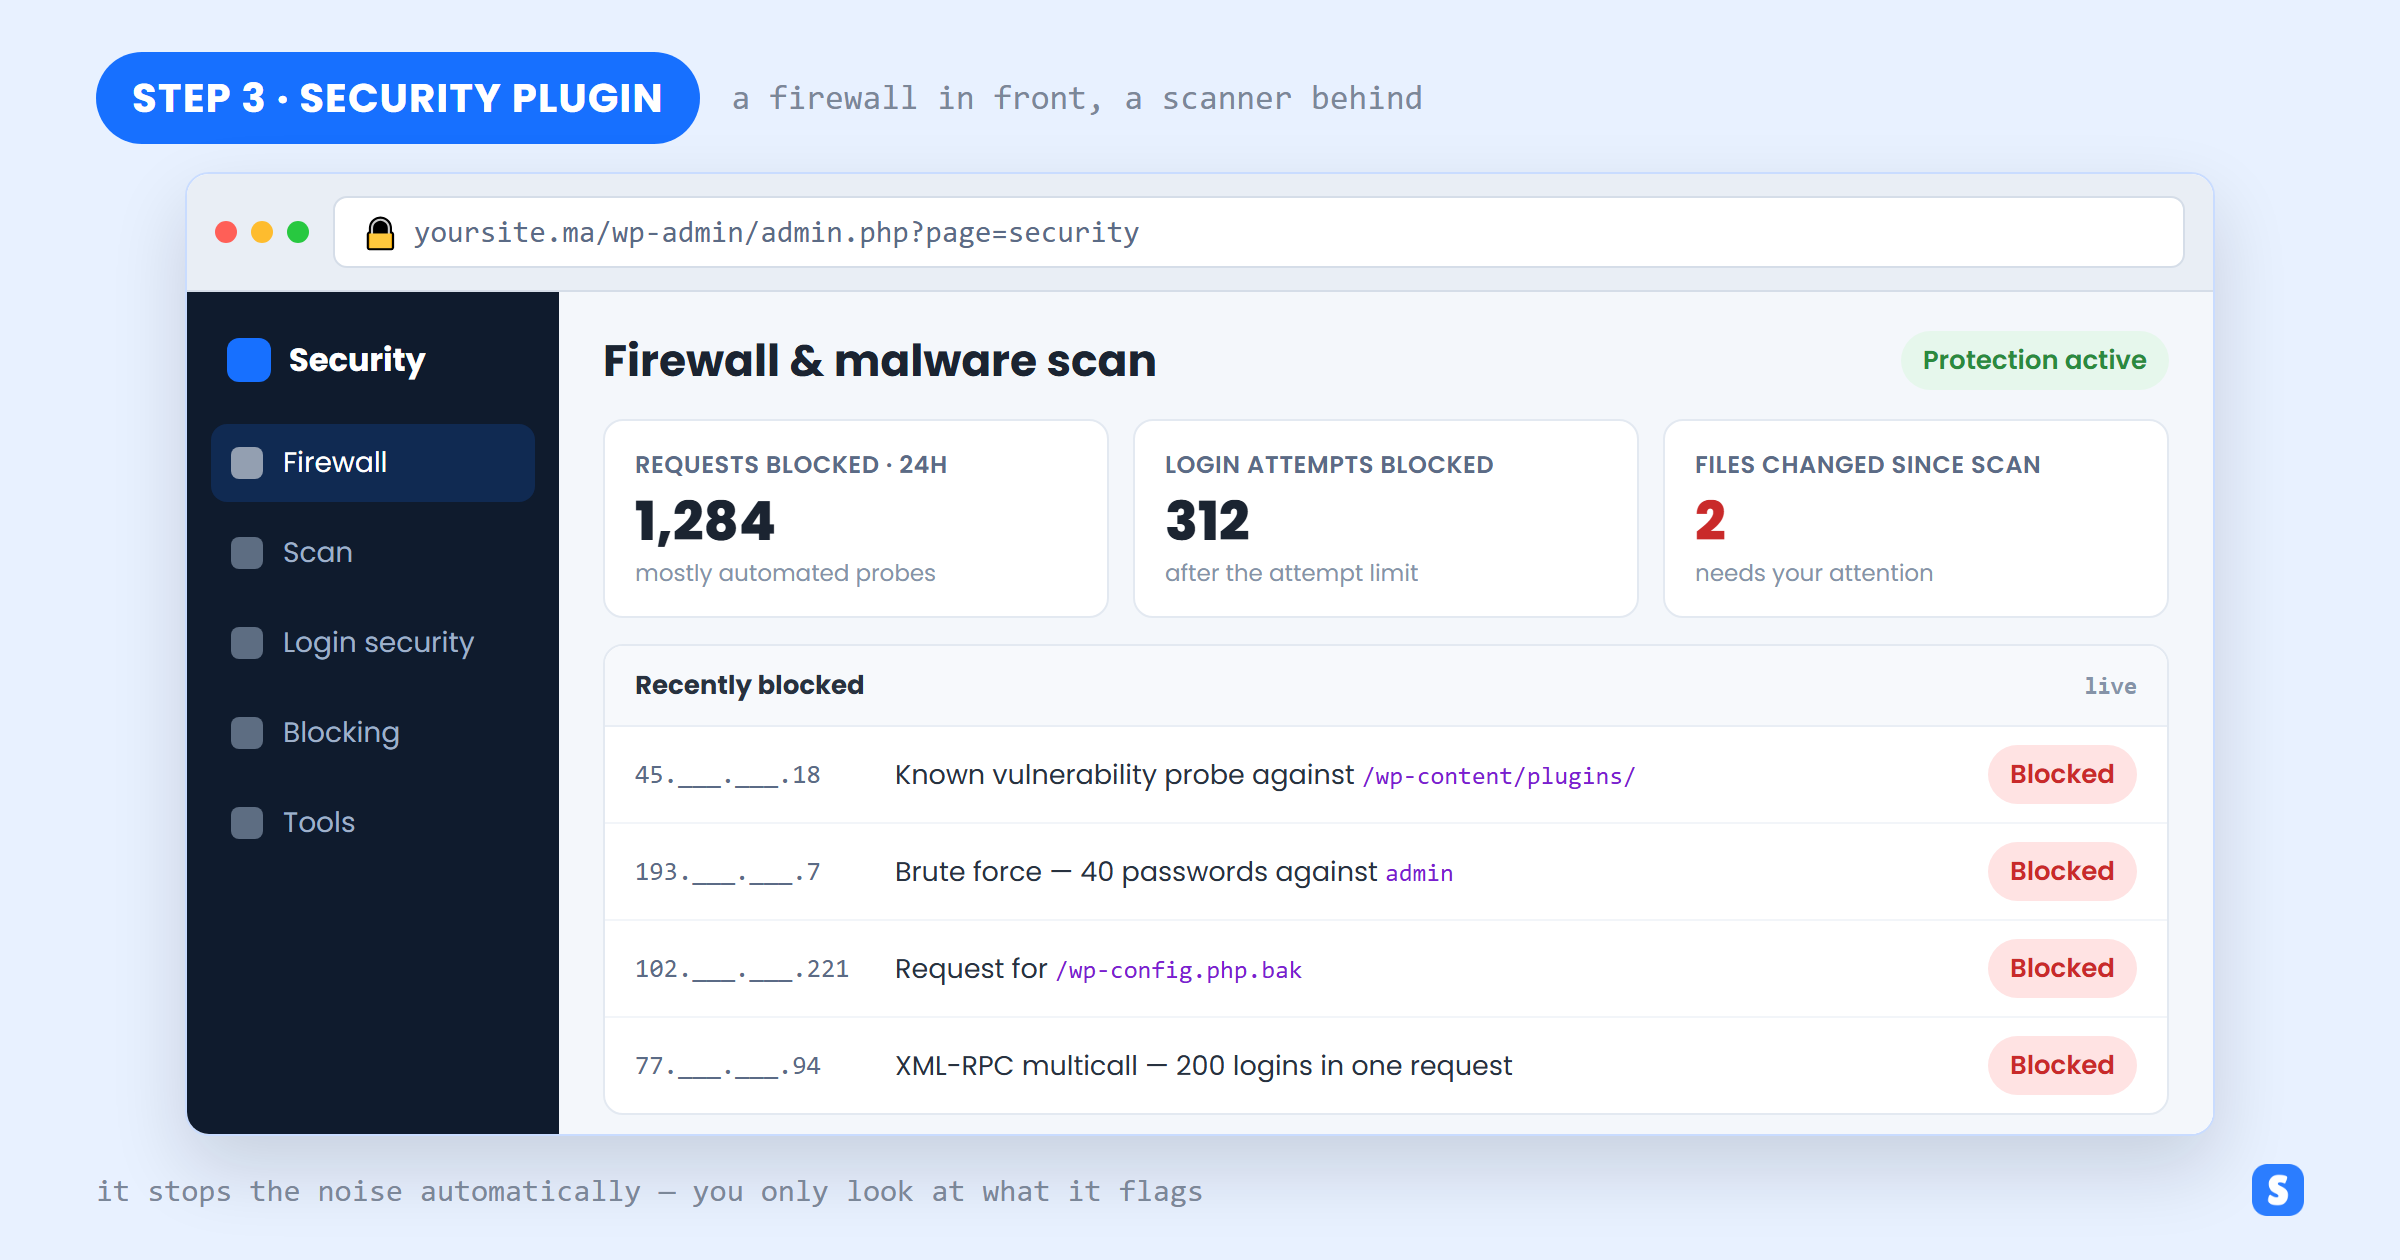
- Firewall — filters known attack patterns and probes for vulnerable plugins, so most of the noise never reaches your site.
- Malware and file-change scanning — compares your core and plugin files against the official versions and flags anything modified or added. This is usually how a quiet compromise gets noticed.
- Login protection — attempt limits, lockouts and 2FA, which covers Steps 2 and 5 from the same settings screen.
- Email alerts — turn them on for administrator logins and file changes, then actually read them.
4. Serve Every Page Over HTTPS
Without HTTPS, everything between the visitor and your server travels in plain text — including the username and password posted to wp-login.php. Anyone sharing that network can read it. Browsers also mark plain http pages “Not secure”, which costs you trust and search visibility.
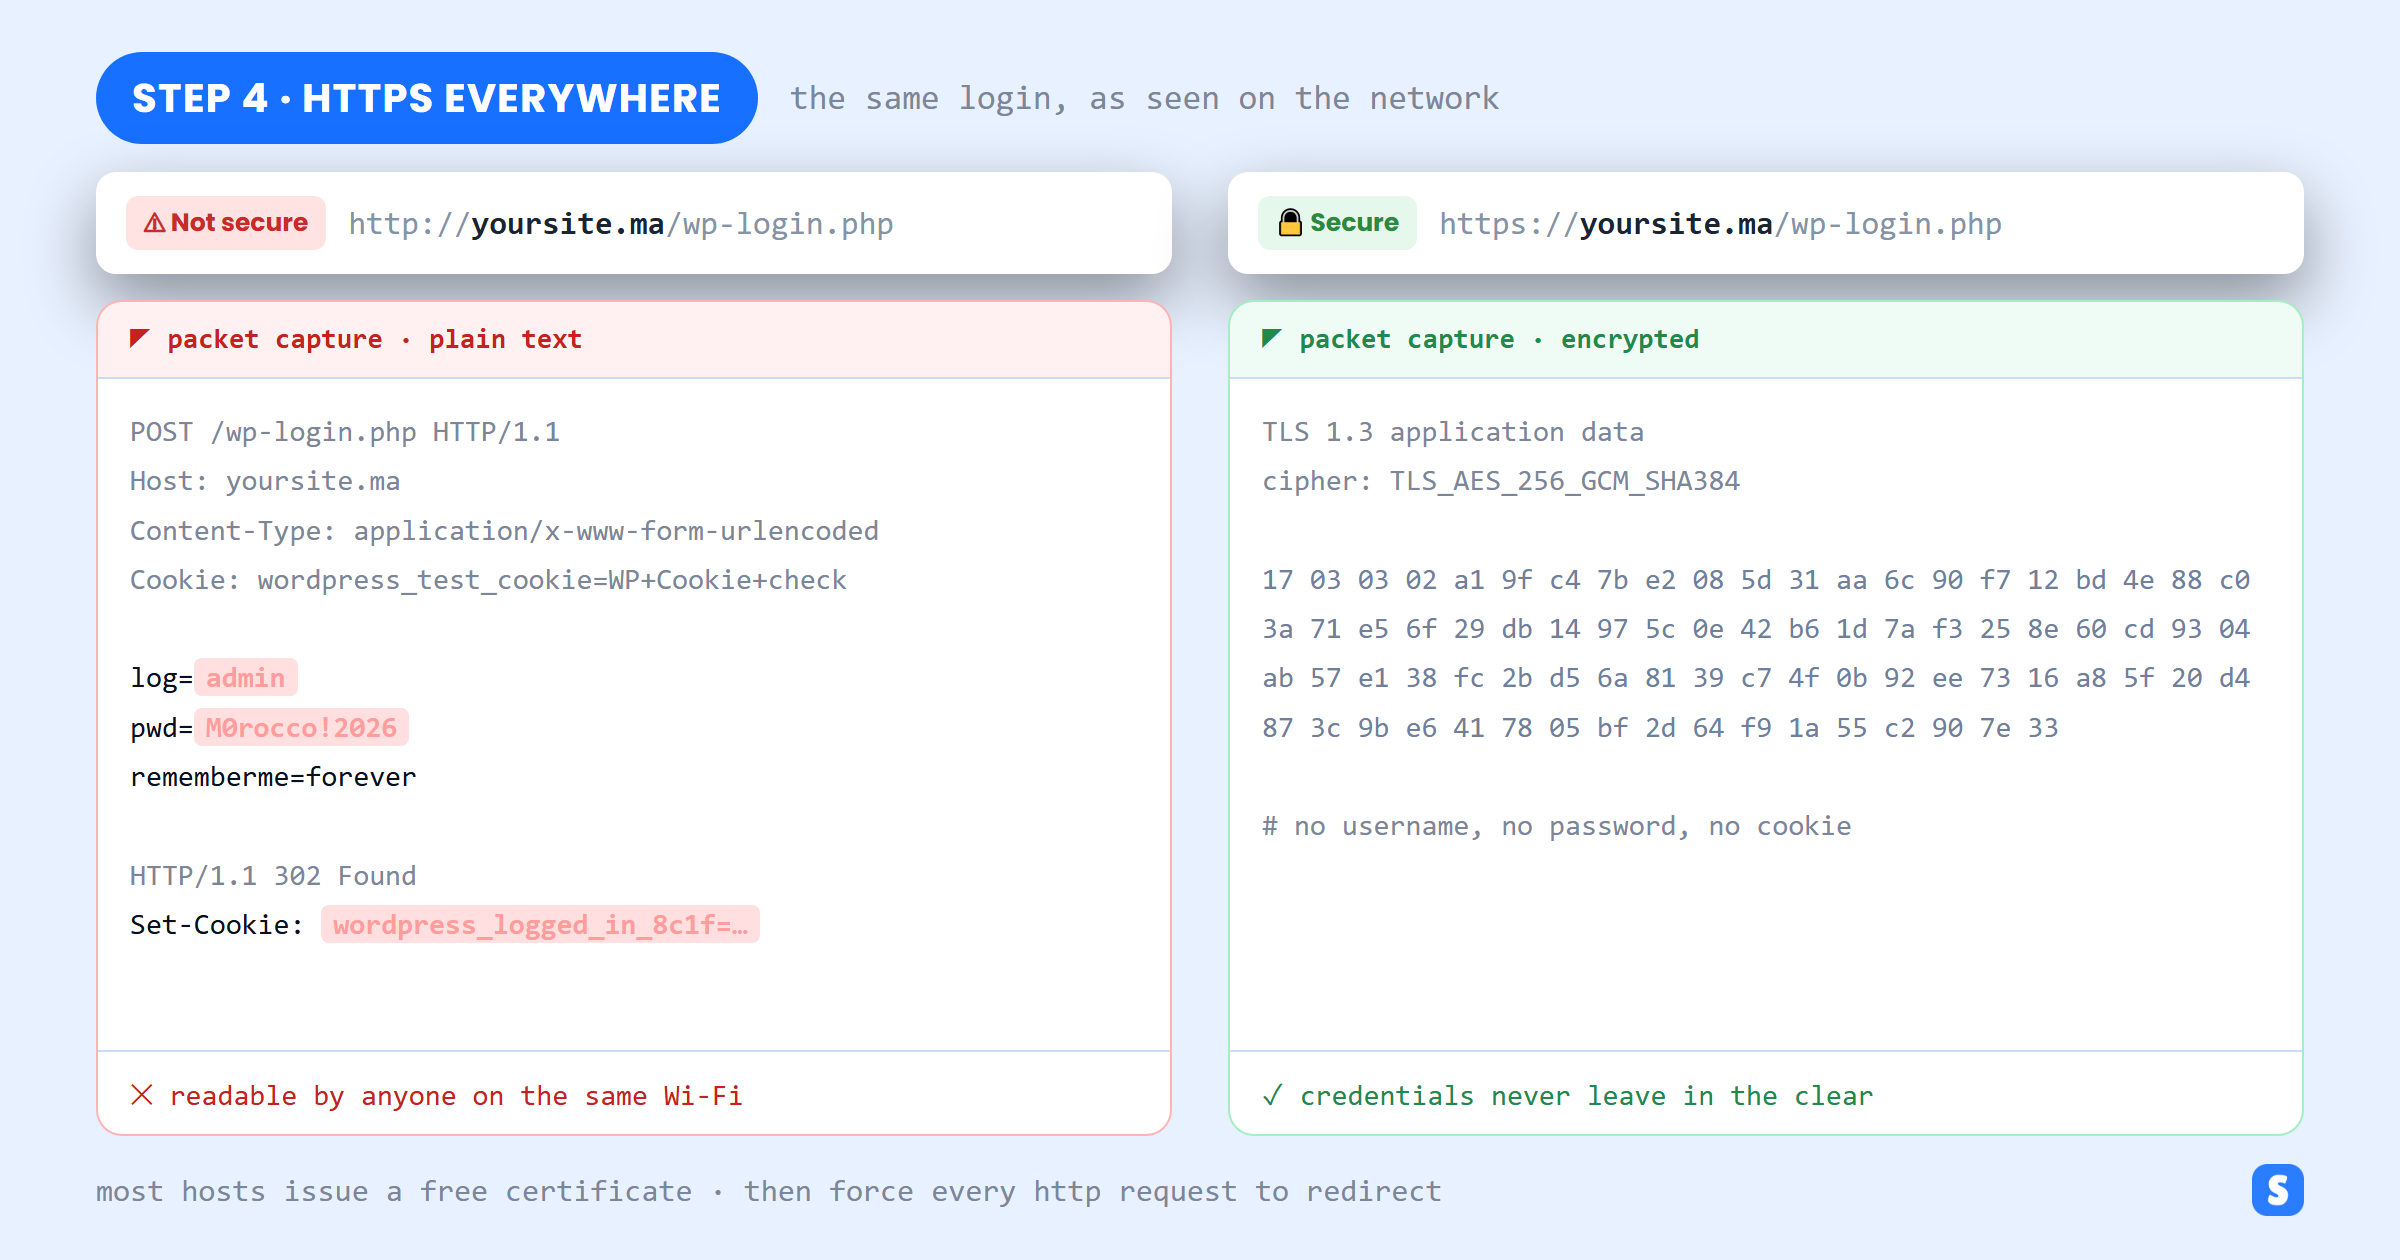
- Get a certificate. Nearly every host issues free Let’s Encrypt certificates from the control panel — see our walkthrough on how to install an SSL certificate.
- Force the redirect. Having a certificate is not enough if http still answers. Every http request should redirect to https.
- Fix mixed content. Update the WordPress Address and Site Address to https, and correct any images or scripts still loading over http.
- Renewals should be automatic. An expired certificate breaks the site as visibly as an outage.
5. Limit Login Attempts and Move the Login URL
Brute force only works at volume. A bot that can try thousands of passwords an hour will eventually find a weak one; a bot that gets five tries and then a sixty-minute lockout will not. Limiting attempts is the single highest-value setting on the login form.
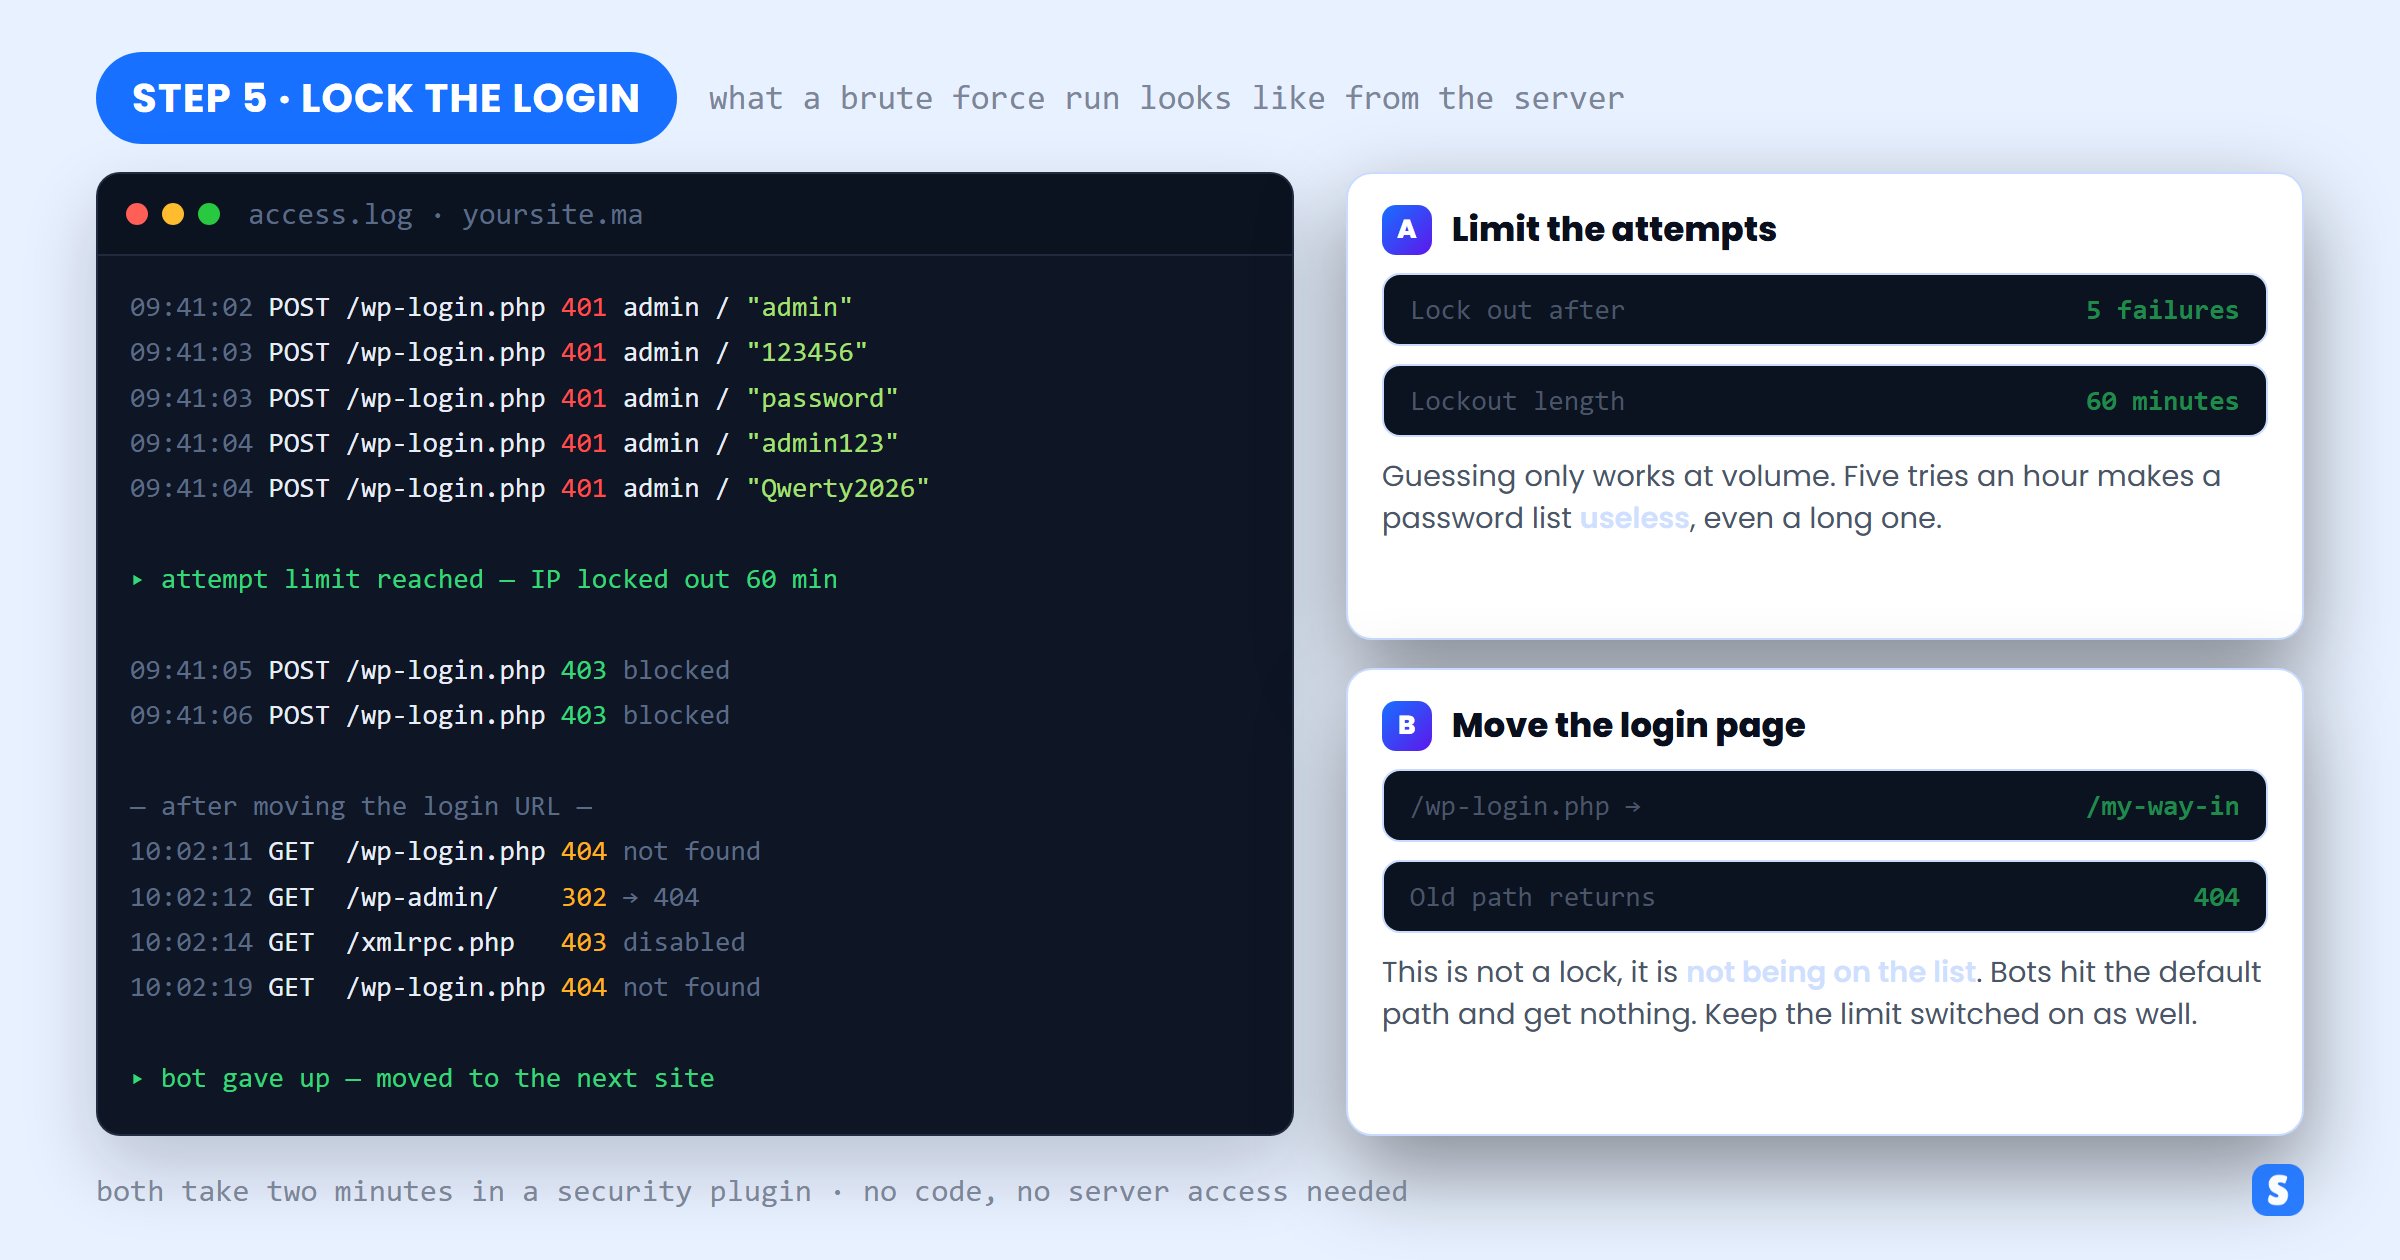
- Lock out after about five failed attempts, for at least an hour. Every security plugin offers this.
- Move the login page off
/wp-login.phpto something only your team knows. This is not a lock — it is not being on the list the bots work through. - Disable XML-RPC if nothing uses it. A single XML-RPC request can carry hundreds of login attempts, which sidesteps naive attempt counters.
- Keep both switched on. A moved login URL without an attempt limit just means the eventual visitor gets unlimited tries.
Treat a sudden spike in lockout emails as information, not spam. It usually means your site has been added to somebody’s target list.
6. Back Up Your Website — and Test the Restore
Backups do not prevent a break-in. They decide whether it costs you an afternoon or a fortnight. The catch is that most people discover their backup does not work on the day they need it, which is the worst possible moment to find out.
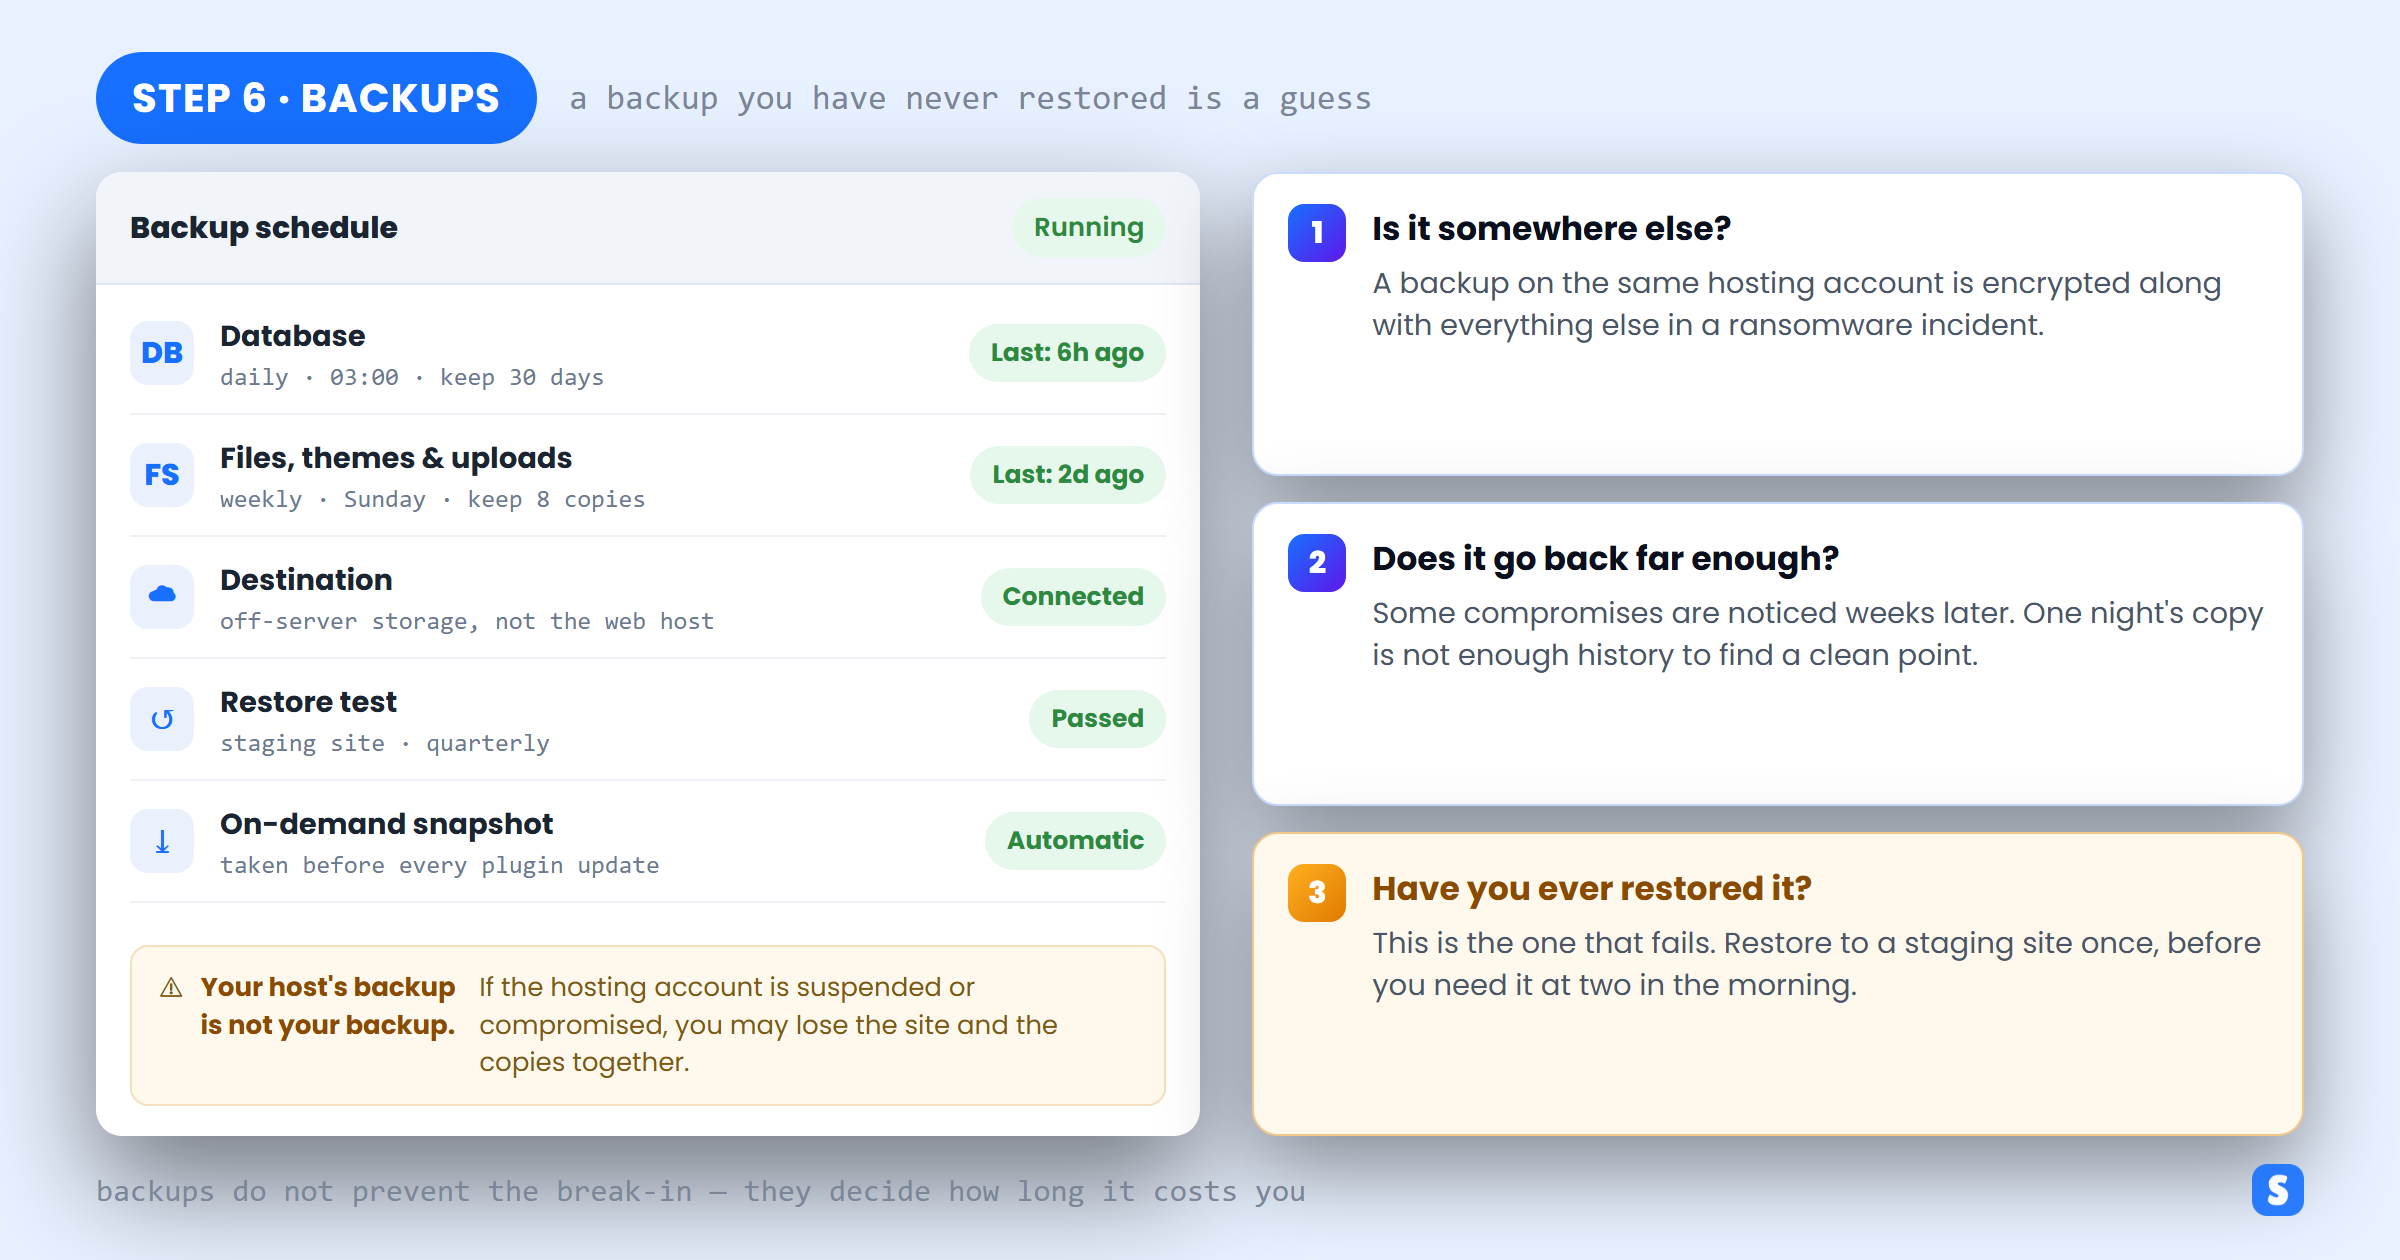
- Automate it. Database daily, files weekly, using a plugin such as UpdraftPlus or your host’s scheduled backups.
- Store copies somewhere else. A backup sitting on the same hosting account is encrypted along with the site in a ransomware incident, or lost with it if the account is suspended.
- Keep enough history. Compromises are often noticed weeks later, and you need a restore point from before it happened — a single overnight copy will not have one.
- Test a restore. Restore to a staging site once, deliberately, while nothing is wrong. This is the step everyone skips and the only one that proves the rest worked.
7. Delete Unused Themes and Plugins
Deactivating a plugin does not remove it. The PHP files stay on your server, they stop being updated because nobody notices them in the update list, and in many cases they can still be requested directly. Every plugin you keep is a commitment to keep patching it.
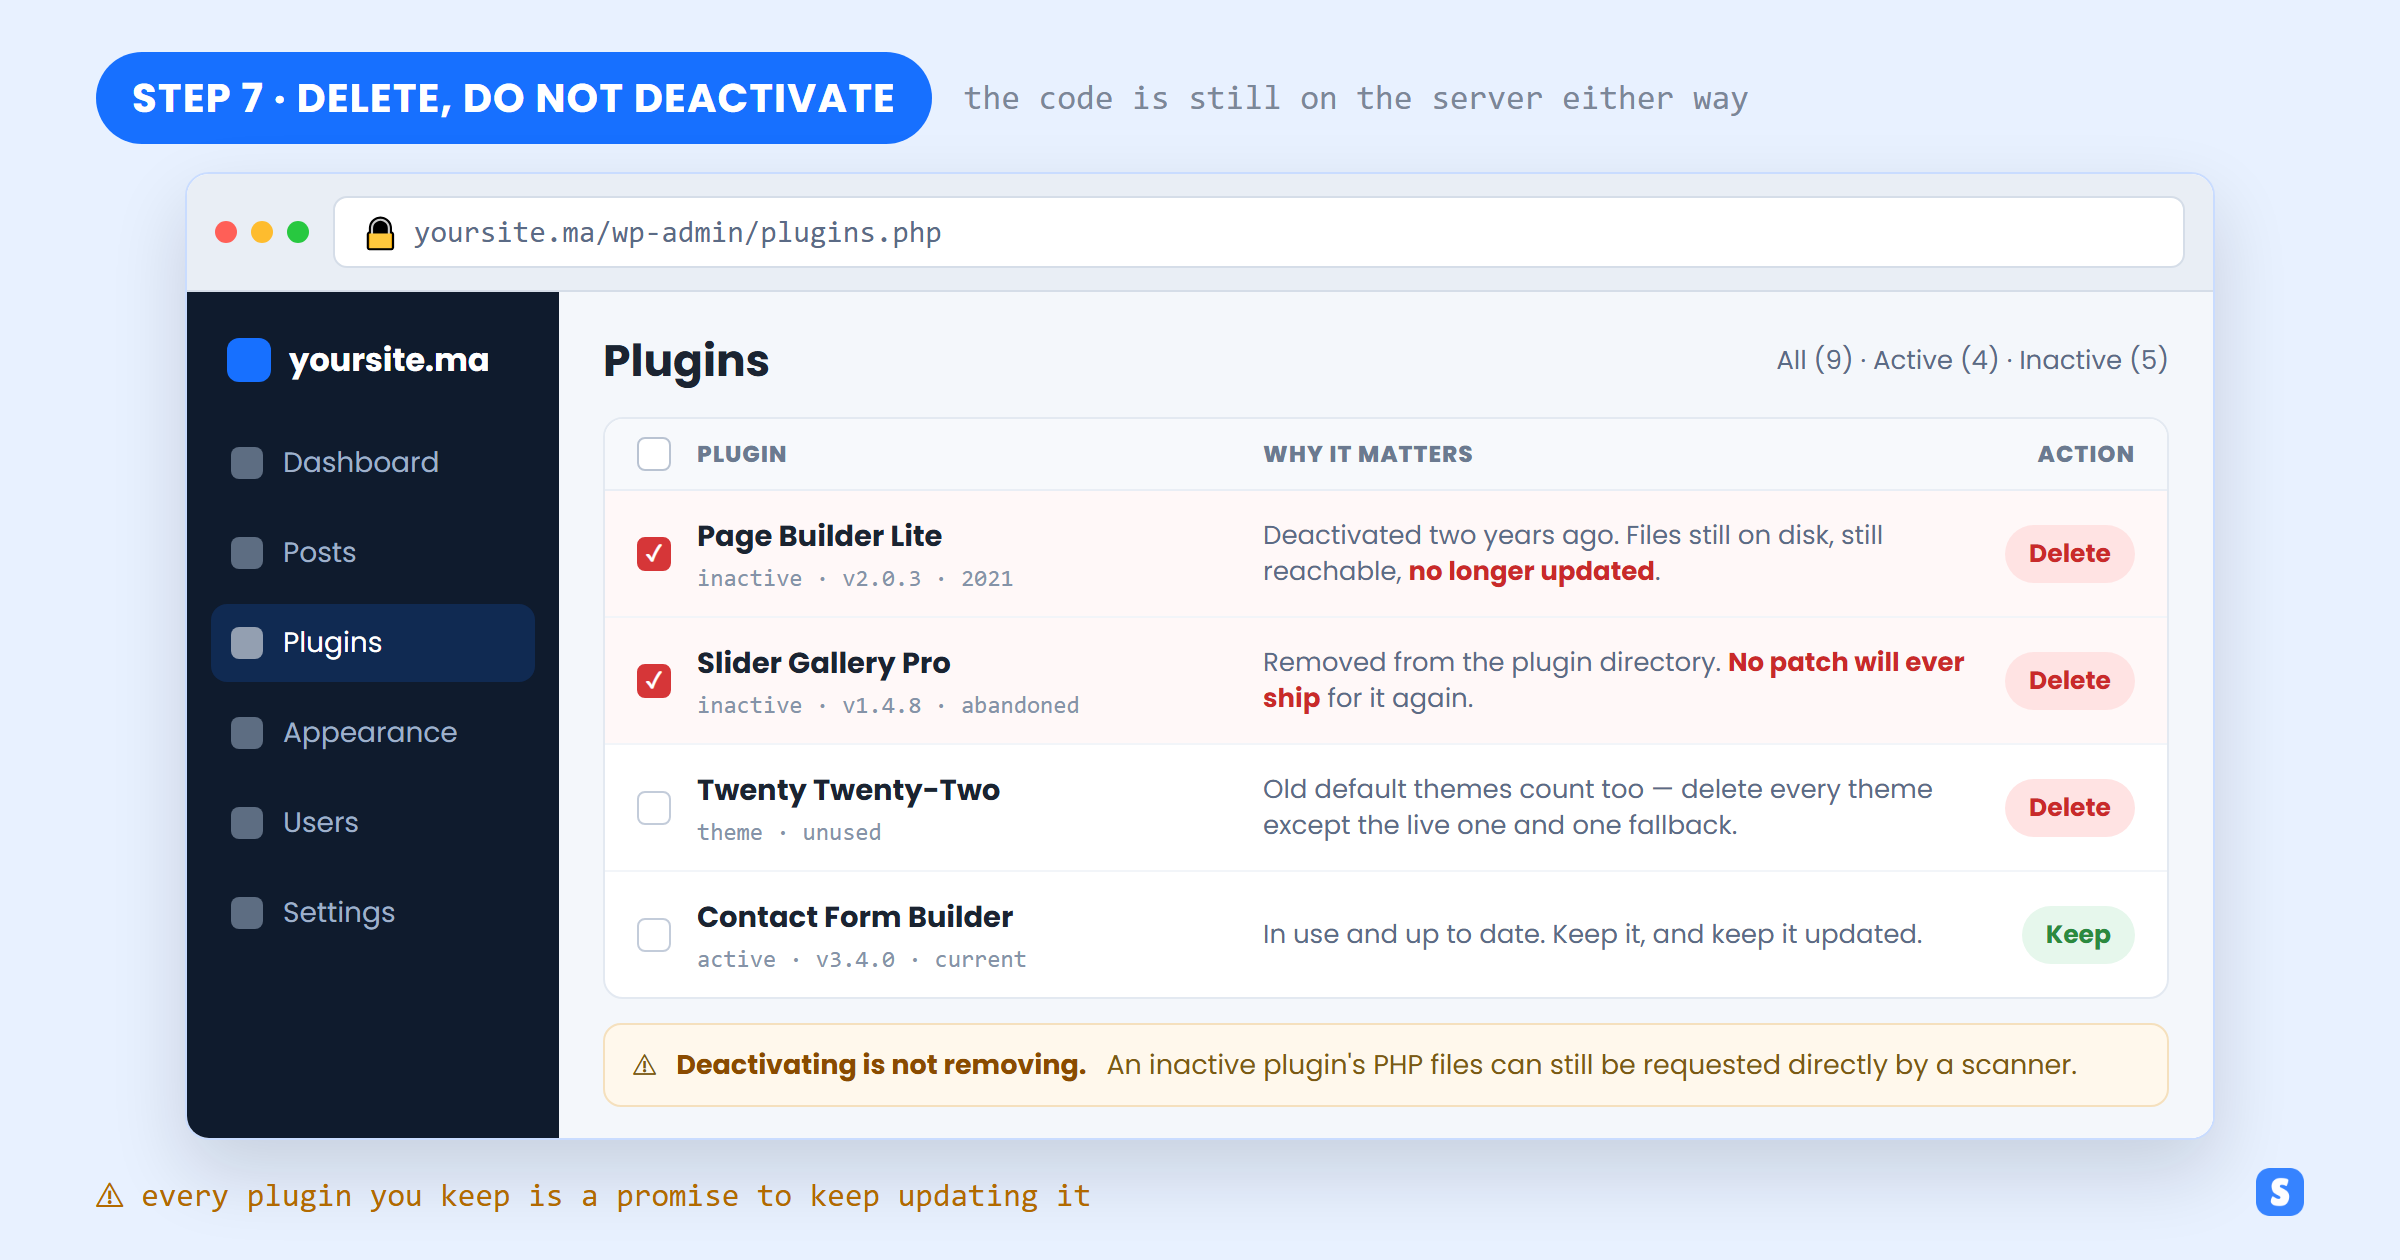
- Delete, do not deactivate. Go through Plugins and Appearance → Themes and remove anything you are not using.
- Keep one spare theme. A default theme is useful for troubleshooting; three old ones are just three more things to patch.
- Replace abandoned plugins. If a plugin has been pulled from the directory or has not been updated in years, no patch is ever coming.
- Clear out leftovers too. Installer files, exported databases and
.zipor.bakcopies in the web root are exactly what scanners look for. Turning off directory listing stops folders being browsed.
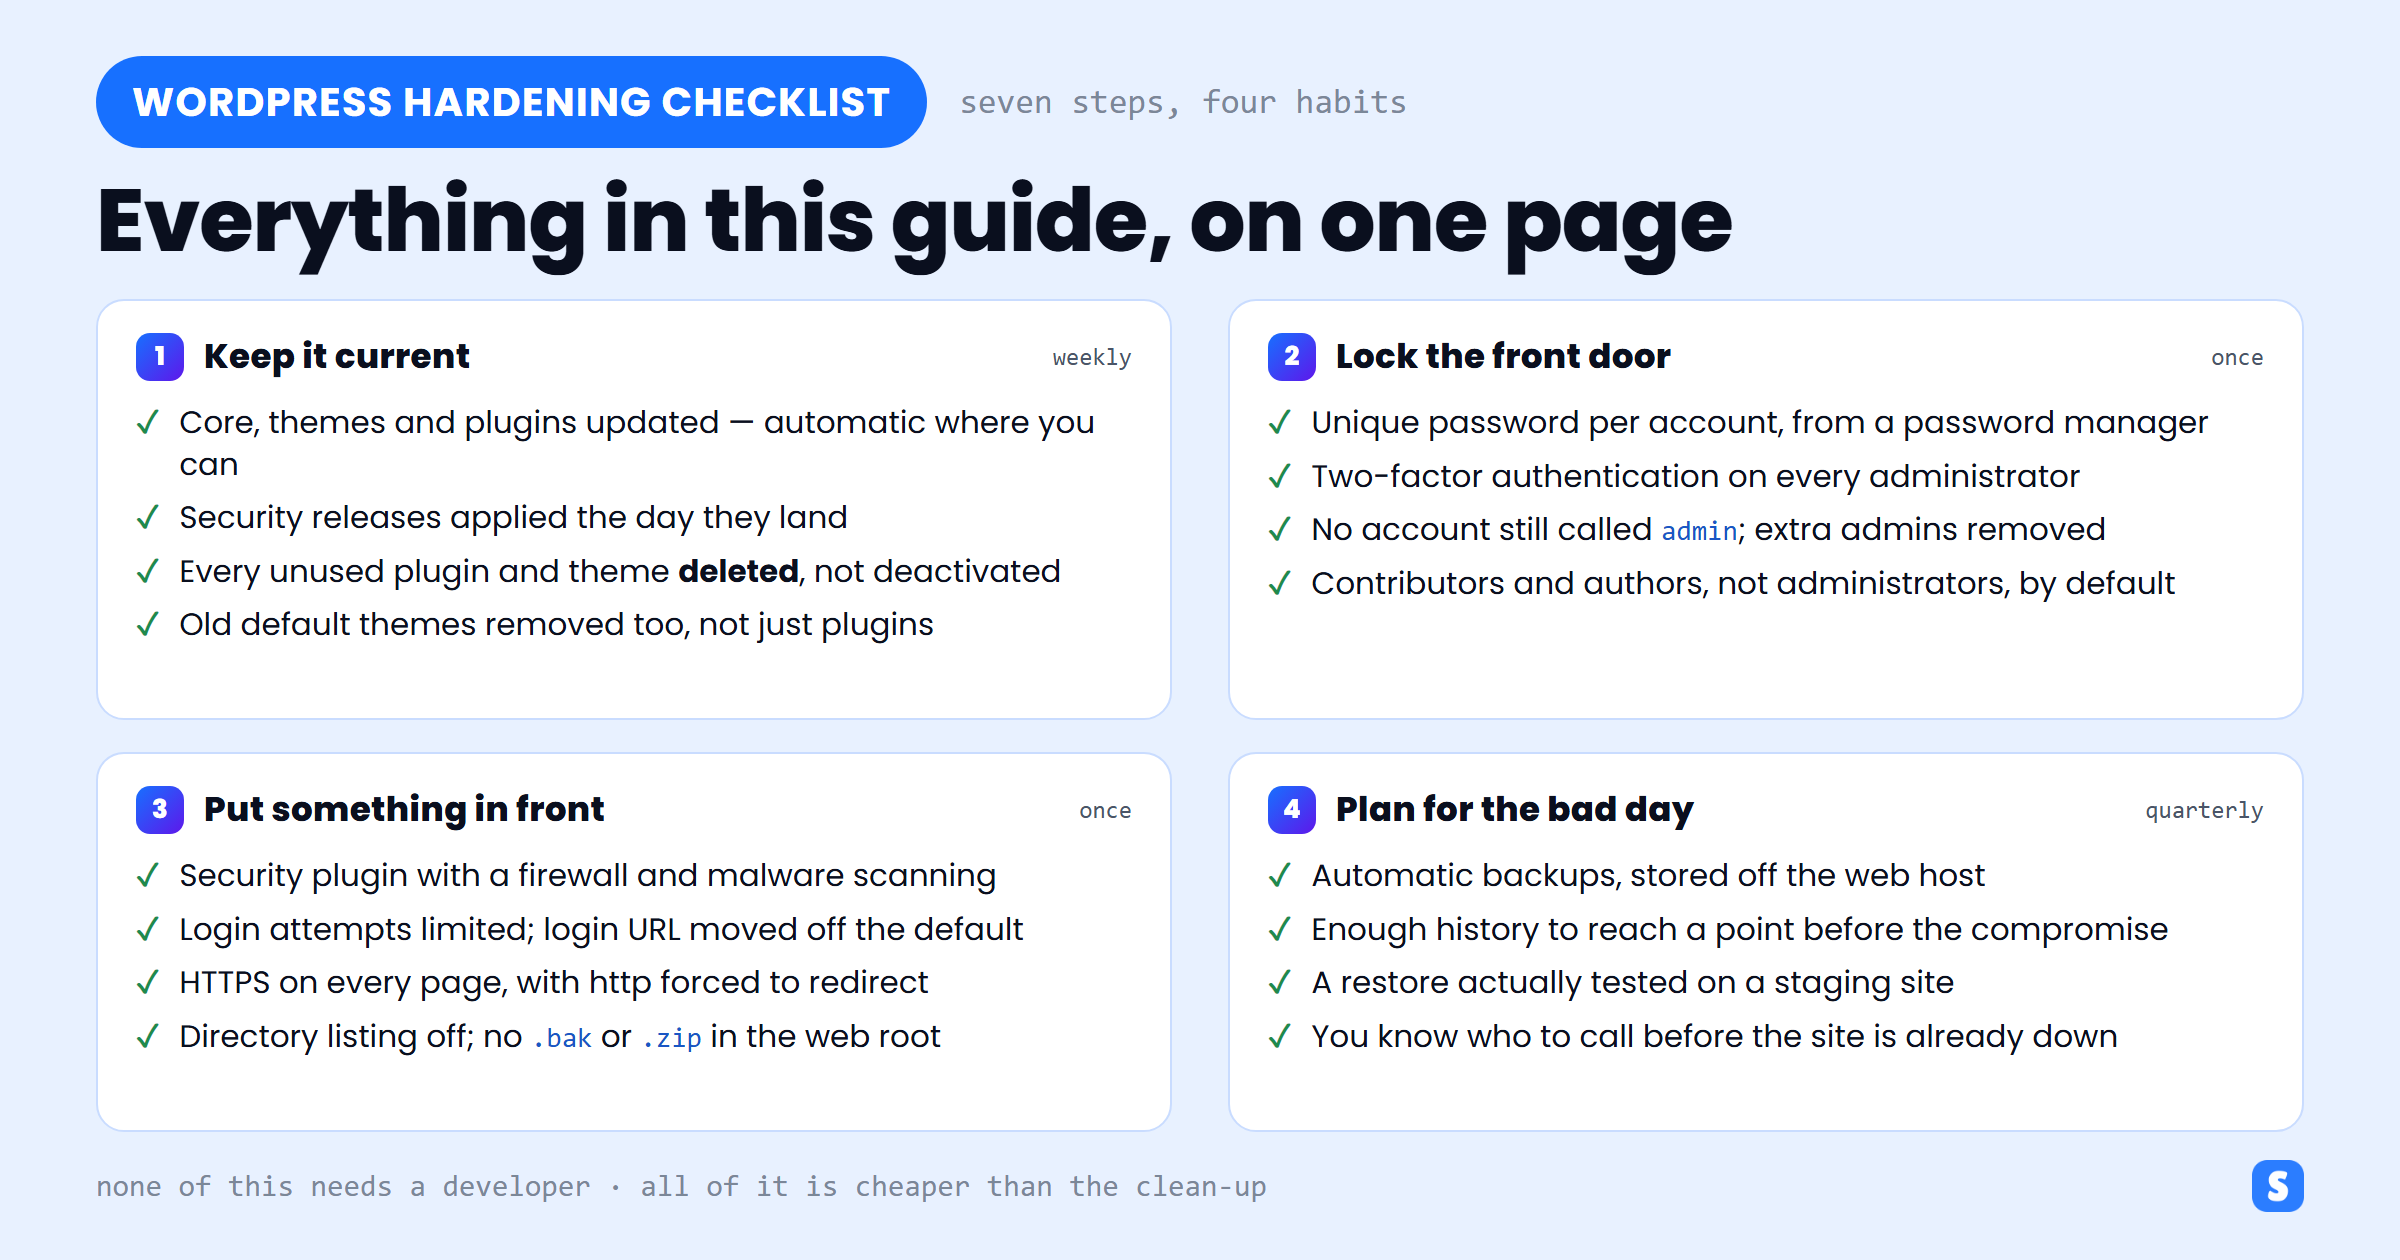
Your WordPress Security Checklist
Print this, or keep it beside your maintenance notes. It is the whole guide grouped by how often each item actually needs your attention.
Common Mistakes That Undo the Work
- “It is a small site, nobody would bother.” Attacks are automated and indiscriminate. Nobody chose you.
- Installing three security plugins. They conflict, they slow the site down, and you end up trusting none of the alerts.
- Deactivating instead of deleting. The code is still there, and now it is unmaintained as well.
- Backups nobody has ever restored. An untested backup is a hope, not a plan.
- Hardening once and never revisiting. A site that was current last year is running last year’s vulnerabilities today.
These are the WordPress-flavoured version of the wider developer mistakes in cybersecurity we see across every stack — including, increasingly, in AI-built applications.
Frequently Asked Questions
Is WordPress itself insecure?
No. WordPress core is maintained by a dedicated security team and patched quickly. The overwhelming majority of compromised sites are running outdated third-party plugins or themes, or have a weak administrator password — not a flaw in core.
How often should I check a WordPress site?
Weekly is a reasonable rhythm for updates if automatic updates are on, plus reading the alert emails from your security plugin as they arrive. The quarterly job is testing that a backup actually restores.
Do I still need a security plugin if my host has protection?
Usually yes, and they do different things. Host-level protection filters traffic before it reaches your site; a plugin understands WordPress specifically — user roles, login attempts, and whether your plugin files have been modified. Just do not run two competing firewall plugins.
My site was already hacked. Do these steps fix it?
No — hardening prevents the next break-in, it does not remove an existing one. A compromised site needs the malicious files and database entries cleaned out, every password and key rotated, and the original entry point found. Harden afterwards, or the same door gets used again.
Does any of this require a developer?
Nothing in this guide does. Every step is a setting in the WordPress dashboard, a plugin configuration, or a switch in your hosting control panel.
Do the Boring Things First
There is no single setting that makes a site safe, and there is no plugin you can install and forget. What there is, reliably, is a short list of ordinary maintenance that removes the attacks that actually happen: keep things updated, make the login hard to get through, put a firewall in front, encrypt the connection, and keep a backup you have proven works.
Doing all seven takes an afternoon the first time and a few minutes a week afterwards. That is a much smaller commitment than cleaning up a compromised site — and if you would rather have someone check the result, SecureWeb offers a free website security scan and full penetration testing when the site handles money or personal data.